


At WWDC 2020, Apple updated SwiftUI to its second version. I exclaimed: Swift is finally usable! This time we're not writing Web or mini-programs! This is a Native Code tutorial.
In a blink of an eye, SwiftUI has been out for a year. With the popularity of this framework, the threshold for Apple software development has been further lowered - low enough that even I can tiptoe in. This summer, due to the pandemic, the planned summer exchange at the National University of Singapore was cancelled. So, my long-planned SwiftUI exploration began ahead of schedule.
Due to the inconvenience of checking campus bus departure times at SUSTech, I wrote an Apple Watch app to query the latest departure times for SUSTech campus buses. As a starter project for Swift and SwiftUI, the code logic is very simple, just for practice. The complete project code has been uploaded to GitHub.
Currently, SUSTech campus buses have two routes: uphill route (destination: Xin园) and downhill route (destination: Research Building). In this watch app, we need to display the operational status of these two bus routes separately. SUSTech's bus schedule also has two versions: weekday version and holiday version. In the app, we need to be able to flexibly switch between schedules.
Let's plan the development architecture first. Although this application is really simple - simple enough that all code could be put in one file, doing so wouldn't be a good start.
SwiftUI is different from the old UIKit; it doesn't advocate the MVC (Model, View, Controller) model, but rather MVVM (Model, View, View Model). That is, there's no Controller that can control the View's progression. Using SwiftUI is like dancing in shackles. It's powerful, but can't be used to do everything arbitrarily. I have deep experience with this.
Model is an abstraction of data. In this application, it should be encapsulated as a bus schedule. As the first SwiftUI application, we'll keep everything simple and won't touch data management (File System, Core Data, UserDefault, ...), but rather hardcode all runtime schedules directly into the code.
View is the UI interface we need to build. I've designed the interface in advance:
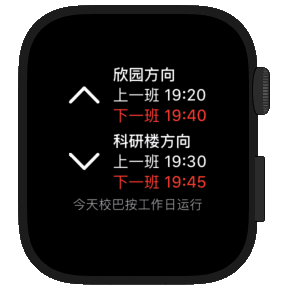
The interface is mainly composed of text, supplemented by two SF Symbol icons. In watchOS 7.0, Apple canceled force touch operations, so we hide the two function buttons below the main interface.
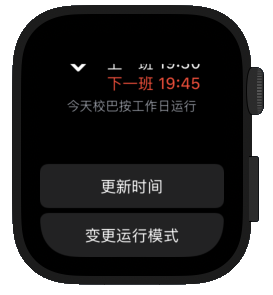
View Model is an interesting concept. We should further transform the data in Model into what's needed in View within the View Model. Additionally, we should enumerate all possible user intents here, such as clicking "update time" or "change operation mode".
Model: Bus.swift
Let's start with the simplest Model. We need to know the two bus departure times before and after the current time.
// Hardcode the schedule here, some data omitted.
let XinYuan: [String] = ["07:20", "07:25", ... , "22:00", "22:10", "22:30"]
let KeYanLou: [String] = ["07:00", "07:05", ..., "21:20", "21:30", "21:40"]
let XinYuanHoliday: [String] = ["07:20", "07:40", ..., "21:40", "22:00", "20:20"]
let KeYanLouHoliday: [String] = ["07:00", "07:20", ..., "21:20", "21:40", "22:00"]

private func getBusSchedule(_ current: Date, schedule: [String]) -> (String?, String?) {
    var previous: String?
    var next: String?
    for time_string in schedule {
        let time = dateFormatter.date(from: time_string)!
        if Time(time) <= Time(current) {
            previous = time_string
        } else {
            next = time_string
            return (previous, next)
        }
    }
    return (previous, next)
}

func getXinYuanBus(_ current: Date, weekday isOnWeekDay: Bool) -> (String?, String?) {
    if isOnWeekDay {
        return getBusSchedule(current, schedule: XinYuan)
    } else {
        return getBusSchedule(current, schedule: XinYuanHoliday)
    }
}
Here I wrote a Time class to ignore the date data of the Date class and only compare time. A more elegant approach would be to write an extension for Date, but I didn't do that here.
class Time: Comparable {
    static func <(lhs: Time, rhs: Time) -> Bool {
        lhs.hour == rhs.hour ? lhs.minute < rhs.minute : lhs.hour < rhs.hour
    }

    static func ==(lhs: Time, rhs: Time) -> Bool {
        lhs.hour == rhs.hour && lhs.minute == rhs.minute
    }

    var hour: Int
    var minute: Int

    init(_ date: Date) {
        let calendar = Calendar.current
        let components = calendar.dateComponents([.hour, .minute], from: date)
        self.hour = components.hour!
        self.minute = components.minute!
    }
}
ViewModel: BusViewModel.swift
Next, let's write the View Model. The View Model is mainly responsible for processing data into a form convenient for View to read (this also facilitates testing). We mainly use "computed properties" to implement this.
var currentTime: String {
    dayFormatter.string(from: currentDate)
}
var XinYuanPrevious: String {
    bus.getXinYuanBus(currentDate, weekday: isOnWeekDay).0 ?? "Empty"
}
var XinYuanNext: String {
    bus.getXinYuanBus(currentDate, weekday: isOnWeekDay).1 ?? "Empty"
}
var KeYanLouPrevious: String {
    bus.getKeYanLouBus(currentDate, weekday: isOnWeekDay).0 ?? "Empty"
}
var KeYanLouNext: String {
    bus.getKeYanLouBus(currentDate, weekday: isOnWeekDay).1 ?? "Empty"
}
We also need the ability to switch operation modes, implemented here using variable get/set capturing.
var isChange: Bool = false
var changedValue: Bool?
var isOnWeekDay: Bool {
    get {
        if !isChange {
            return !calender.isDateInWeekend(currentDate)
        }
        else {
            return changedValue!
        }
    }
    set {
        self.isChange = true
        self.changedValue = newValue
    }
}
mutating func swichModel() {
    isOnWeekDay.toggle()
}
View: BusView.swift
Finally, we use SwiftUI to build the interface. First construct the main part.
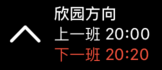
Use HStack and VStack to control interface nesting.
struct BusTableView: View {
    var direction: String
    var previous: String
    var next: String
    var iconName: String

    var body : some View {
        HStack {
            Image(systemName: iconName)
                .font(.title)
                .padding(.trailing)
            VStack(alignment: .leading) {
                Group {
                    Text("\(direction) Direction")
                        .font(.headline)
                    Text("Previous: \(previous)")
                    Text("Next: \(next)")
                        .foregroundColor(.red)
                }
            }
        }
    }
}
Then use the main body to compose the entire interface.
Wrap it in a ScrollView to directly get a series of features like digital crown rotation and vibration.
struct BusView: View {
    @State private var busViewModel: BusViewModel = BusViewModel()
    var body: some View {
        ScrollView {
            VStack {
                VStack(alignment: .leading) {
                    BusTableView(direction: "Xin园", previous: busViewModel.XinYuanPrevious, next: busViewModel.XinYuanNext, iconName: "chevron.up")
                    BusTableView(direction: "Research Building", previous: busViewModel.KeYanLouPrevious, next: busViewModel.KeYanLouNext, iconName: "chevron.down")
                    // Small gray text here ...
                    // Two buttons here ...
                }
        }
    }
}
The small gray text changes based on a property in ViewModel, so wrap it with Group to get an if statement functionality.
struct BusWorkView: View {
    var isOnWeekDay: Bool
    var body: some View {
        Group {
            if isOnWeekDay {
                Text("Buses operate on weekday schedule today")
                    .fontWeight(.light)
            } else {
                Text("Buses operate on holiday schedule today")
                    .fontWeight(.light)
            }
        }
    }
}
Scroll down to see two buttons.
These two buttons are directly completed with Button wrapping Text. I originally used Label, which can also be paired with icons. Unfortunately, SwiftUI's Label currently displays terribly in watchOS 7.0 Beta (icons and text can't align), so I temporarily used Text instead.
VStack {
    Button{
        self.busViewModel.refreshBus()
    } label: {
        Text("Update Time")
    }

    Button {
        self.busViewModel.swichModel()
    } label:{
        Text("Change Operation Mode")
    }
}
Here I used Swift's new syntax that hasn't been officially released yet: Multiple trailing closure. This syntax doesn't have a Chinese translation yet. But this writing style will become more common after September this year.
This implementation is very simple. We could later add features like multiple route selection, subscribing to bus schedules from servers, holiday arrangements, etc. (which are actually quite simple too). I hope SUSTech opens more bus routes, so the content for the next blog post will be ready...
© LICENSED UNDER CC BY-NC-SA 4.0