





本文将接上一篇,实现首页上半部分,导航滚动与首页轮播图,首页部分分为两篇来讲解
上一篇 微信小程序电商实战—环境搭建篇
1、定义模块与设置头部
首先先在app.json文件中定义首页、分类、购物车以及我的四个模块。
背景颜色为白色,名称是秋码淘好货
 "pages":[
    "pages/index/index",
    "pages/category/category",
    "pages/cart/cart",
    "pages/personal/personal"
  ],
  "window":{
    "backgroundTextStyle":"light",
    "navigationBarBackgroundColor": "#fff",
    "navigationBarTitleText": "秋码淘好货",
    "navigationBarTextStyle":"black"
  },
2、滑块导航栏
编辑index.wxml和index.wxss这两个文件
index.wxml
<view class="page">
  <!-- 搜索框 -->
  <view class="search">
    <view class="searchBar">
      <icon class="weui-icon-search" type="search" size="14"></icon>
      <input  class="input" placeholder="大家都在搜" bindtap="entrySearch" disabled />
    </view>
  </view>
  <!-- 导航栏 -->
  <view class="navBar">
      <scroll-view class="navBar-box" scroll-x="true" style="white-space: nowrap; display:flex ">
          <view class="cate-list {{curIndex==index?'on':''}}" wx:for="{{category}}"
                wx:key="{{item.id}}" data-id="{{item.id}}" data-index="{{index}}"
                bindtap="navbarTap">{{item.name}}</view>
      </scroll-view>
  </view>
</view>
index.wxss
.page{
  height:100%;
  display:flex;
  flex-direction:column;
  box-sizing:border-box;
  position:relative;
  top:0;
  left:0;
  bottom:0;
  right:0;
  background-color:#f5f8fa;
}

.search{
  background: #fff;
}
.searchBar{
  margin: 20rpx 30rpx;
  border-radius: 30px;
  border:1px solid #f5f5f5;
  background: #f5f5f5;
}
.weui-icon-search{
  margin-left: 15rpx;
  float: left;
}

.navBar{
  height: 60rpx;
  background: #fff;
  border-top: 1px solid #fafafa;
}
.navBar-box{
  width: 100%;
  height: 60rpx;
}
.cate-list{
  display: inline;
  margin: 15rpx 22rpx;
  text-align: center;
  font-size: 14px;
  color: #9d9d9d;
}
.navBar-box .cate-list.on {
  color: #000000;
  font-weight: bold;
}
在index.wxml我们使用bindtap进行点击事件监听,设置事件名称为navbarTap并且在index.js里设置这个事件对应的逻辑处理。我们在组件上使用**wx:for控制属性绑定一个数组,即可使用数组中各项的数据重复渲染该组件。默认数组的当前项的下标变量名默认为index,数组当前项的变量名默认为item,想要了解wx:for**可以参考该资料:https://www.w3cschool.cn/weixinapp/weixinapp-list.html
index.js
//导航栏
// pages/index/index.js
var app = getApp()
Page({
  data:{
    category: [       // 导航栏内容数据
      {name:'热门',id:"remen" },
      {name:'美食',id:'meishi'},
      {name:'居家',id:"jujia"},
      {name:'美妆',id:"meizhuang"},
      {name:'女装', id:"nvzhuang"},
      {name:'母婴',id:"muying"},
      {name:"男装",id:"nanzhuang"},
      {name:"鞋品",id:"xiepin"},
      {name:"箱包",id:"xiangbao"},
      {name:"配饰",id:"peishi"},
      {name:"儿童",id:"ertong"},
      {name:"数码",id:"shuma"},
      {name:"家电",id:"jiadian"},
      {name:"内衣",id:"neiyi"},
      {name:"车品",id:"chepin"},
      {name:"文体",id:"wenti"},
      {name:"宠物",id:"chongwu"},
      {name:"其他",id:"qita"}

    ],
    curIndex: 0,
    detail: [],
    toView: 'remen',
    scroll: true
  },
  navbarTap(e) {
    this.setData({
      curIndex: e.currentTarget.dataset.index?e.currentTarget.dataset.index:0,
      toView: e.currentTarget.dataset.index,
    })
  },

})
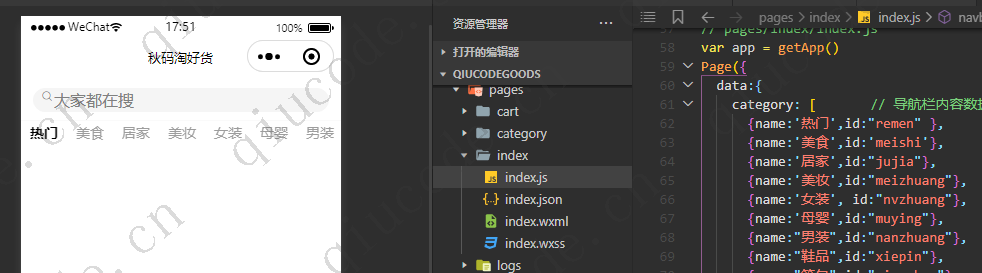
保存查看一下:
3、首页轮播图
在l**index.wxml**添加以下内容
<swiper class="banner" indicator-dots autoplay indicator-active-color="#fbbd08" circular>
    <block wx:for="{{bannerList}}" wx:key="id">
      <swiper-item>
        <image lazy-load src="{{item.img}}"  class="banner_image" />
      </swiper-item>
    </block>
  </swiper>
**index.wxss**添加如下样式
.banner {
  width: 100%;
  display: flex;
  box-sizing: border-box;
  height: 184rpx;
}

.banner_image {
  width: 100%;
  padding: 16rpx 16rpx 12rpx 16rpx;
  display: flex;
  box-sizing: border-box;
  height: 160rpx;
}
**index.js**添加如下内容,在data对象添加一个数组对象。
bannerList:[
      {id:"one",img:"/images/banner/banner-one.png"},
      {id:"teo",img:"/images/banner/banner-two.png"},
      {id:"three",img:"/images/banner/banner-three.jpg"},
      {id:"four",img:"/images/banner/banner-four.jpg"}
    ],
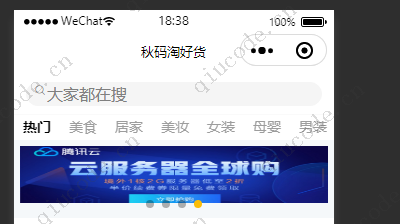
最终实现的效果图如下:
上一篇 微信小程序电商实战—环境搭建篇