


warning: 这篇文章距离上次修改已过1826天,其中的内容可能已经有所变动。
现同事伙伴连接测试环境上的数据库通过如下命令
ssh -o "ProxyCommand ssh -p 5022 xxx@xxxx -W %h:%p" -p 22 yyy@yyyy然后通过 mysql 命令连接上数据库
mysql -h zzz -u zzzz -pmysql 的 -h 参数的意思是 -h, --host=name Connect to host. 然后再根据终端提示输入密码后回车进入到数据库命令行终端。
很明显这样有些麻烦。传统的 navicat 新建连接时只能通过一层跳板机,但是通过 ProxyCommand 的服务肯定无法使用 navicat 自带的这个功能了。
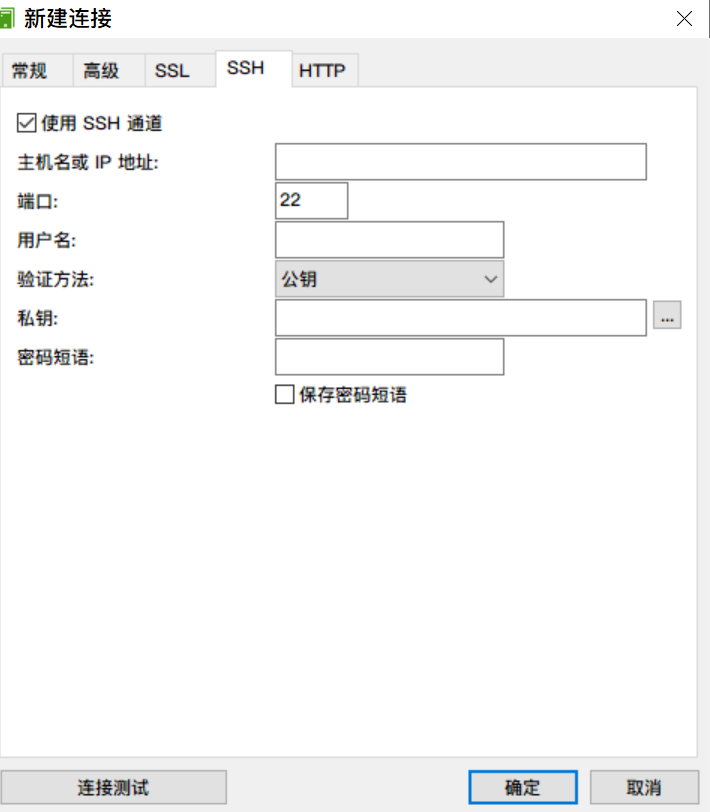
navicat 创建连接使用 ssh 通道
解决办法就是创建 ssh 客户端这边的 config,然后在本机创建一个代理,navicat 连接到这个代理服务,这个代理服务器转发请求给实际的数据库服务器。
首先来了解一下 openssh 的 ProxyCommand
Specifies the command to use to connect to the server. The command string extends to the end of the line, and is executed using the user's shell ‘exec’ directive to avoid a lingering shell process.
Arguments to ProxyCommand accept the tokens described in the TOKENS section. The command can be basically anything, and should read from its standard input and write to its standard output. It should eventually connect an sshd(8) server running on some machine, or execute sshd -i somewhere. Host key management will be done using the Hostname of the host being connected (defaulting to the name typed by the user). Setting the command to none disables this option entirely. Note that CheckHostIP is not available for connects with a proxy command.This directive is useful in conjunction with nc(1) and its proxy support. For example, the following directive would connect via an HTTP proxy at 192.0.2.0:
ProxyCommand /usr/bin/nc -X connect -x 192.0.2.0:8080 %h %p
openssh 客户端配置文档来自: https://man.openbsd.org/ssh_config
一、在本机创建 config 文件
配置上以下内容
Host abc
    Hostname yyyy
    Port 22
    User yyy
    ProxyCommand ssh -p 5022 xxx@xxxx -W %h:%p
    IdentityFile /c/Users/YOUR_USERNAME/.ssh/ID_RSA_FILENAME
参数说明
- Host: 后面定义唯一标识符,依据喜好随意定义
- Hostname: IP or domain name
- Port: 端口
- User: 登录用户
- ProxyCommand: ProxyCommand 命令,要写全
- IdentityFile: 认证文件,写上对应私钥的文件路径,如果用的是默认的
id_rsa文件那么这一行可以省略
保存退出后,windows 下可以通过 git bash 测试: ssh abc,如果成功登录上那么继续
二、在本机创建一个 ssh 客户端代理
ssh -vNL 3367:REAL_IP:3306 DATABASE_USERNAME@abc
使用这句命令 后台运行 nohup ssh -vNL 3367:REAL_IP:3306 DATABASE_USERNAME@abc >> /c/Users/YOUR_USERNAME/.ssh/ssh.log 2>&1 &
参数说明:
- -v: Verbose mode. Causes ssh to print debugging messages about its progress. This is helpful in debugging connection, authentication, and configuration problems. Multiple -v options increase the verbosity. The maximum is 3.
- -N: Do not execute a remote command. This is useful for just forwarding ports.
-
-L: Specifies that connections to the given TCP port or Unix socket on the local (client) host are to be forwarded to the given host and port, or Unix socket, on the remote side. This works by allocating a socket to listen to either a TCP port on the local side, optionally bound to the specified bind_address, or to a Unix socket. Whenever a connection is made to the local port or socket, the connection is forwarded over the secure channel, and a connection is made to either host port hostport, or the Unix socket remote_socket, from the remote machine.
Port forwardings can also be specified in the configuration file. Only the superuser can forward privileged ports. IPv6 addresses can be specified by enclosing the address in square brackets.
By default, the local port is bound in accordance with the GatewayPorts setting. However, an explicit bind_address may be used to bind the connection to a specific address. The bind_address of “localhost” indicates that the listening port be bound for local use only, while an empty address or ‘*’ indicates that the port should be available from all interfaces.
- 3367: 3367是你本机开启的端口,等一会 navicat 要绑定这个端口
- REAL_IP: 这个是 mysql -h 参数指定的 host 的 IP
- 3306: mysql -h 指定的 host 中安装的 mysql 服务的端口,这里 3306 刚好是 mysql 默认端口
- DATABASE_USERNAME: 数据库用户名
- abc: 刚刚
c:\users\YOUR_USERNAME\.ssh\config中配置的 Host 名
上述一些参数含义描述见官方文档: https://man.openbsd.org/ssh
执行了这条命令后,当前 git bash 终端会保持这个进程,你可以实时观察它的日志。下面打开 navicat 连接本地的这个 ssh 服务
三、navicat 连接数据库,通过跳板机连接数据库服务
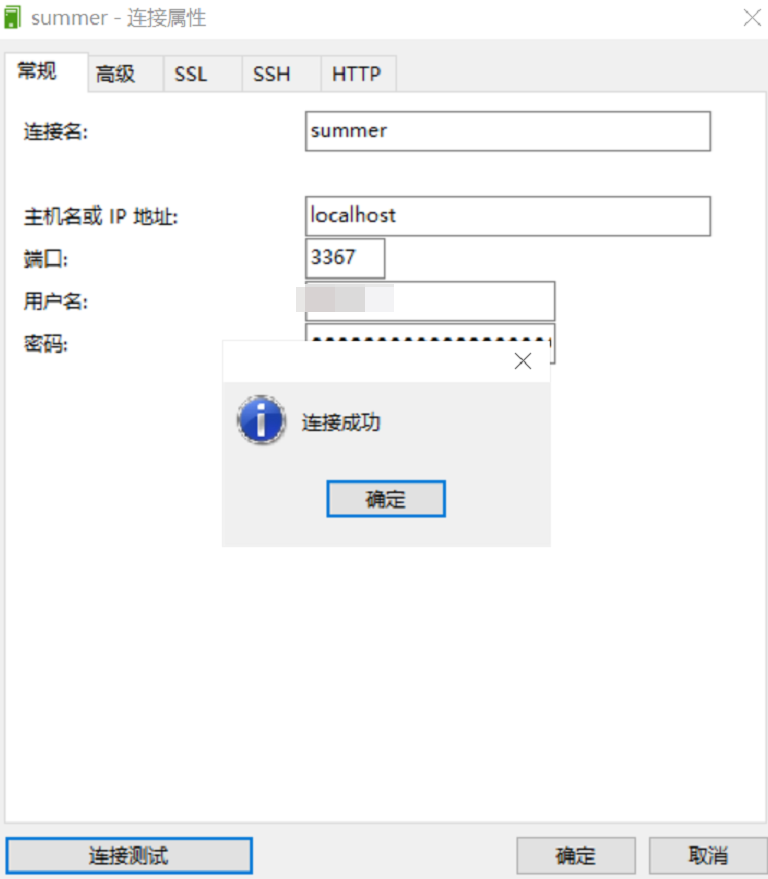
- 连接名随意定义
- 主机名或 IP 地址:localhost
- 端口:3367
- 用户名:数据库用户名
- 密码:数据库密码
- 切换到右边第四个 tab,SSH,确保没有勾上使用SSH通道,因为此时没有通过这边的ssh通道
连接成功!现在可以通过 gui 操作、查询数据库了。
end.