1. 创建负载时,通过 nodeSelector 指定 Node
1
| kubectl label node node2 project=A
|
 1
 2
 3
 4
 5
 6
 7
 8
 9
10
11
12
13
14
15
16
17
18
19
20
21
22
| cat <<EOF | kubectl apply -f -
apiVersion: apps/v1
kind: Deployment
metadata:
name: nginx-nodeselector
spec:
replicas: 1
selector:
matchLabels:
app: nginx-nodeselector
template:
metadata:
labels:
app: nginx-nodeselector
spec:
nodeSelector:
project: A
containers:
- name: nginx
image: nginx
EOF
|
1
2
3
4
| kubectl get pod -o wide
NAME READY STATUS RESTARTS AGE IP NODE NOMINATED NODE READINESS GATES
nginx-nodeselector-7bb75b7687-7r5xk 1/1 Running 0 19s 10.233.96.60 node2 <none> <none>
|
符合预期,Pod 运行在指定的节点 node2 上。
1
2
| kubectl delete deployments nginx-nodeselector
kubectl label node node2 project-
|
实际上,还有另外一个节点选择参数 nodeName,直接指定节点名。但是这种设置过于生硬,而且越过了 Kubernetes 本身的调度机制,实际生产用得很少。
2. 通过准入控制将命名空间绑定到节点
创建负载时指定 nodeSelector,可以设置 Pod 运行的节点。但是如果想要绑定命名空间下全部 Pod 在指定节点下运行,就显得力不从心。而使用 kube-apiserver 的准入控制就可以达到这一目的,这是一个在 Kubernetes 1.5 时就进入 alpha 阶段的特性。
2.1 修改 kube-apiserver 参数
编辑 kube-apiserver 文件:
1
| vim /etc/kubernetes/manifests/kube-apiserver.yaml
|
在 admission-plugins 中新增 PodNodeSelector:
1
| - --enable-admission-plugins=NodeRestriction,PodNodeSelector
|
这里的 NodeRestriction 是默认开启的。如果是高可用的集群,那么需要修改每一个 kube-apiserver。修改完成之后,稍等一会儿 kube-apiserver 会完成重启过程。
2.2 给 Namespace 添加注解
编辑命名空间,增加注解:
1
| kubectl edit ns default
|
1
2
3
4
5
6
| apiVersion: v1
kind: Namespace
metadata:
name: default
annotations:
scheduler.alpha.kubernetes.io/node-selector: project=A
|
scheduler.alpha.kubernetes.io/node-selector 可以是节点名,也可以是 label 键值对。
2.3 为节点增加指定的 label
给 node3 节点打上 project=A 的标签:
1
| kubectl label node node3 project=A
|
这里将命名空间 default 上的负载,绑定到了节点 node3 上。
2.4 创建负载
 1
 2
 3
 4
 5
 6
 7
 8
 9
10
11
12
13
14
15
16
17
18
19
20
| cat <<EOF | kubectl apply -f -
apiVersion: apps/v1
kind: Deployment
metadata:
name: nginx-scheduler
spec:
replicas: 3
selector:
matchLabels:
app: nginx-scheduler
template:
metadata:
labels:
app: nginx-scheduler
spec:
containers:
- name: nginx
image: nginx
EOF
|
1
2
3
4
5
6
| kubectl get pod -o wide
NAME READY STATUS RESTARTS AGE IP NODE NOMINATED NODE READINESS GATES
nginx-scheduler-6478998698-brkzn 1/1 Running 0 84s 10.233.92.52 node3 <none> <none>
nginx-scheduler-6478998698-m422x 1/1 Running 0 84s 10.233.92.51 node3 <none> <none>
nginx-scheduler-6478998698-mnf4d 1/1 Running 0 84s 10.233.92.50 node3 <none> <none>
|
可以看到,虽然集群上有 4 个可用的节点,但是 default 空间下的负载都运行在 node3 节点之下。
2.5 清理环境
1
| kubectl label node node3 project-
|
1
| kubectl delete deployments nginx-scheduler
|
kubectl edit ns default
需要注意的是,如果命名空间已经开启了 scheduler.alpha.kubernetes.io/node-selector,而节点没有相关的标签,此时,Pod 将会一直处于 Pending 状态,无法得到调度,直至有符合标签的 Node 出现。
3. 利用拓扑域对节点进行分组
如下图,通过 kube-apiserver 的访问控制插件,我们可以建立模型,每个项目一个命名空间,每个命名空间包含指定的节点。这样就可以满足,业务隔离、成本计费的要求。但是随着集群越来越大,项目需要在集群下划分若干的可用区,用于保障业务的可用性。
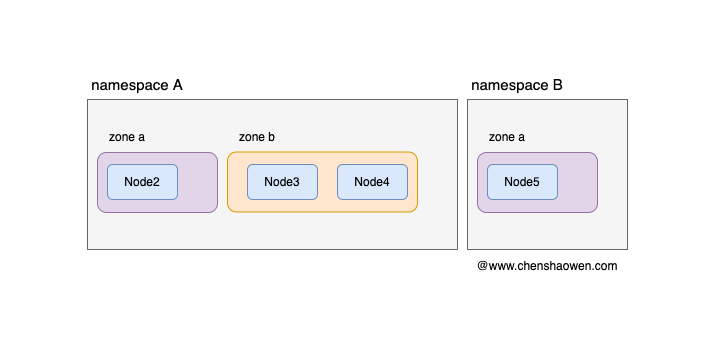
而拓扑域主要就是解决 Pod 在集群的分布问题,可以用于实现 Pod 对节点的定向选择的需求。Kubernetes 集群调度器的拓扑域特性在 1.16 进入 Alpha 阶段,在 1.18 进入 Beta 阶段。下面我们进行一些实验:
这里将节点 node2 划分到 zone a,将 node3、node4 划分到 zone b。
1
| kubectl label node node2 zone=a
|
1
| kubectl label node node3 node4 zone=b
|
 1
 2
 3
 4
 5
 6
 7
 8
 9
10
11
12
13
14
15
16
17
18
19
20
21
22
23
24
25
26
27
| cat <<EOF | kubectl apply -f -
apiVersion: apps/v1
kind: Deployment
metadata:
name: nginx-topology
spec:
replicas: 20
selector:
matchLabels:
app: nginx-topology
template:
metadata:
labels:
app: nginx-topology
spec:
topologySpreadConstraints:
- maxSkew: 1
topologyKey: zone
whenUnsatisfiable: DoNotSchedule
labelSelector:
matchLabels:
app: nginx-topology
containers:
- name: nginx
image: nginx
EOF
|
这里 topologyKey 用于指定划分拓扑域的 Key,maxSkew 表示在 zone=a、zone=b 中 Pod 数量相差不能超过 1, whenUnsatisfiable: DoNotSchedule 表示不满足条件时,不进行调度。
 1
 2
 3
 4
 5
 6
 7
 8
 9
10
11
12
13
14
15
16
17
18
19
20
21
22
23
| kubectl get pod -o wide
NAME READY STATUS RESTARTS AGE IP NODE NOMINATED NODE READINESS GATES
nginx-topology-7d8698544d-2srcj 1/1 Running 0 3m3s 10.233.92.63 node3 <none> <none>
nginx-topology-7d8698544d-2wxkp 1/1 Running 0 3m3s 10.233.96.53 node2 <none> <none>
nginx-topology-7d8698544d-4db5b 1/1 Running 0 3m3s 10.233.105.43 node4 <none> <none>
nginx-topology-7d8698544d-9tqvn 1/1 Running 0 3m3s 10.233.96.58 node2 <none> <none>
nginx-topology-7d8698544d-9zll5 1/1 Running 0 3m3s 10.233.105.45 node4 <none> <none>
nginx-topology-7d8698544d-d6nbm 1/1 Running 0 3m3s 10.233.105.44 node4 <none> <none>
nginx-topology-7d8698544d-f4nw9 1/1 Running 0 3m3s 10.233.96.54 node2 <none> <none>
nginx-topology-7d8698544d-ggfgv 1/1 Running 0 3m3s 10.233.92.66 node3 <none> <none>
nginx-topology-7d8698544d-gj4pg 1/1 Running 0 3m3s 10.233.92.61 node3 <none> <none>
nginx-topology-7d8698544d-jc2xt 1/1 Running 0 3m3s 10.233.92.62 node3 <none> <none>
nginx-topology-7d8698544d-jmmcx 1/1 Running 0 3m3s 10.233.96.56 node2 <none> <none>
nginx-topology-7d8698544d-l45qj 1/1 Running 0 3m3s 10.233.92.65 node3 <none> <none>
nginx-topology-7d8698544d-lwp8m 1/1 Running 0 3m3s 10.233.92.64 node3 <none> <none>
nginx-topology-7d8698544d-m65rx 1/1 Running 0 3m3s 10.233.96.57 node2 <none> <none>
nginx-topology-7d8698544d-pzrzs 1/1 Running 0 3m3s 10.233.96.55 node2 <none> <none>
nginx-topology-7d8698544d-tslxx 1/1 Running 0 3m3s 10.233.92.60 node3 <none> <none>
nginx-topology-7d8698544d-v4cqx 1/1 Running 0 3m3s 10.233.96.50 node2 <none> <none>
nginx-topology-7d8698544d-w4r86 1/1 Running 0 3m3s 10.233.96.52 node2 <none> <none>
nginx-topology-7d8698544d-wwn95 1/1 Running 0 3m3s 10.233.96.51 node2 <none> <none>
nginx-topology-7d8698544d-xffpx 1/1 Running 0 3m3s 10.233.96.59 node2 <none> <none>
|
其中在 node2 节点 10 个 Pod、node3 节点 7 个节点、node4 节点 3 个节点。可以看到,Pod 均匀地分布在 zone=a、zone=b 上。
1
2
| kubectl label node node2 node3 node4 zone-
kubectl delete deployments nginx-topology
|
4. 总结
随着集群越来越大,业务之间的隔离、业务对节点的独占等问题就会浮现出来。通常,每个业务都会有一个单独的命名空间,因此,我们可以将命名空间与节点进行绑定。
本文主要给出了两种方法,一种是创建负载时,直接设置 nodeSelector,取巧的方法是用命名空间值作为 value;另外一种方式是,借助于 kube-apiserver 提供的访问控制插件,通过注解的方式,在创建命名空间下的负载时,通过标签筛选指定节点,完成命名空间与节点之间的绑定。
再进一步考虑,如果节点数量非常庞大,需要划分可用区分散负载,那么我们可以借助于拓扑域来实现。通过拓扑域,我们可以让负载,根据配置的策略均匀的分布在指定的可用区、机柜上。
5. 参考










