1. 什么是 SR-IOV 技术
SR-IOV(Single Root I/O Virtualization)是一种虚拟化技术,它允许虚拟机、容器直接访问物理硬件资源,从而提高 I/O 性能,还能减少主机 CPU 消耗。
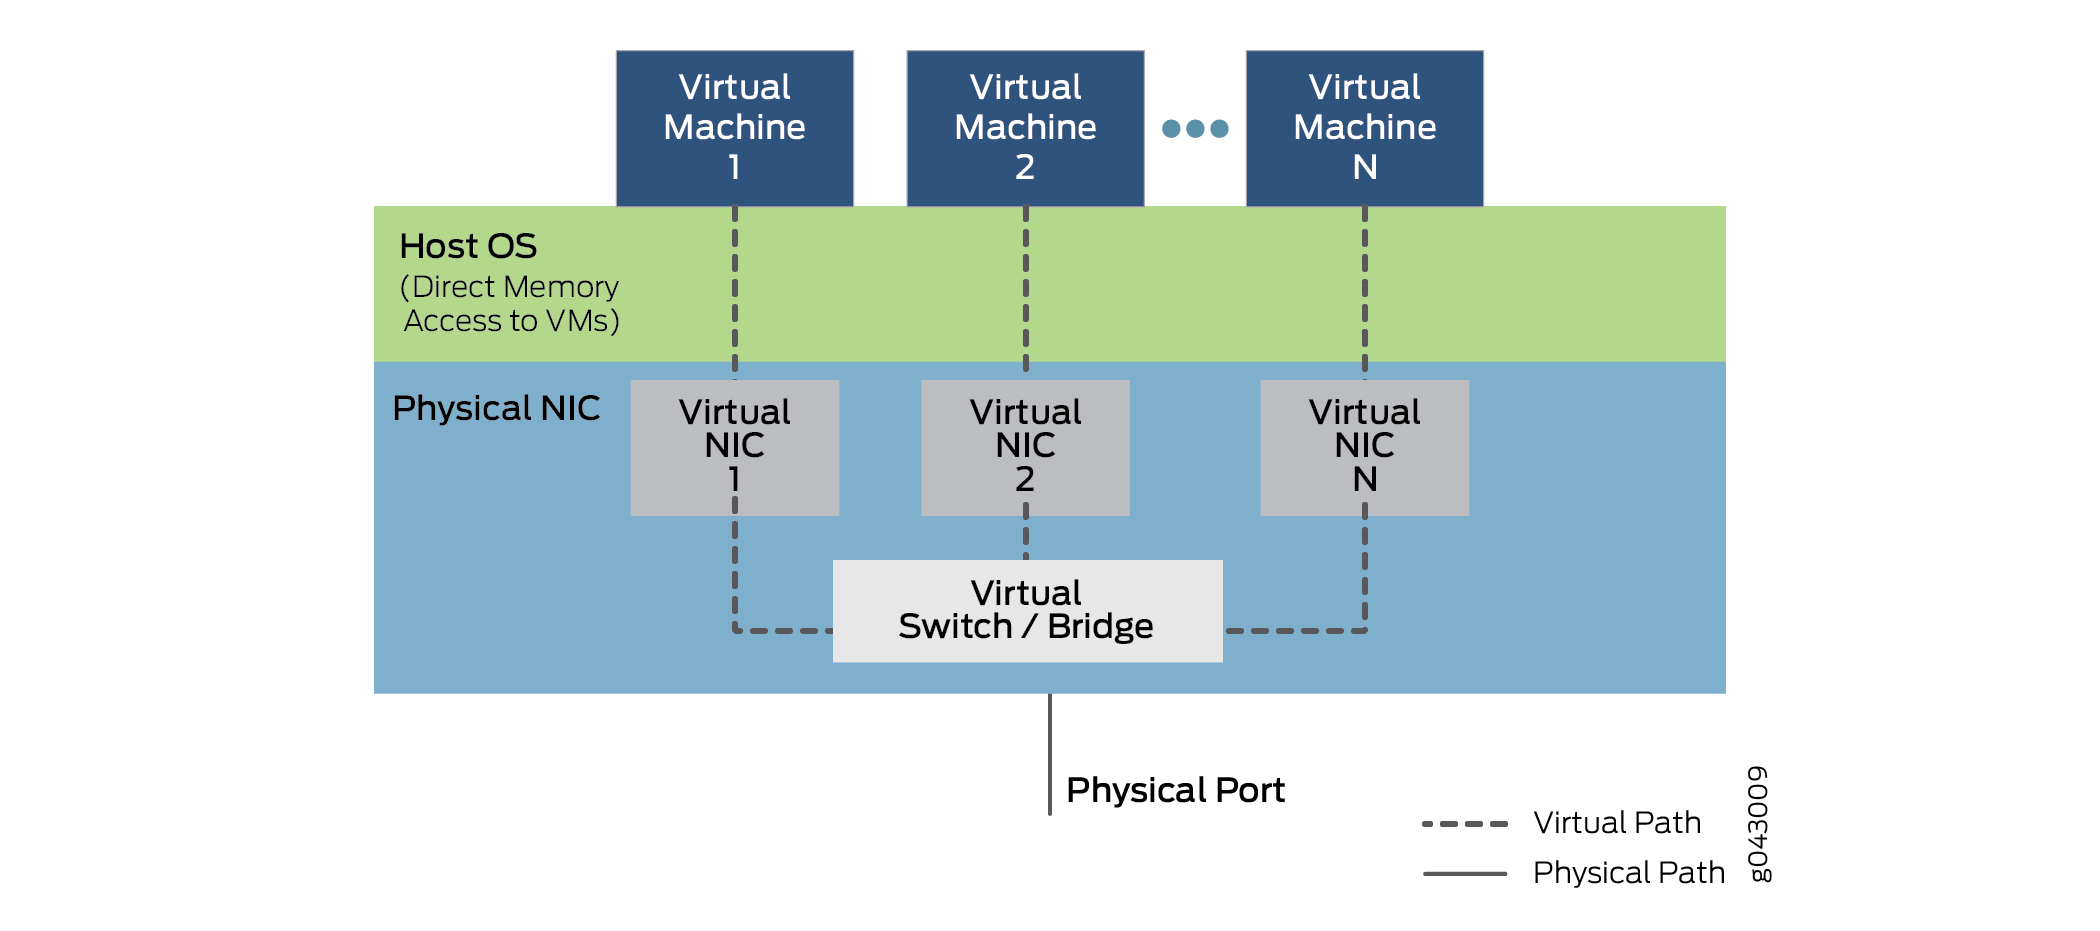
如上图,SR-IOV 将单个物理设备(例如网络接口卡,NIC)划分成多个虚拟功能 (Virtual Functions, VFs),每个 VF 可以被分配给不同的虚拟机或容器,像独立的设备一样使用。
2. 开启 SR-IOV 软件硬件支持
在开机时按下 Del 或 F2 等键进入 BIOS 设置界面,相关的配置通常在 Advanced \ System Configuration \ Virtualization 中。
VT-d 是定向 I/O 虚拟化技术,俗称虚拟化直通技术。允许宿主机将某些硬件资源(比如硬盘、显卡、网卡)的管辖权直接移交给虚拟机。
SR-IOV(Single Root I/O Virtualization)是一种 PCIe 设备虚拟化技术,它允许将单个物理 PCIe 设备(如网卡)划分为多个虚拟功能(VF)。
开启 IOMMU 后,系统能够为每个虚拟机分配独立的设备地址空间,提供设备的内存隔离和保护,防止虚拟机之间发生内存地址冲突。

编辑 Grub 配置
在 GRUB_CMDLINE_LINUX 中添加 intel_iommu=on iommu=pt。
生成 Grub 配置
1
| grub-mkconfig -o /boot/grub/grub.cfg
|
重启系统
查看是否开启 IOMMU
1
| dmesg | grep -e DMAR -e IOMMU
|
3. 查看本地网络设备
1
2
3
4
5
6
7
| lspci -v | grep -i SR-IOV
Capabilities: [bcc] Single Root I/O Virtualization (SR-IOV)
Capabilities: [160] Single Root I/O Virtualization (SR-IOV)
Capabilities: [160] Single Root I/O Virtualization (SR-IOV)
Capabilities: [160] Single Root I/O Virtualization (SR-IOV)
Capabilities: [160] Single Root I/O Virtualization (SR-IOV)
|
这其中 1 个 [bcc] 是 NVIDIA 显卡的 SR-IOV 设备,剩下的 4 个 [160] 是 Intel 网卡。
3.1 查看网卡
1
2
3
| ls /sys/class/net/
eth0 eth1 bond1 lo calixxx ...
|
其中,ethX 是真实的物理网卡,bondX 是网络绑定 (bonding) 接口,lo 是本机的 loopback 网络接口,calixxx 是网络插件 Calico 为容器提供的网络接口.
网络绑定是一种将多个物理网络接口组合为一个逻辑接口的方法。
 1
 2
 3
 4
 5
 6
 7
 8
 9
10
11
12
13
14
| cat /proc/net/bonding/bond1
Ethernet Channel Bonding Driver: v3.7.1 (April 27, 2011)
...
Slave Interface: eth5
MII Status: up
Speed: 10000 Mbps
...
Slave Interface: eth4
MII Status: up
Speed: 10000 Mbps
...
|
这意味着,bond1 绑定了两个 eth5 和 eth4 网卡,聚合成一个虚拟网卡提供 20 Gbps 的带宽。
3.2 创建 SR-IOV VF
SR-IOV 针对的是物理网卡,不能针对 bond 绑定的网卡,而要使用 ethX 网卡。
1
2
3
| cat /sys/class/net/eth0/device/sriov_numvfs
0
|
1
| echo 2 > /sys/class/net/eth0/device/sriov_numvfs
|
1
2
3
4
| lspci | grep Virtual
3d:02.0 Ethernet controller: Intel Corporation Ethernet Virtual Function 700 Series (rev 09)
3d:02.1 Ethernet controller: Intel Corporation Ethernet Virtual Function 700 Series (rev 09)
|
这样就给网卡创建了 2 个 SR-IOV VF。
1
2
3
4
5
6
7
| ip link show eth0
4: eth0: <BROADCAST,MULTICAST> mtu 1500 qdisc noop state DOWN mode DEFAULT group default qlen 1000
link/ether 90:f7:b2:4b:dc:3d brd ff:ff:ff:ff:ff:ff
vf 0 link/ether 2e:3a:41:bc:02:cc brd ff:ff:ff:ff:ff:ff, spoof checking on, link-state auto, trust off
vf 1 link/ether 5a:d4:e4:45:83:7b brd ff:ff:ff:ff:ff:ff, spoof checking on, link-state auto, trust off
altname enp61s0f0
|
3.3 删除 SR-IOV VF
1
| echo 0 > /sys/class/net/eth0/device/sriov_numvfs
|
4 K8s 下使用 SR-IOV
4.1 Pod 中如何使用 SR-IOV
SR-IOV 设备的 VF 资源在 Pod 中是无法被直接访问的,需要基于 Kubernetes 的资源扩展方式实现对 VF 的管理。
如果需要卸载,请同时删除节点下的 /etc/cni/net.d/*multus* 文件,否则会导致 Pod 无法创建。
4.2 创建 multus
安装 kube-multus 之后,一个 Pod 可以使用多个网卡。
1
| kubectl apply -f https://raw.githubusercontent.com/shaowenchen/ops-hub/refs/heads/master/network/kube-multus.yml
|
4.3 安装 SR-IOV CNI
安装 kube-sriov-cni 之后,创建 Pod 网络时,可以调用 SR-IOV CNI 挂载 VF 资源。
1
| kubectl apply -f https://raw.githubusercontent.com/shaowenchen/ops-hub/master/network/kube-sriov-cni.yaml
|
4.4 安装 SR-IOV 设备插件
安装 sriov-network-device-plugin 之后,创建 Pod 时,Kublet 会通过 GRPC 与 sriov-network-device-plugin 交互来给 Pod 分配 SR-IOV VF。
1
| kubectl apply -f https://raw.githubusercontent.com/shaowenchen/ops-hub/refs/heads/master/network/kube-sriov-device-plugin.yaml
|
4.5 配置可用的 SR-IOV VF
 1
 2
 3
 4
 5
 6
 7
 8
 9
10
11
12
| ethtool -i eth0
driver: i40e # 驱动
version: 2.25.7
firmware-version: 4.10 0x80001a63 1.2585.0
expansion-rom-version:
bus-info: 0000:3d:00.0 # PCI 地址
supports-statistics: yes
supports-test: yes
supports-eeprom-access: yes
supports-register-dump: yes
supports-priv-flags: yes
|
1
2
3
| lspci -s 0000:3d:00.0 -v | grep SR-IOV
Capabilities: [160] Single Root I/O Virtualization (SR-IOV)
|
1
2
3
| lspci -s 0000:3d:00.0 -n
3d:00.0 0200: 8086:37d1 (rev 09)
|
这里的 8086 就是厂商 ID,37d1 就是设备 ID。
1
| kubectl -n kube-system edit cm sriovdp-config
|
1
2
3
4
5
6
7
8
| {
"resourceName": "eth0",
"selectors": {
"drivers": ["i40e"],
"vendor": ["8086"],
"device": ["37d1"]
}
},
|
 1
 2
 3
 4
 5
 6
 7
 8
 9
10
11
12
13
| kubectl get node bj6-a-kas-t41-01 -o json | jq '.status.allocatable'
{
"cpu": "38",
"ephemeral-storage": "527342541975",
"hugepages-1Gi": "0",
"hugepages-2Mi": "0",
"intel.com/eth0": "2",
"memory": "127356472Ki",
"pods": "110",
"tencent.com/vcuda-core": "100",
"tencent.com/vcuda-memory": "60"
}
|
这里的 intel.com/eth0 就是 sirov-device-plugin 识别的 SR-IOV 设备。
4.6 配置 NetworkAttachmentDefinition
 1
 2
 3
 4
 5
 6
 7
 8
 9
10
11
12
13
14
15
16
17
18
19
| kubectl apply -f - <<EOF
apiVersion: k8s.cni.cncf.io/v1
kind: NetworkAttachmentDefinition
metadata:
annotations:
k8s.v1.cni.cncf.io/resourceName: intel.com/eth0
name: sriov-eth0
namespace: default
spec:
config: |
{
"type": "sriov",
"cniVersion": "0.3.1",
"name": "sriov-network",
"ipam": {
"type": "host-local"
}
}
EOF
|
如果 Pod 一直处于 ContainerCreating 状态,很有可能是 NetworkAttachmentDefinition 配置错误。
4.7 创建普通 Pod
 1
 2
 3
 4
 5
 6
 7
 8
 9
10
11
| kubectl apply -f - <<EOF
apiVersion: v1
kind: Pod
metadata:
name: demo-ubuntu
spec:
containers:
- name: demo-ubuntu
image: shaowenchen/demo:ubuntu
imagePullPolicy: Always
EOF
|
查看网卡
1
2
3
4
5
6
| kubectl exec -it demo-ubuntu ip link show
1: lo: <LOOPBACK,UP,LOWER_UP> mtu 65536 qdisc noqueue state UNKNOWN mode DEFAULT group default qlen 1000
link/loopback 00:00:00:00:00:00 brd 00:00:00:00:00:00
3: eth0@if1659: <BROADCAST,MULTICAST,UP,LOWER_UP> mtu 1450 qdisc noqueue state UP mode DEFAULT group default
link/ether 52:22:5d:0c:0d:d3 brd ff:ff:ff:ff:ff:ff link-netnsid 0
|
4.8 创建 SR-IOV Pod
通过注解的方式,可以给 Pod 申请 SR-IOV VF。
 1
 2
 3
 4
 5
 6
 7
 8
 9
10
11
12
13
14
15
16
17
18
| kubectl apply -f - <<EOF
apiVersion: v1
kind: Pod
metadata:
name: demo-ubuntu-sriov
annotations:
k8s.v1.cni.cncf.io/networks: sriov-eth0
spec:
containers:
- name: demo-ubuntu
image: shaowenchen/demo:ubuntu
imagePullPolicy: Always
resources:
requests:
intel.com/eth0: '1'
limits:
intel.com/eth0: '1'
EOF
|
查看网卡
 1
 2
 3
 4
 5
 6
 7
 8
 9
10
| kubectl exec -it demo-ubuntu-sriov ip link show
1: lo: <LOOPBACK,UP,LOWER_UP> mtu 65536 qdisc noqueue state UNKNOWN mode DEFAULT group default qlen 1000
link/loopback 00:00:00:00:00:00 brd 00:00:00:00:00:00
3: eth0@if1663: <BROADCAST,MULTICAST,UP,LOWER_UP> mtu 1450 qdisc noqueue state UP mode DEFAULT group default
link/ether f2:32:06:2f:85:13 brd ff:ff:ff:ff:ff:ff link-netnsid 0
7: net1: <NO-CARRIER,BROADCAST,MULTICAST,UP> mtu 1500 qdisc mq state DOWN mode DEFAULT group default qlen 1000
link/ether 90:f7:b2:4b:dc:40 brd ff:ff:ff:ff:ff:ff
alias eth0
altname enp61s0f0
|
主机上的 eth0 也是 DOWN 状态,这里出现了 net1 网卡就说明已经配置了 SR-IOV VF。
4.9 将 sriov 设置为默认网卡
需要在 kube-system 下创建 NetworkAttachmentDefinition 。
 1
 2
 3
 4
 5
 6
 7
 8
 9
10
11
12
13
14
15
16
17
18
| kubectl apply -f - <<EOF
apiVersion: v1
kind: Pod
metadata:
name: demo-ubuntu-sriov-default
annotations:
v1.multus-cni.io/default-network: sriov-eth0
spec:
containers:
- name: demo-ubuntu
image: shaowenchen/demo:ubuntu
imagePullPolicy: Always
resources:
requests:
intel.com/eth0: '1'
limits:
intel.com/eth0: '1'
EOF
|
5. 总结
本篇文章,介绍了 SR-IOV 技术以及在 Kubernetes 中的使用。
常用的部署方式还有 https://github.com/k8snetworkplumbingwg/sriov-network-operator ,借助 Operator 可以更快地实现 SR-IOV 与 Kubernetes 的集成。
SR-IOV 实现了对物理网卡的虚拟化、多租户使用。除了借助 sriov-network-device-plugin 实现对 VF 资源的注册,还有一种方式是 k8s-rdma-shared-dev-plugin,在我们生产的环境中,也是使用的这种方式对接 IB 网卡。






