文中以 Python 2.7.8 版本源码为例。
1. Python 中常见的文件格式
Python 源代码文件,可以使用文本编辑器进行修改。
Python 源代码编译后,生成的字节码文件。
pyc 文件执行时,会出现 console 窗口;pyw 文件执行时,不会出现。pyw 文件主要是用来运行纯 GUI 图形用户界面程序,运行时,需要 Pythonw 解释执行。
Python 源代码优化编译后的文件。 执行命令,python -O your.py, 即可将 Python 源代码编译为 pyo 文件
一般是其他语言编写的 Python 扩展模块。pyd 文件是用 D 语言(C/C++综合进化版本)编写,编译生成的二进制文件。
2. py 生成 pyc 文件
如果对代码目录具有写的权限,在两种情况下,py 源代码文件会编译生成 pyc 文件:
- 被 import 的模块,会生成 pyc 文件。
- 被
py_compile 编译的 Python 代码会生成 pyc 文件
需要知道的是,直接执行 py 源代码文件,并不会自动生成 pyc 文件。
单文件编译:
1
2
| import py_compile
py_compile.compile(r'./your.py')
|
文件夹编译:
1
2
| import compileall
compileall.compile_dir('./')
|
pyc 是由 py 源代码文件经过编译后生成的,一种跨平台的二进制字节码文件。Python 解释器能解释执行 pyc 文件,类似于 Java 虚拟机。同时,pyc 的内容与 Python 的版本相关,不同版本的 Python 解释器,编译 py 源代码后生成的 pyc 文件不同。Python 2.7 编译生成的 pyc,Python 3.5 是无法执行的。
如果跨版本执行 pyc,可能会报错(这里说可能,是因为小版本之间的 magic number 相同,可以执行):
1
| RuntimeError: Bad magic number in .pyc file
|
在下面的内容中,还会有进一步的解释。
3. import 实现的源码
Python 中 import 会生成 pyc 文件,下面从 Python 源码中 import 实现部分开始分析。
 1
 2
 3
 4
 5
 6
 7
 8
 9
10
11
12
13
14
| /* Load a source module from a given file and return its module */
/* object WITH INCREMENTED REFERENCE COUNT. If there's a matching */
/* byte-compiled file, use that instead. */
static PyObject *
load_source_module(char *name, char *pathname, FILE *fp)
{
if (check_compiled_module(pathname, mtime, cpathname))) {
co = read_compiled_module(cpathname, fpc);
}
else {
write_compiled_module(co, cpathname, &st, mtime);
}
m = PyImport_ExecCodeModuleEx(name, (PyObject *)co, pathname);
}
|
Python 执行 import 指令时,在代码目录下查找同名,后缀为 pyw、pyo、pyc 的文件。如果找到,则调用 check_compiled_module 函数,判断 pyc 文件中,头部的时间戳,是否与 py 文件 最后修改时间 一致。如果一致则,直接加载;否则重新编译生成 pyc 文件,并将 最后修改时间 写入 py 源码。
如果没找到,则编译生成 pyc 文件。下面是 check_compiled_module 的源码。
 1
 2
 3
 4
 5
 6
 7
 8
 9
10
11
12
13
14
15
16
17
18
19
| /* Given a pathname for a Python source file, its time of last */
/* modification, and a pathname for a compiled file, check whether the */
/* compiled file represents the same version of the source. If so, */
/* return a FILE pointer for the compiled file, positioned just after */
/* the header; if not, return NULL. */
/* Doesn't set an exception. */
static FILE *
check_compiled_module(char *pathname, time_t mtime, char *cpathname)
{
...
pyc_mtime = PyMarshal_ReadLongFromFile(fp);
if (pyc_mtime != mtime) {
if (Py_VerboseFlag)
PySys_WriteStderr("# %s has bad mtime\n", cpathname);
fclose(fp);
return NULL;
}
...
}
|
check_compiled_module 函数是通过检查 py 和 pyc 文件的最后修改的时间戳 mtime 是否一致,来判断是否需要更新 pyc 文件。
 1
 2
 3
 4
 5
 6
 7
 8
 9
10
11
12
13
14
15
16
17
18
19
20
21
| /* Write a compiled module to a file, placing the time of last*/
/* modification of its source into the header.*/
/* Errors are ignored, if a write error occurs an attempt is made to*/
/* remove the file. */
static void
write_compiled_module(PyCodeObject *co, char *cpathname, struct stat *srcstat, time_t mtime)
{
...
PyMarshal_WriteLongToFile(pyc_magic, fp, Py_MARSHAL_VERSION);
/* First write a 0 for mtime */
PyMarshal_WriteLongToFile(0L, fp, Py_MARSHAL_VERSION);
PyMarshal_WriteObjectToFile((PyObject *)co, fp, Py_MARSHAL_VERSION);
...
/* Now write the true mtime (as a 32-bit field) */
fseek(fp, 4L, 0);
assert(mtime <= 0xFFFFFFFF);
PyMarshal_WriteLongToFile((long)mtime, fp, Py_MARSHAL_VERSION);
fflush(fp);
fclose(fp);
...
}
|
在写入 pyc 文件时,还需要写入一个 Long 型变量,变量的内容则是 py 源文件的最后修改时间戳 ftLastWriteTime。
4. 不同版本的 pyc 如何区分
前面提到,不同 Python 版本的解释器生成的 pyc 文件不一样。那么,Python 解释器是如何加以区分的呢?
在上面生成 pyc 文件的源码中,可以看到 PyMarshal_WriteLongToFile(pyc_magic, fp, Py_MARSHAL_VERSION); 将 pyc_magic 和 Py_MARSHAL_VERSION 变量写入 pyc 文件。Py_MARSHAL_VERSION 指定了当前的文件格式,2.7.8 版本为 2,3.5.5 版本为 4;pyc_magic 指定了和 Python 解释器相关的版本信息。
 1
 2
 3
 4
 5
 6
 7
 8
 9
10
11
12
13
14
15
16
| /* Magic word to reject .pyc files generated by other Python versions.
It should change for each incompatible change to the bytecode.
Known values:
...
Python 2.6a0: 62151 (peephole optimizations and STORE_MAP opcode)
Python 2.6a1: 62161 (WITH_CLEANUP optimization)
Python 2.7a0: 62171 (optimize list comprehensions/change LIST_APPEND)
Python 2.7a0: 62181 (optimize conditional branches:
introduce POP_JUMP_IF_FALSE and POP_JUMP_IF_TRUE)
Python 2.7a0 62191 (introduce SETUP_WITH)
Python 2.7a0 62201 (introduce BUILD_SET)
Python 2.7a0 62211 (introduce MAP_ADD and SET_ADD)
*/
#define MAGIC (62211 | ((long)'\r'<<16) | ((long)'\n'<<24))
static long pyc_magic = MAGIC;
|
可以看到,在不同的 Python 解释器版本中 pyc_magic 值不同。通过定义新的 pyc_magic 可以用于生成专属的 Python 解释器,这也是实现 pyc 文件和指定 Python 解释器绑定的一种方式。
5. PyCodeObject & PyFrameObject
PyCodeObject 是 Python 源代码编译后,真正生成的结果。也就是说,编写的 Python 源代码都会被转换成 PyCodeObject 对象。
源码位置: Include\code.h
 1
 2
 3
 4
 5
 6
 7
 8
 9
10
11
12
13
14
15
16
17
18
19
20
21
22
| /* Bytecode object */
typedef struct {
PyObject_HEAD
int co_argcount; /* #arguments, except *args */
int co_nlocals; /* #local variables */
int co_stacksize; /* #entries needed for evaluation stack */
int co_flags; /* CO_..., see below */
PyObject *co_code; /* instruction opcodes */
PyObject *co_consts; /* list (constants used) */
PyObject *co_names; /* list of strings (names used) */
PyObject *co_varnames; /* tuple of strings (local variable names) */
PyObject *co_freevars; /* tuple of strings (free variable names) */
PyObject *co_cellvars; /* tuple of strings (cell variable names) */
/* The rest doesn't count for hash/cmp */
PyObject *co_filename; /* string (where it was loaded from) */
PyObject *co_name; /* string (name, for reference) */
int co_firstlineno; /* first source line number */
PyObject *co_lnotab; /* string (encoding addr<->lineno mapping) See
Objects/lnotab_notes.txt for details. */
void *co_zombieframe; /* for optimization only (see frameobject.c) */
PyObject *co_weakreflist; /* to support weakrefs to code objects */
} PyCodeObject;
|
在 PyCodeObjec 对象的 co_code 中保存着字节码指令。Python 解释器,执行字节码指令序列的过程就是,从头到尾遍历整个 co_code 依次执行字节码指令的过程。
源码位置:Python\marshal.c
 1
 2
 3
 4
 5
 6
 7
 8
 9
10
11
12
| void
PyMarshal_WriteObjectToFile(PyObject *x, FILE *fp, int version)
{
WFILE wf;
wf.fp = fp;
wf.error = WFERR_OK;
wf.depth = 0;
wf.strings = (version > 0) ? PyDict_New() : NULL;
wf.version = version;
w_object(x, &wf);
Py_XDECREF(wf.strings);
}
|
PyMarshal_WriteObjectToFile 写入 PyCodeObject 对象到 pyc 文件,函数内部调用 w_object 将 Python 代码中出现的对象和对应的 TYPE_* 标识一一存入对象,比如int对象对应标识 TYPE_INT。
但是,Python 程序在运行时,它的解释器上处理的并不是一个 PyCodeObject对象,而是与之对应的帧栈对象 PyFrameObject。
- 源码位置:Include\frameobject.h
 1
 2
 3
 4
 5
 6
 7
 8
 9
10
11
12
13
14
15
16
17
18
| typedef struct _frame {
PyObject_VAR_HEAD
struct _frame *f_back; /* previous frame, or NULL */
PyCodeObject *f_code; /* code segment */
PyObject *f_builtins; /* builtin symbol table (PyDictObject) */
PyObject *f_globals; /* global symbol table (PyDictObject) */
PyObject *f_locals; /* local symbol table (any mapping) */
PyObject **f_valuestack; /* points after the last local */
PyObject **f_stacktop;
PyObject *f_trace; /* Trace function */
PyObject *f_exc_type, *f_exc_value, *f_exc_traceback;
PyThreadState *f_tstate;
int f_lasti; /* Last instruction if called */
int f_lineno; /* Current line number */
int f_iblock; /* index in f_blockstack */
PyTryBlock f_blockstack[CO_MAXBLOCKS]; /* for try and loop blocks */
PyObject *f_localsplus[1]; /* locals+stack, dynamically sized */
} PyFrameObject;
|
Python 解释器,用 PyInterpreterState 结构维护进程运行环境,PyThreadState 维护线程运行环境,PyFrameObject 维护栈帧运行环境,三者是依次包含关系,如下图所示:
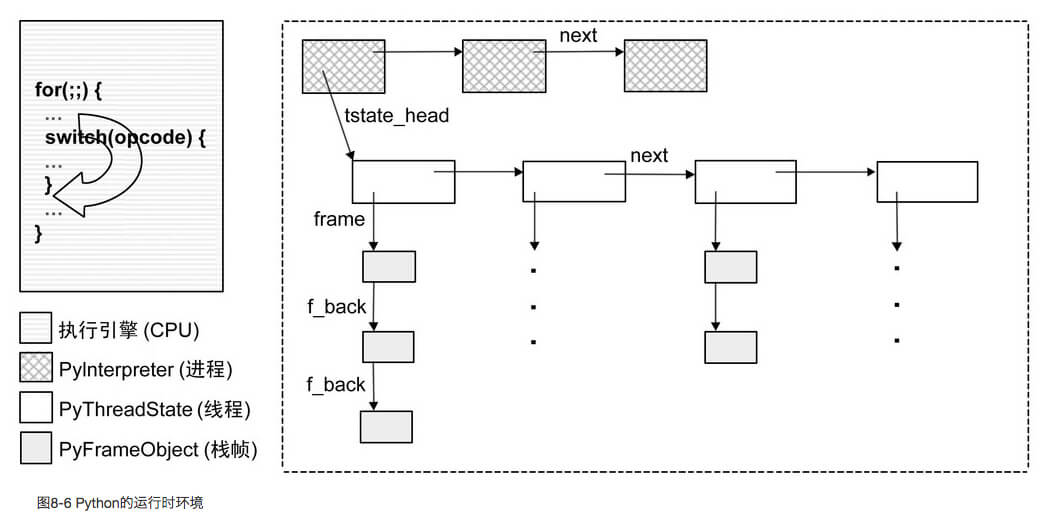
Python 解释器,动态加载上述三种结构进内存,并模拟操作系统执行过程。程序执行后,先创建各个运行时环境,再将栈帧中的字节码载入,循环遍历解释执行。
6. 参考



