
在上一篇文档 《使用 ChatOps 改进研发流程》中,通过 ChatOps 给 Pull Requests 提供预览链接提升了敏捷速度。本篇主要描述如何快速实现这个功能。
1. 第一步: 配置一个触发器
1.1 选择一个触发器
在 GitHub 中有三类 Workflows 触发器,定时、人工、自动触发器。我们需要选择一个自动触发器,用于触发执行逻辑。目前 GitHub Actions 支持的自动触发器有 check_run、check_suite、create、delete、deployment、deployment_status、fork、gollum、issue_comment、issues、label、milestone、page_build、project、project_card、project_column、public、pull_request、pull_request_review、pull_request_review_comment、pull_request_target、push、registry_package、release、status、watch、workflow_run。
在 workflows.yaml 文件中,on 关键字下添加触发器:
1
2
3
| on:
issue_comment:
types: [created]
|
这里选择的是 issue_comment ,当有 Issues 或者 Pull Requests 被评论时,触发 Actions 的执行。
1.2 定义一个触发关键字
定义关键字是为了关联操作逻辑,主要是匹配过滤,将 /deploy 与 deploy-script 关联起来,将 /clear 与 clear-script 关联起来。
下面是根据指定 trigger 关键字 /deploy 进行触发的 workflows.yaml 片段。
 1
 2
 3
 4
 5
 6
 7
 8
 9
10
11
12
13
14
15
16
17
18
19
20
21
22
23
| jobs:
deploy-check:
runs-on: ubuntu-latest
steps:
- name: acknowledge request to commenter
id: check
uses: khan/pull-request-comment-trigger@master
with:
trigger: "/deploy"
reaction: rocket
env:
GITHUB_TOKEN: "${{ secrets.GITHUB_TOKEN }}"
outputs:
triggered: ${{ steps.check.outputs.triggered }}
deploy-script:
if: needs.deploy-check.outputs.triggered == 'true'
runs-on: ubuntu-latest
needs: deploy-check
steps:
- name: script
run: |
echo "start"
|
2. 第二步: 执行自定义指令
这一步主要是执行一些相应的步骤,用来完成对基础设施的修改。比如,更新服务、部署应用、删除文件等,具有很高的自由度。
这里主要是需要部署新的服务,并提供一个对外可访问的地址。如果是静态项目的预览,直接使用 netlify 提供的预览服务更好。但是,更多的项目,还是需要远程到服务器上进行操作。
下面是一个以 root 用户远程到指定服务器,创建并暴露服务的示例。
 1
 2
 3
 4
 5
 6
 7
 8
 9
10
11
| - name: executing remote ssh commands
id: deploy_console
uses: appleboy/ssh-action@master
with:
host: ${{ secrets.IP }}
username: root
password: ${{ secrets.PASSWORD }}
port: 22
script: |
kubectl run nginx --image=nginx
kubectl expose deploy nginx --type=NodePort --port=80 --target-port=80
|
可以根据具体需要,在 script 中填充自定义的脚本命令。
3. 第三步: 反馈信息
最后就是需要反馈信息,明确表明任务已经完成,并将完成的结果以某种方式告诉给用户。这里主要提供两种方式:评论回复和 Slack 通知。
3.1 评论回复
添加相关的 Job 可以实现回复指定的 Issues/Pull Requests 的功能。同时,在评论的内容中,我们也可以引用内置的变量,让回复内容更加详细,含义传达更加有效。
1
2
3
4
5
6
7
| - name: Create comment
uses: peter-evans/create-or-update-comment@v1
with:
issue-number: ${{ github.event.issue.number }}
body: |
Congratulations! Deployment succeeded.
reactions: heart, hooray, laugh
|
3.2 Slack 通知
在之前的文档中,我已经分享过《如何配置 Slack 通知》 ,这里不再赘述。
 1
 2
 3
 4
 5
 6
 7
 8
 9
10
11
12
13
14
15
| - uses: 8398a7/action-slack@v3
with:
status: custom
fields: workflow,job,commit,repo,ref,author,took
custom_payload: |
{
username: 'action-slack',
icon_emoji: ':octocat:',
attachments: [{
color: '${{ job.status }}' === 'success' ? 'good' : '${{ job.status }}' === 'failure' ? 'danger' : 'warning',
text: `Congratulations! Deployment succeeded.`,
}]
}
env:
SLACK_WEBHOOK_URL: ${{ secrets.SLACK_WEBHOOK_URL }}
|
将上面的片段添加到 workflows 即可。
4. 一些 GitHub Actions 的使用技巧
4.1 切换代码到 Pull Requests 所在分支
在一个 Pull Requests 流程中,通常有两个分支,upstream 和 developer 。而 workflows 的 on 针对当前分支,在 upstream 仓库中,不能直接 Checkout 提交 Pull Requests 的 developer 仓库的分支。
下面这段片段,可以将代码切换到待合并的开发者分支上。
 1
 2
 3
 4
 5
 6
 7
 8
 9
10
11
12
13
| - name: get pull request ref
id: get_pull_request_ref
uses: octokit/request-action@v2.x
with:
route: GET /repos/:repository/pulls/:issue_id
repository: ${{ github.repository }}
issue_id: ${{ github.event.issue.number }}
env:
GITHUB_TOKEN: "${{ secrets.GITHUB_TOKEN }}"
- uses: actions/checkout@v2
with:
repository: ${{ fromJson(steps.get_pull_request_ref.outputs.data).head.repo.full_name }}
ref: ${{ fromJson(steps.get_pull_request_ref.outputs.data).head.ref }}
|
4.2 使用 Deployment 维护部署的状态
GitHub 提供了一个名为 Deployment 的对象,用来管理部署的事件和状态。下面是一个时序图:
 1
 2
 3
 4
 5
 6
 7
 8
 9
10
11
12
13
14
15
16
17
18
19
20
21
22
23
24
| +---------+ +--------+ +-----------+ +-------------+
| Tooling | | GitHub | | 3rd Party | | Your Server |
+---------+ +--------+ +-----------+ +-------------+
| | | |
| Create Deployment | | |
|--------------------->| | |
| | | |
| Deployment Created | | |
|<---------------------| | |
| | | |
| | Deployment Event | |
| |---------------------->| |
| | | SSH+Deploys |
| | |-------------------->|
| | | |
| | Deployment Status | |
| |<----------------------| |
| | | |
| | | Deploy Completed |
| | |<--------------------|
| | | |
| | Deployment Status | |
| |<----------------------| |
| | | |
|
在页面上的效果如下图:
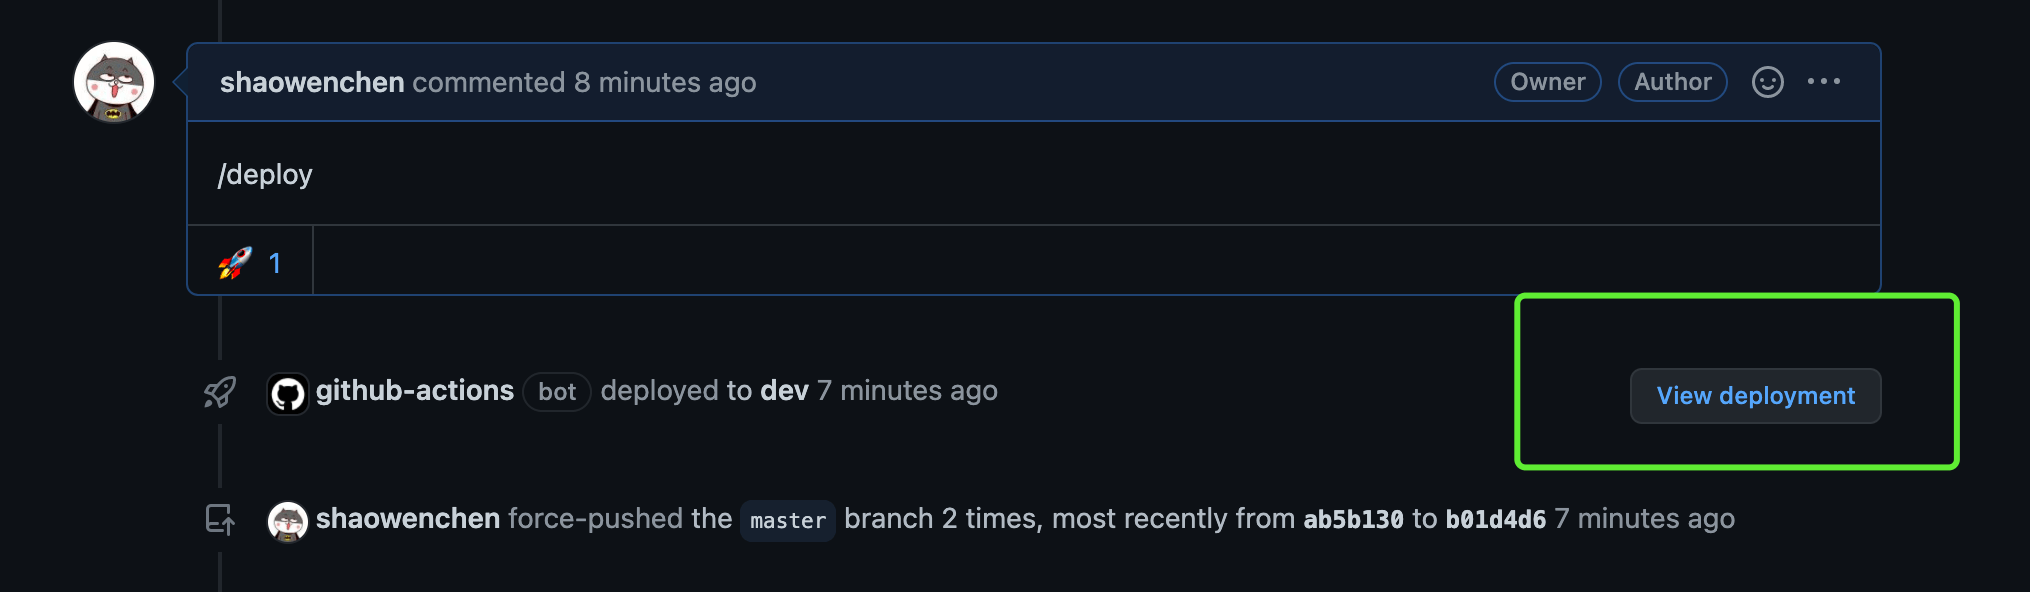
使用的方法,可以参考文末提供的链接。
我最终没有采用这种方式的原因是,在 Pull Requests 下,upstream 不存在 developer 的 PR 分支时,页面找不到 Deployment。好吧,我知道你没明白,不过没关系,推荐用这种方式管理 Deployment,可以先试试。
4.3 变量的调试方法
在 GitHub Actions 中内置了很多变量,使用第三方 Actions 也会得到很多变量。在调试过程中,如果对变量存在性或值内容存在疑惑,可以直接打印查看。
下面就是一个示例:
1
2
3
| - name: echo
run: |
echo ${{ steps.get_pull_request_ref.outputs.data }}
|
最终打印的部分结果如下:
 1
 2
 3
 4
 5
 6
 7
 8
 9
10
11
12
13
14
| {
"url": "https://api.github.com/repos/***/console/pulls/7",
"id": 548619025,
"node_id": "MDExOlB1bGxSZXF1ZXN0NTQ4NjE5MDI1",
"html_url": "https://github.com/***/console/pull/7",
"diff_url": "https://github.com/***/console/pull/7.diff",
"patch_url": "https://github.com/***/console/pull/7.patch",
"issue_url": "https://api.github.com/repos/***/console/issues/7",
"number": 7,
"state": "open",
"locked": false,
"title": "Feat/workspace group",
...
}
|
在整个过程中,调试是非常耗时的,我们要掌握一定的方法,才能事半功倍。
4.4 Output 传递 Step 之间的变量
使用 Output 和 Env 都可以实现 Step 之间的变量传递,这里以 Output 为例:
 1
 2
 3
 4
 5
 6
 7
 8
 9
10
11
| - name: set SERVICE_PORT
id: set_port
run: |
echo "::set-output name=SERVICE_PORT::$(sshpass -p "${{ secrets.QING_PASSWORD }}" ssh -o StrictHostKeyChecking=no root@${{ secrets.EIP }} "kubectl get svc ${{ env.SERVICE_NAME }} -o json | jq .spec.ports[].nodePort")"
- name: Create comment
uses: peter-evans/create-or-update-comment@v1
with:
issue-number: ${{ github.event.issue.number }}
body: |
Congratulations! Deployment succeeded. This is the [preview link](http://${{ secrets.EIP }}:${{ steps.set_port.outputs.SERVICE_PORT }}/) .
reactions: heart, hooray, laugh
|
首先通过执行 sshpass 命令拿到服务的端口,设置为 output 变量。然后,在其他的 Step 中,通过 ${{ steps.set_port.outputs.SERVICE_PORT }} 的方式,引用跨 Step 的变量值。
5. 参考



