1. 存储方案
三种存储方案:
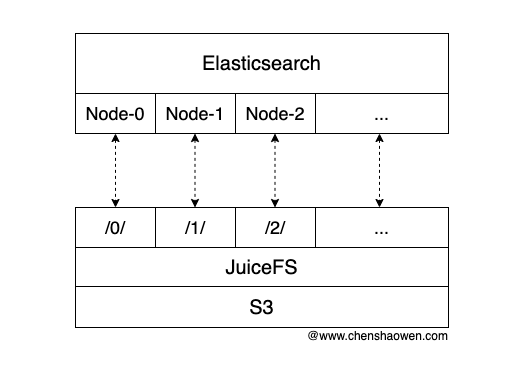
Elasticsearch 的节点共用一个 JuiceFS,通过子目录挂载不同的 Elasticsearch 节点。
/0/ 对应节点 Node-0
/1/ 对应节点 Node-1
/2/ 对应节点 Node-2
这种方式的好处主要是,易于扩展、配置方便。
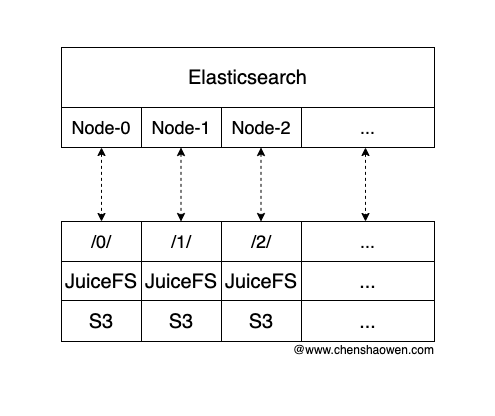
Elasticsearch 每个节点都对接一个独立的 JuiceFS,每个节点具有单独的存储后端。
Bucket-0 对应节点 Node-0
Bucket-1 对应节点 Node-1
Bucket-2 对应节点 Node-2
这种方式的好处主要是,可靠性高、性能更好。
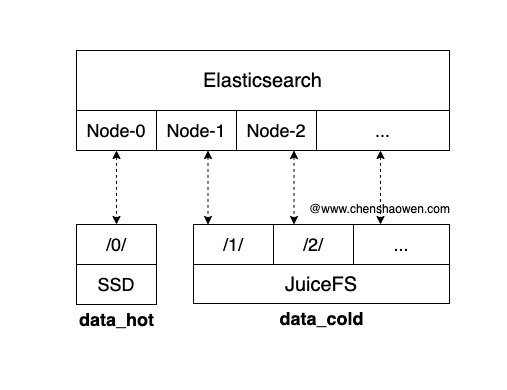
JuiceFS 的性能不及 SSD,采用混合的方式,将热数据放在 SSD 中,冷数据放在 JuiceFS 中,也是一个不错的选择。
这种方式的好处主要是,兼顾成本与性能,但是运维更加复杂。
目前的业务需求是,使用 Elasticsearch 查询一些温冷数据,但数据体量比较大,达到 10 TB 文本数据,能容忍接口响应时间 10 秒,因此采用的是基于目录隔离的方式。
2. 创建 Elasticsearch 所需的 PVC
2.1. 设置环境变量
1
2
3
4
5
6
| export ACCESS_KEY=xxx
export SECRET_KEY=xxx
export BUCKET=xxx
export ENDPOINT=ks3-cn-beijing-internal.ksyun.com
export BUCKET_ENPOINT=$BUCKET.$ENDPOINT
export PROVIDER=ks3
|
1
2
| export REDIS_PASSWORD=xxx
export REDIS_ENDPOINT=x.x.x.x:6379/0
|
1
2
| export NAMESPACE=xxx
export PVC_NAME=elasticsearch-data-es-jfs-test-es-default-0
|
这里需要注意 PVC_NAME 是 ECK Operator 根据 Elasticsearch 的 name 生成的。这里创建的 Elasticsearch 名字为 es-jfs-test,所以 PVC_NAME 为 elasticsearch-data-es-jfs-test-es-default-0,表示第一个节点的存储卷。
2.2 格式化 JuiceFS
1
2
3
4
5
| juicefs format \
--storage $PROVIDER \
--bucket $BUCKET_ENPOINT \
redis://:$REDIS_PASSWORD@$REDIS_ENDPOINT \
es-jfs-test
|
2.3 创建 PVC
 1
 2
 3
 4
 5
 6
 7
 8
 9
10
11
12
13
14
15
16
17
18
19
20
21
22
23
24
25
26
27
28
29
30
31
32
| kubectl apply -f - <<EOF
apiVersion: data.fluid.io/v1alpha1
kind: Dataset
metadata:
name: $PVC_NAME
namespace: $NAMESPACE
spec:
accessModes:
- ReadWriteMany
mounts:
- name: es-jfs-test
mountPoint: "juicefs://0/"
options:
bucket: $BUCKET_ENPOINT
storage: $PROVIDER
encryptOptions:
- name: metaurl
valueFrom:
secretKeyRef:
name: es-jfs-test
key: metaurl
- name: access-key
valueFrom:
secretKeyRef:
name: es-jfs-test
key: access-key
- name: secret-key
valueFrom:
secretKeyRef:
name: es-jfs-test
key: secret-key
EOF
|
需要注意 MountPoint 的格式是 juicefs://0/,表示第一个节点。创建第二个节点时,应该修改为 juicefs://1/。
 1
 2
 3
 4
 5
 6
 7
 8
 9
10
11
12
13
14
15
16
17
18
19
20
21
22
23
24
25
26
| kubectl apply -f - <<EOF
apiVersion: data.fluid.io/v1alpha1
kind: JuiceFSRuntime
metadata:
name: $PVC_NAME
namespace: $NAMESPACE
spec:
replicas: 1
juicefsVersion:
image: juicedata/juicefs-fuse
imageTag: ce-v1.1.0
fuse:
image: juicedata/juicefs-fuse
imageTag: ce-v1.1.0
cleanPolicy: OnDemand
worker:
resources:
limits:
cpu: 15
memory: 200Gi
tieredstore:
levels:
- mediumtype: SSD
path: /cache
quota: 40960 # 40GiB
EOF
|
创建测试 Pod 不仅仅是为了测试 PVC 能正常挂载,而是提前让 PVC 处理 Bound 状态,避免 Elasticsearch 又重新创建 PVC。
 1
 2
 3
 4
 5
 6
 7
 8
 9
10
11
12
13
14
15
16
17
18
| kubectl apply -f - <<EOF
apiVersion: v1
kind: Pod
metadata:
name: $PVC_NAME
namespace: $NAMESPACE
spec:
containers:
- name: demo
image: shaowenchen/demo:ubuntu
volumeMounts:
- mountPath: /data/jfs
name: data
volumes:
- name: data
persistentVolumeClaim:
claimName: $PVC_NAME
EOF
|
参考 在 Kubernetes 下创建后端为 JuiceFS 的 PVC
3. 部署 Elasticsearch
下面是一个简易的部署过程。
3.1 安装 ECK Operator
因为最新版本的 ECK Operator 并不支持 Kubernetes v1.26.9,这里安装的是 ECK Operator v2.11.1。
1
| kubectl create -f https://raw.githubusercontent.com/shaowenchen/ops-hub/master/observation/v2.11.1-eck-crds.yaml
|
1
| kubectl apply -f https://raw.githubusercontent.com/shaowenchen/ops-hub/master/observation/v2.11.1-eck-operator.yaml
|
3.2 部署 Elasticsearch 实例
需要注意的是这里的 count 设置为 1,表示只有一个节点。如果需要使用多个节点,那么需要提前创建对应的 PVC,并且保证其状态为 Bound。
 1
 2
 3
 4
 5
 6
 7
 8
 9
10
11
12
13
14
15
16
17
18
19
20
21
22
23
24
25
26
27
28
29
30
31
32
33
34
35
36
37
38
39
40
41
42
43
44
45
46
47
48
| cat <<EOF | kubectl apply -f -
apiVersion: elasticsearch.k8s.elastic.co/v1
kind: Elasticsearch
metadata:
namespace: data-center
name: es-jfs-test
spec:
version: 8.3.2
image: elasticsearch:8.3.2
http:
tls:
selfSignedCertificate:
disabled: true
nodeSets:
- name: default
count: 3
config:
node.store.allow_mmap: false
podTemplate:
spec:
initContainers:
- name: sysctl
securityContext:
privileged: true
runAsUser: 0
command: ['sh', '-c', 'sysctl -w vm.max_map_count=262144']
- name: install-plugins
command:
- sh
- -c
- |
bin/elasticsearch-plugin install --batch https://get.infini.cloud/elasticsearch/analysis-ik/8.3.2
securityContext:
runAsUser: 0
runAsGroup: 0
containers:
- name: elasticsearch
env:
- name: "ES_JAVA_OPTS"
value: "-Xms30g -Xmx30g"
resources:
requests:
cpu: 10
memory: 20Gi
limits:
cpu: 50
memory: 500Gi
EOF
|
3.3 查看 Elasticsearch 密码
1
2
3
| kubectl -n $NAMESPACE get secret es-jfs-test-es-elastic-user -o go-template='{{.data.elastic | base64decode}}'
xxx
|
默认用户名是 elastic
4. 部署 Metricbeat
为了在 Kibana 中能看到 Elasticsearch 的指标数据,需要部署 Metricbeat。
 1
 2
 3
 4
 5
 6
 7
 8
 9
10
11
12
13
14
15
16
17
18
19
20
21
22
23
24
25
26
27
28
29
30
31
32
33
34
35
36
| kubectl apply -f - <<EOF
apiVersion: beat.k8s.elastic.co/v1beta1
kind: Beat
metadata:
name: es-jfs-test
namespace: $NAMESPACE
spec:
type: metricbeat
version: 8.3.2
elasticsearchRef:
name: es-jfs-test
config:
metricbeat:
autodiscover:
providers:
- type: kubernetes
scope: cluster
hints.enabled: true
templates:
- config:
- module: kubernetes
metricsets:
- event
period: 10s
processors:
- add_cloud_metadata: {}
logging.json: true
deployment:
podTemplate:
spec:
serviceAccountName: metricbeat
automountServiceAccountToken: true
# required to read /etc/beat.yml
securityContext:
runAsUser: 0
EOF
|
 1
 2
 3
 4
 5
 6
 7
 8
 9
10
11
12
13
14
15
16
17
18
19
20
21
22
23
24
25
26
27
28
29
30
31
32
33
34
35
36
37
38
| kubectl apply -f - <<EOF
apiVersion: rbac.authorization.k8s.io/v1
kind: ClusterRole
metadata:
name: metricbeat
rules:
- apiGroups: [""]
resources:
- nodes
- namespaces
- events
- pods
verbs: ["get", "list", "watch"]
- apiGroups: ["batch"]
resources:
- jobs
verbs: ["get", "list", "watch"]
- apiGroups: ["extensions"]
resources:
- replicasets
verbs: ["get", "list", "watch"]
- apiGroups: ["apps"]
resources:
- statefulsets
- deployments
- replicasets
verbs: ["get", "list", "watch"]
- apiGroups:
- ""
resources:
- nodes/stats
verbs:
- get
- nonResourceURLs:
- /metrics
verbs:
- get
EOF
|
1
2
3
4
5
6
7
| kubectl apply -f - <<EOF
apiVersion: v1
kind: ServiceAccount
metadata:
name: metricbeat
namespace: $NAMESPACE
EOF
|
 1
 2
 3
 4
 5
 6
 7
 8
 9
10
11
12
13
14
| kubectl apply -f - <<EOF
apiVersion: rbac.authorization.k8s.io/v1
kind: ClusterRoleBinding
metadata:
name: metricbeat
subjects:
- kind: ServiceAccount
name: metricbeat
namespace: $NAMESPACE
roleRef:
kind: ClusterRole
name: metricbeat
apiGroup: rbac.authorization.k8s.io
EOF
|
5. 部署 Kibana
 1
 2
 3
 4
 5
 6
 7
 8
 9
10
11
12
13
14
15
16
17
| cat <<EOF | kubectl apply -f -
apiVersion: kibana.k8s.elastic.co/v1
kind: Kibana
metadata:
namespace: $NAMESPACE
name: es-jfs-test
spec:
version: 8.3.2
count: 1
image: elastic/kibana:8.3.2
elasticsearchRef:
name: es-jfs-test
http:
tls:
selfSignedCertificate:
disabled: true
EOF
|
编辑 Kibana 的 Service 将 type 改为 NodePort。
1
| kubectl -n $NAMESPACE edit svc es-jfs-test-kb-http
|
此时就可以使用上面的 elastic 用户的密码登录 Kibana 了。
6. 查看 JuiceFS 的文件目录
为了直观的查看一下 Elasticsearch 的文件目录,我在测试主机上挂载了上面的 JuiceFS 用于测试验证。
1
2
3
4
5
6
| juicefs mount -d \
--storage $PROVIDER \
--bucket $BUCKET_ENPOINT \
redis://:$REDIS_PASSWORD@$REDIS_ENDPOINT \
es-jfs-test \
/data/ops/es-jfs-test
|
 1
 2
 3
 4
 5
 6
 7
 8
 9
10
11
12
13
14
15
16
17
18
19
20
21
22
23
24
| tree -L 2
.
├── 0
│ ├── indices
│ ├── mytest
│ ├── node.lock
│ ├── nodes
│ ├── snapshot_cache
│ ├── _state
│ └── test
├── 1
│ ├── indices
│ ├── node.lock
│ ├── nodes
│ ├── snapshot_cache
│ └── _state
└── 2
├── indices
├── node.lock
├── nodes
├── snapshot_cache
└── _state
12 directories, 8 files
|
部署完成之后,业务就开始导入数据进行测试了。
7. 总结
AI 相关设备的 CPU、Mem 配置都很高,但大家通常又只关注 GPU、NPU 算力卡的使用率。这导致了 AI 算力设备上 CPU、Mem 的使用率很低。
最近有业务需求,使用 Elasticsearch 分词之后,查询大批量的语料数据,但又对成本非常敏感,不愿意使用 SSD 作为 Elasticsearch 的数据存储。
本篇主要是记录使用 JuiceFS 存储对接 Elasticsearch 的过程,希望能够帮忙大家快速使用上。
8. 参考
https://github.com/elastic/cloud-on-k8s/tree/2.11
https://www.elastic.co/guide/en/cloud-on-k8s/2.11/k8s-quickstart.html









