








This series of blog posts will guide you through building a simple browser-based dinosaur runner game using Deno.
- Setup a basic project
- Game loop, canvas, and controls
- Obstacles and collision detection
- Databases and global leaderboards
- Player profiles, customization, and live tuning
- Observability, metrics, and alerting
In Stage 1, we set up the foundation of the Dino Runner game: an HTTP server with static file serving, and a basic page which we deployed to the web with Deno Deploy.
Stage 2 is where we’ll start to bring the game to life.
We’ll turn that simple landing page into a moving canvas with a jumping
character with keyboard and mouse controls. We’ll also learn about game loops
using requestAnimationFrame.
Keep reading and build along or view the entire source here.
By the end of this stage you will have:
requestAnimationFrameStage 2 uses a simple but realistic full-stack layout, building on what we set up in Stage 1:
Runner Game/
├── src/                    # Server-side source code
│   ├── main.ts             # Server entry point
│   └── routes/             # Route definitions
│       └── api.routes.ts   # API route definitions
├── public/                 # Client-side static files
│   ├── index.html          # Main landing page & game canvas
│   ├── js/
│   │   └── game.js         # Client-side game logic
│   └── css/
│       └── styles.css      # Styling
├── deno.json               # Deno configuration
└── .env                    # Environment variables
The core of the game will be rendered inside an
HTML5 <canvas>
element. This allows us to draw graphics dynamically using JavaScript.
In stage 1 we wrote a very basic index.html page. Now, we will enhance it to
include the game canvas and some UI elements. Replace the internals of the
<body> of your public/index.html with the following:
<main>
  <h1>🦕 Dino Runner</h1>
  <section class="container canvas-container">
    <canvas id="gameCanvas" width="800" height="200"></canvas>
  </section>
</main>
We want this to feel like a game, so let’s also add a score display and a ‘Click
to Start’ message. Directly after the <canvas> tag, inside the <section>
element, add the following HTML:
<div class="game-ui">
  <div class="score">Score: <span id="score">0</span></div>
  <div class="game-status" id="gameStatus">Click to Start!</div>
</div>
The class attributes on these elements will allow us to style them later with
CSS and the ids will let us update them dynamically with JavaScript.
Finally, lets add some instructions for the player, to show which keys to use.
Below the canvas-container section, add this HTML:
<section class="container">
  <h3>Controls</h3>
  <div class="control-grid">
    <kbd>Space</kbd>
    <kbd>↑</kbd>
    <span class="click">️Click</span>
    <span>Jump</span>
    <span>Jump</span>
    <span>Start/Jump</span>
  </div>
</section>
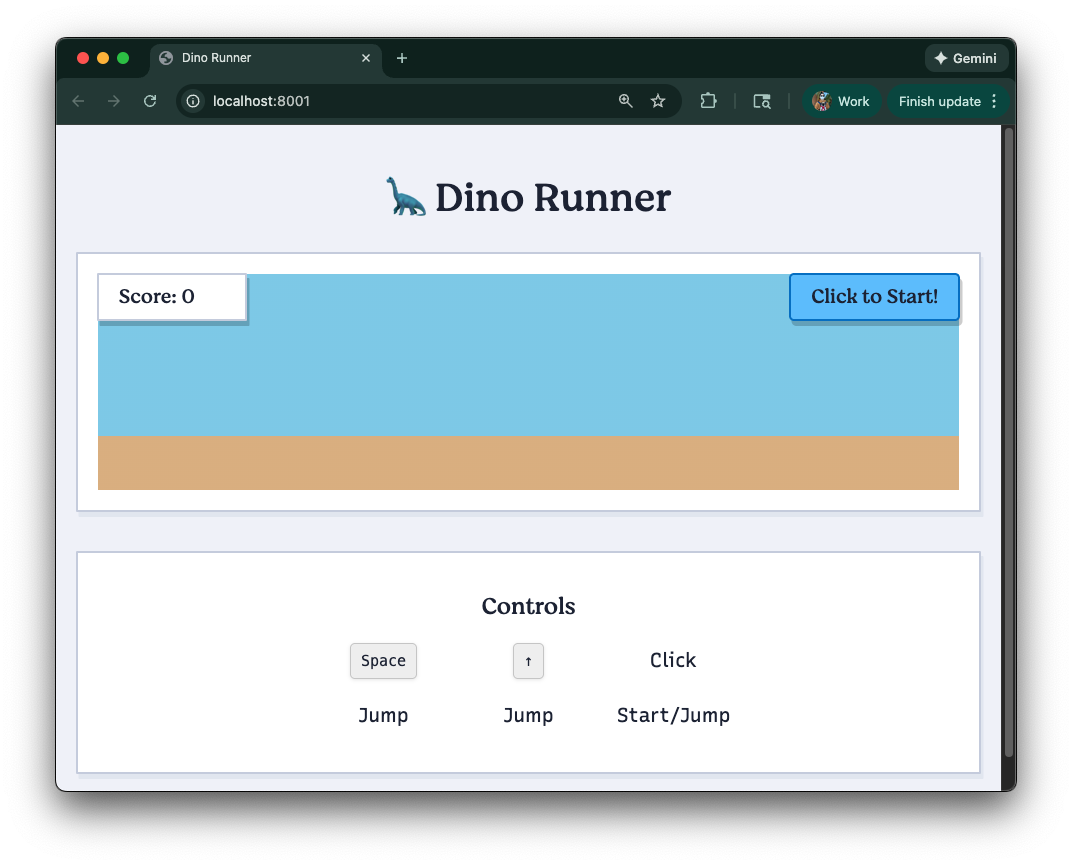
You can now serve your game locally with deno task dev and open it in your
browser. You should see a blank canvas and some basic text elements. Very
boring, lets style it up!
Next, let’s add some basic styles to make our game look a bit nicer. Open
public/css/styles.css and add the following CSS:
:root {
  --primary: #66c2ff;
  --primary-dark: #0077cc;
  --secondary: #cbd1e1;
  --tertiary: #e5e9f2;
  --bg: #f1f3f9;
  --dark: #1e253b;
}

html {
  box-sizing: border-box;
}
*,
*:before,
*:after {
  box-sizing: inherit;
}

body {
  margin: 0 auto;
  padding: 1rem;
  background-color: var(--bg);
  color: var(--dark);
  line-height: 1.6;
}

h1 {
  margin: 1.5rem auto;
  color: var(--dark);
}

h2,
h3 {
  margin: 1rem 0;
  color: var(--dark);
  text-align: center;
}


.container {
  margin-bottom: 1.5rem;
  padding: 1rem;
  border: 2px solid #cbd1e1;
  border-radius: 1px;
  background: white;
  box-shadow: 2px 4px 0px 0px var(--tertiary);
  text-align: center;
}

.canvas-container {
  position: relative;
  padding: 1rem;
  display: inline-block;
  width: calc(804px + 2rem);
  max-width: 100%;
}

.status {
  background-color: #eee;
  border-color: var(--primary);
}

#gameCanvas {
  display: block;
  background: linear-gradient(
    to bottom,
    SkyBlue 0%,
    SkyBlue 79%,
    SandyBrown 79%,
    SandyBrown 100%
  );
  cursor: pointer;
}

.game-ui {
  position: absolute;
  top: 15px;
  left: 15px;
  right: 15px;
  display: flex;
  justify-content: space-between;
  align-items: flex-start;
  pointer-events: none;
}

.score,
.game-status {
  padding: 0.3rem 1rem;
  border: 2px solid #cbd1e1;
  border-radius: 1px;
  background: white;
  box-shadow: 2px 4px 0px 0px rgba(0, 0, 0, 0.2);
  text-align: center;
  font-family: var(--font-serif);
  text-decoration: none;
}

.score {
  min-width: 120px;
  text-align: left;
}

.game-status {
  background: var(--primary);
  border-color: var(--primary-dark);
  border-radius: 4px;
  box-shadow: 2px 4px 0px 0px rgba(0, 0, 0, 0.2);
}

.control-grid {
  display: grid;
  justify-content: center;
  place-items: center;
  gap: 1rem;
  grid-template-columns: repeat(3, 100px);
  margin: 1rem auto;
}

kbd {
  background: #f0f0f0;
  border: 1px solid #ccc;
  border-radius: 4px;
  padding: 4px 8px;
  font-size: 12px;
  box-shadow: 0 1px 3px rgba(0, 0, 0, 0.1);
  width: max-content;
}

.click {
  padding: 3px 0px;
}


@media (max-width: 860px) {
  #gameCanvas {
    width: 100%;
    max-width: 800px;
    height: auto;
  }

  .canvas-container {
    width: 100%;
    box-sizing: border-box;
  }

  .control-grid {
    flex-direction: column;
    align-items: center;
  }
}

@media (max-width: 600px) {
  body {
    padding: 0;
  }
}
You can of course customize these styles and make the game your own.
Now its time for the fun part - adding the game logic with JavaScript!
The core of our game logic will live in public/js/game.js. This file will
handle rendering to the canvas, processing user input, and managing game state.
Let’s start by setting up the basic structure of our game engine. Open
public/js/game.js and add the following code:
console.log("Dinosaur Runner Game - Stage 2");

class DinoGame {
  constructor() {
    this.canvas = document.getElementById("gameCanvas");
    this.ctx = this.canvas.getContext("2d");
    this.scoreElement = document.getElementById("score");
    this.statusElement = document.getElementById("gameStatus");


    this.gameState = "waiting";
    this.score = 0;
    this.gameSpeed = 2;


    this.dino = {
      x: 50,
      y: 150,
      width: 40,
      height: 40,
      velocityY: 0,
      isJumping: false,
      groundY: 150,
    };


    this.gravity = 0.6;
    this.jumpStrength = -12;


    this.groundY = 180;

    this.init();
  }

  init() {
    this.setupEventListeners();
    this.gameLoop();
    this.updateStatus("Click to Start!");
  }
}
We’ve described a game which has a state, a score, a dino character with position and velocity, and some basic physics properties like gravity and jump strength. Changing the gravity will make the dino fall faster or slower, and changing the jump strength will affect how high it jumps. The ground is the y-coordinate where the dino stands when not jumping.
This skeleton wires up the canvas, tracks a single dino object, and immediately
calls init() so the rest of our hooks run once the class is instantiated. Make
sure public/index.html loads this script by ensuring the following line is
before the closing </body> tag:
<script type="module" src="/js/game.js"></script>
Now we can implement each method in small, testable chunks.
The ‘game loop’ is the heartbeat of the game. It loops once a frame to
continuously update the game state and render the scene. We’ll use
requestAnimationFrame
to create a smooth loop that loops in time with the browser’s refresh rate.
Frames are the individual images that make up the animation. The more frames per second (FPS), the smoother the animation appears. Most browsers aim for 60 FPS, which means the game loop will run approximately every 16.67 milliseconds.
We already called this.gameLoop() in the constructor, next we’ll implement all
of the mechanics to implement a functioning game loop.
We want both keyboard and mouse/touch controls, for multiple device support.
We’ll set up event listeners for keydown and click to handle these inputs.
Append these methods inside the DinoGame class:
setupEventListeners() {
  document.addEventListener("keydown", (e) => {
    if (e.code === "Space" || e.code === "ArrowUp") {
      e.preventDefault();
      this.handleJump();
    }
  });

  this.canvas.addEventListener("click", () => {
    this.handleJump();
  });
}

handleJump() {
  if (this.gameState === "waiting") {
    this.startGame();
  } else if (this.gameState === "playing" && !this.dino.isJumping) {
    this.jump();
  } else if (this.gameState === "gameOver") {
    this.resetGame();
  }
}
setupEventListeners() keeps things device-agnostic and prevents the space bar
from scrolling the page mid-game. handleJump() is our state gatekeeper: it
either starts the run, triggers a jump, or resets the game after a crash.
Next we need to implement the actual jump mechanics and basic physics. We’ll use simple gravity and velocity to simulate jumping and falling. Jumping will set an upward velocity, and gravity will pull the dino back down to the ground.
On game start, we reset the score to 0, update the UI to reflect that and we set
a game state to "playing".
On jump, we set an initial negative velocity (the jump strength) to propel the dino upwards and then mark it as jumping to prevent double jumps.
When jumping we also apply gravity to bring the dino back down, and check for ground collision to reset its position.
For every completed jump, we’ll increment the score slightly to reward survival time.
Add these methods below the previous ones, still inside the DinoGame class:
startGame() {
  this.gameState = "playing";
  this.score = 0;
  this.updateScore();
  this.updateStatus("");
  console.log("Game started!");
}

jump() {
  if (!this.dino.isJumping) {
    this.dino.velocityY = this.jumpStrength;
    this.dino.isJumping = true;
    console.log("Dino jumped!");
  }
}

updatePhysics() {
  if (this.gameState !== "playing") return;

  this.dino.velocityY += this.gravity;
  this.dino.y += this.dino.velocityY;

  if (this.dino.y >= this.dino.groundY) {
    this.dino.y = this.dino.groundY;
    this.dino.velocityY = 0;
    this.dino.isJumping = false;
  }

  this.score += 0.1;
  this.updateScore();
}
Gravity slowly increases velocityY, the ground check clamps the dinosaur back
to the floor, and the score ticks up a tiny amount every frame so longer
survival means higher points. Now we need to implement the rendering logic.
Next we handle drawing to the canvas, first we completely clear the canvas, then we paint the dino, and overlay instructions while waiting to start.
Game graphics are drawn to the canvas with the ctx (context) object we grabbed
right at the start. We clear the canvas each frame, draw the ground line, then
draw the dino at its current position.
The ‘dino’ that we are drawing is just a green rectangle with some extra details to give it two little legs and a face. This keeps things simple for now with a very basic leg animation, but you could easily swap this out for sprite images or more complex shapes later.
render() {
  this.ctx.clearRect(0, 0, this.canvas.width, this.canvas.height);

  this.drawDino();

  if (this.gameState === "waiting") {
    this.drawInstructions();
  }
}

drawDino() {
  const strideActive = this.gameState === "playing" && !this.dino.isJumping;
  const legStride = strideActive ? (Math.floor(this.frameCount / 8) % 2 === 0 ? 2 : -2) : 0;
  const legBaseY = this.dino.y + this.dino.height - 2;

  this.ctx.fillStyle = "green";
  this.ctx.fillRect(
    this.dino.x,
    this.dino.y,
    this.dino.width,
    this.dino.height,
  );

  this.ctx.fillStyle = "darkgreen";
  this.ctx.fillRect(this.dino.x + 25, this.dino.y + 8, 4, 4);
  this.ctx.fillRect(this.dino.x + 30, this.dino.y + 20, 8, 2);

  if (!this.dino.isJumping) {
    this.ctx.fillStyle = "green";
    this.ctx.fillRect(this.dino.x + 10, this.dino.y + 40, 6, 8);
    this.ctx.fillRect(this.dino.x + 24, this.dino.y + 40, 6, 8);
  }
}

drawInstructions() {
  this.ctx.fillStyle = "black";
  this.ctx.font = "24px Arial";
  this.ctx.textAlign = "center";
  this.ctx.fillText(
    "Press SPACE or ↑ to jump!",
    this.canvas.width / 2,
    this.canvas.height / 2 - 20,
  );

  this.ctx.font = "16px Arial";
  this.ctx.fillText(
    "Click anywhere to start",
    this.canvas.width / 2,
    this.canvas.height / 2 + 10,
  );
}
Because we render every animation frame, keeping drawDino() small makes tweaks
easy. In future we could add new colors, simple animations or sprites.
When the game state changes we update the DOM elements to reflect those changes,
for example game reset and score updates. Add the following methods inside the
DinoGame class:
updateScore() {
  this.scoreElement.textContent = Math.floor(this.score);
}

updateStatus(message) {
  this.statusElement.textContent = message;
  this.statusElement.style.display = message ? "block" : "none";
}

resetGame() {
  this.gameState = "waiting";
  this.score = 0;
  this.dino.y = this.dino.groundY;
  this.dino.velocityY = 0;
  this.dino.isJumping = false;
  this.updateScore();
  this.updateStatus("Click to Start!");
  console.log("Game reset!");
}
resetGame() will get called after a collision (we’ll add obstacles in the next
stage) so the player can immediately start again without refreshing.
Finally we wire up the game loop plus a quick API call that proves the server route we built in Stage 1 still works:
gameLoop() {
  this.updatePhysics();
  this.render();
  requestAnimationFrame(() => this.gameLoop());
}
requestAnimationFrame keeps our update/draw cycle locked to the browser’s
refresh rate, and the load handler ensures the DOM is fully ready before
querying elements.
At the very bottom of public/js/game.js, outside the DinoGame class, add the
following lines to create a new instance of the game. We’ll also add a quick
health check to the server API we built in Stage 1:
async function checkHealth() {
  try {
    const response = await fetch("/api/health");
    const data = await response.json();
    console.log("Server health check:", data);
  } catch (error) {
    console.error("Health check failed:", error);
  }
}

window.addEventListener("load", () => {
  checkHealth();
  new DinoGame();
  console.log("Stage 2 complete: Canvas game with controls ready!");
});
When we run deno task dev and point our browser to localhost:8001, we can
see our game!
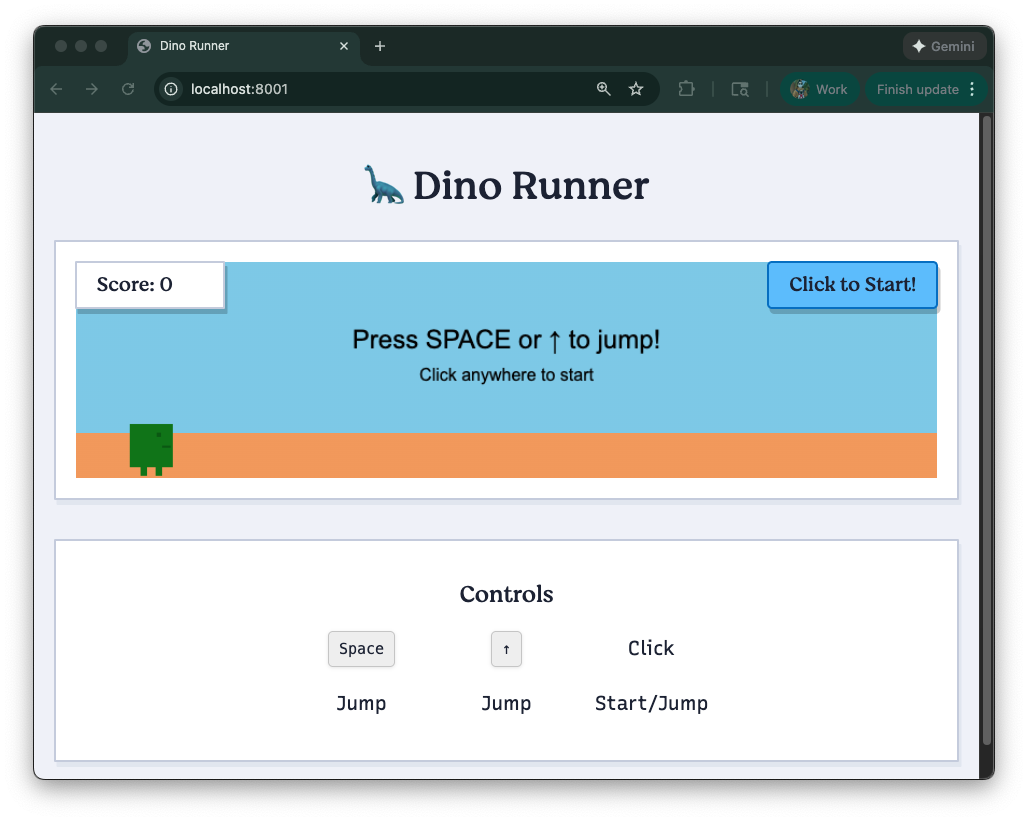
You can also play it right now, but there are zero obstacles (yet).
Now that we have a basic game loop, jumping dino, and score tracking, it’s time to deploy our updated game to the web! In your terminal you can run the deploy command again:
This will push your changes to Deno Deploy and give you a live URL where you can see your game in action.
At this point the dino can jump, land, and accrue points. In the next stage we’ll add obstacles and collision detection to create a proper game!
What are you building with Deno? Let us know on Twitter, Bluesky, or Discord.
此内容由惯性聚合(RSS阅读器)自动聚合整理,仅供阅读参考。 原文来自 — 版权归原作者所有。