2023年05月06日
集成Elog,重新启用COS…
2023-03-30
再次更新部署到虚拟机上,弃用COS。
2022-08-07
再一次开始折腾hexo了,为了省下高昂的服务器费用,为了利用上永久的虚拟主机。 只不过可惜的是虚拟主机不能支持 https,所以无奈使用了COS。 还有一点就是用markdown写文章感觉确实不错,再加上github action加持,hexo用起来感觉也是相当不错的. 而且服务器的话WordPress还要考虑一堆的性能优化问题,静态博客就完全不用担心了。 下面简单记录下hexo的部署配置问题。
Hexo 配置
固定 ID
固定 ID 推荐使用hexo-abbrlink2
- Add plugin to Hexo:
shell
npm install hexo-abbrlink2 --save- Modify permalink in
config.ymlfile:
yaml
permalink: posts/:abbrlink/- optional settings:
yaml
abbrlink:
  start: 1000 # the first id, default 0
资源目录
yaml
# Directory
source_dir: source在引用图片时通过路径/images/image.jpg,引入图片资源
Next 配置
创建标签云
默认无标签页,打开链接会404 创建标签页:
markdown
---
date: 2021-08-04 13:22:27
type: "tags"
---
创建分类页
默认无分类页,打开链接会404 创建分类页:
shell
hexo new page categoriesmarkdown
---
date: 2021-08-04 13:22:33
type: "categories"
---
自定义样式
hexo根目录下的source新增一个_data目录,在该目录下新建styles.styl,这个文件将存放我们自定义的样式,然后在_config.next.yml文件中custom_file_path选项里面将style那一行取消注释。
yaml
custom_file_path:
    #head: source/_data/head.njk
    #header: source/_data/header.njk
    #sidebar: source/_data/sidebar.njk
    #postMeta: source/_data/post-meta.njk
    #postBodyEnd: source/_data/post-body-end.njk
    #footer: source/_data/footer.njk
    #bodyEnd: source/_data/body-end.njk
    #variable: source/_data/variables.styl
    #mixin: source/_data/mixins.styl
    style: source/_data/styles.styl
添加备案号
yaml
footer:
    # Beian ICP and gongan information for Chinese users. See: https://beian.miit.gov.cn, http://www.beian.gov.cn
    beian:
        enable: true
        icp: xxxxxx
自动化部署
COS
- Installation
yaml
npm install hexo-deployer-cos --save- Options You can configure in _config.yml as follows:
yaml
deploy:
  type: cos
  secretId: yourSecretId
  secretKey: yourSecretKey
  bucket: yourBucket
  region: yourRegion
For projects that use pipelines, you may not want to expose COS properties in the project file, so we support getting them through environment variables.
yaml
COS_SECRET_ID=yourSecretId
COS_SECRET_KEY=yourSecretKey
COS_BUCKET=yourBucket
COS_REGION=yourRegion
Environment variables have lower priority than _config.xml configuration
FTPSync
- Install hexo-deployer-ftpsync.
shell
npm install hexo-deployer-ftpsync --save- Edit settings.
yaml
deploy:
  type: ftpsync
  host: <host>
  user: <user>
  pass: <password>
  remote: [remote]
  port: [port]
  ignore: [ignore]
  connections: [connections]
  verbose: [true|false]
文章更新时间设置:
updated_option
updated_option控制了当Front Matter中没有指定updated时,updated如何取值:
mtime: 使用文件的最后修改时间。这是从Hexo 3.0.0开始的默认行为。
date: 使用date作为updated的值。可被用于Git工作流之中,因为使用Git管理站点时,文件的最后修改日期常常会发生改变
empty: 直接删除updated。使用这一选项可能会导致大部分主题和插件无法正常工作。use_date_for_updated选项已经被废弃,将会在下个重大版本发布时去除。请改为使用updated_option: ‘date’。
CDN 缓存刷新
方案一
该方案参考自:https://segmentfault.com/a/1190000039707833
但这个方案存在一个问题,由于我们的静态网站有默认索引页面
index.html,而官方提供的这个函数只会刷新对应的文件的URL,而不会刷新索引URL,例如http://www.bytelife.net/index.html这个文件,通常我们的请求是http://www.bytelife.net/,因此官方的方案针对于静态网站来说不算完美。优化方案 可以通过简单修改官方的函数来解决这个问题,点击刚刚创建的
CDN缓存刷新函数列表中的函数名称,将index.js文件内容替换为下面的代码,最后点击右上角的“部署”按钮即可:

javascript
/* eslint-disable no-param-reassign */
'use strict';
const TimeoutWatcher = require('./common/TimeoutWatcher');
const CosCdnRefreshTask = require('./common/CosCdnRefreshTask');
const { getParams, logger, getLogSummary } = require('./common/utils');
exports.main_handler = async (event, context) => {
  /**
   * set a timer to terminate the cdn refresh task, ensure log message is printed
   */
  let runningTask;
  const watcher = new TimeoutWatcher({
    timeLimit: context.time_limit_in_ms,
    trigger(error) {
      if (runningTask && runningTask.cancelTask) {
        runningTask.cancelTask(error);
      }
    },
    error: new Error('task is timeout'),
  });
  logger({
    title: 'param as follow: ',
    data: { event },
  });
  /**
   * parse param from event and process.env
   */
  const { secretId, secretKey, token, objects, triggerType, cdnHosts } = getParams(event);
  logger({ title: 'param is parsed success', });
  const taskResults = [];
  const task = new CosCdnRefreshTask({
    secretId, secretKey, token, objects, triggerType, cdnHosts,
  });
  if (watcher.isTimeout()) {
    // if current is timeout, trigger the cancel task in next tick
    process.nextTick(() => task.cancelTask(watcher.error));
  } else {
    runningTask = task;
  }
  const results = await task.runTask();
  results.forEach((item) => {
    taskResults.push(item);
    // 如果以 /index.html 结尾,则增加目录首页/
    // 例如 https://www.xxxx.com/index.html, 则增加 https://www.xxxx.com/
    if (item.params.urls[0].lastIndexOf('/index.html') == item.params.urls[0].length - 11) {
      taskResults.push(item.substr(0, item.length - 10));
    }
  });
  watcher.clear();
  logger({
    title: 'cos cdn refresh full logs:',
    data: taskResults,
  });
  const { status, messages } = getLogSummary({
    name: 'cos cdn refresh',
    results: taskResults,
  });
  logger({
    messages: messages.map((item) => item.replace(/, /g, '\n')),
  });
  context.callbackWaitsForEmptyEventLoop = false;
  if (status === 'fail') {
    throw messages.join('; ');
  } else {
    return messages.join('; ');
  }
};
方案二
该方案参考自:https://blog.xm.mk/posts/fc83/#%E7%BC%93%E5%AD%98%E5%88%B7%E6%96%B0%E8%84%9A%E6%9C%AC
使用腾讯云的
Python-SDK实现,写一个Python脚本,在部署完成后执行脚本调用API完成缓存刷新。在仓库根目录下创建文件
flush-dns.py,文件内容如下,将其中的https://blog.example.com/修改为你的CDN加速域名。
python
import json
import argparse
from tencentcloud.common import credential
from tencentcloud.common.profile.client_profile import ClientProfile
from tencentcloud.common.profile.http_profile import HttpProfile
from tencentcloud.common.exception.tencent_cloud_sdk_exception import (
    TencentCloudSDKException,
)
from tencentcloud.cdn.v20180606 import cdn_client, models

# 传入参数
parser = argparse.ArgumentParser(description='-i <secretId> -k <secretKey>')
parser.add_argument('-i', '--secretid', type=str, required=True, help='secretId')
parser.add_argument('-k', '--secretkey', type=str, required=True, help='secretKey')
args = parser.parse_args()

try:
    cred = credential.Credential(args.secretid,args.secretkey)
    httpProfile = HttpProfile()
    httpProfile.endpoint = "cdn.tencentcloudapi.com"

    clientProfile = ClientProfile()
    clientProfile.httpProfile = httpProfile
    client = cdn_client.CdnClient(cred, "", clientProfile)

    req = models.PurgePathCacheRequest()
    params = {"Paths": ["https://blog.example.com/"], "FlushType": "flush"}
    req.from_json_string(json.dumps(params))

    resp = client.PurgePathCache(req)
    print(resp.to_json_string())

except TencentCloudSDKException as err:
    print(err)
创建完脚本后,需要在工作流中调用,配置如下:
yaml
- name: Flush CDN
  env:
    SECRET_ID: ${{ secrets.SecretId }}      # 传入鉴权信息
    SECRET_KEY: ${{ secrets.SecretKey }}
  run: |                                    # 安装 sdk 并运行刷新脚本
    pip install --upgrade tencentcloud-sdk-python
    python flush-dns.py -i $SECRET_ID -k $SECRET_KEY
COS 配置
重定向规则
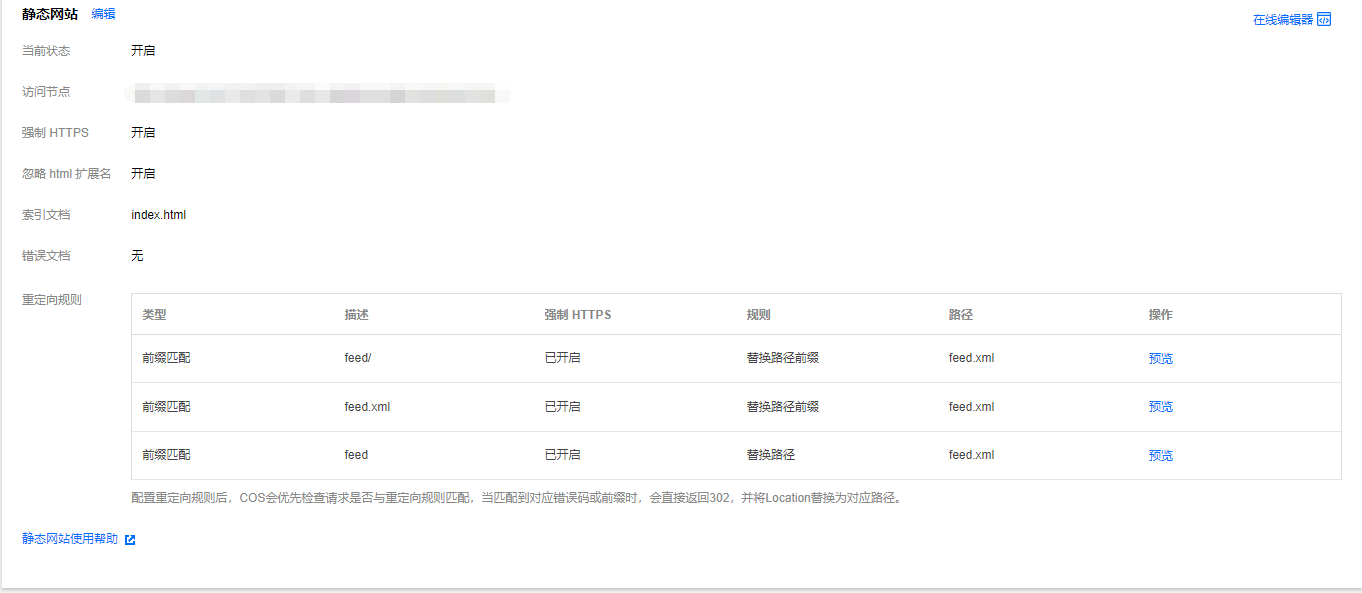
由于当时用WordPress时提供的rss订阅地址为/feed/,现在的订阅地址/feed.xml,为了兼容WordPress时订阅地址,需要做重定向规则配置:
-
选择要设置的存储桶 - 基础配置 - 静态网站 - 编辑 - 重定向规则 - 新增规则,参考如下图配置:
-
内容分发网络
CDN配置- 回源配置
- 回源跟随
301/302配置 - 配置状态 -
开启
-
配置完毕后,即可正常访问
/feed/订阅地址