惯性聚合 高效追踪和阅读你感兴趣的博客、新闻、科技资讯
阅读原文 在惯性聚合中打开

推荐订阅源

P
Proofpoint News Feed
Martin Fowler
Martin Fowler
freeCodeCamp Programming Tutorials: Python, JavaScript, Git & More
让小产品的独立变现更简单 - ezindie.com
C
Cisco Blogs
Last Week in AI
Last Week in AI
T
The Blog of Author Tim Ferriss
The GitHub Blog
The GitHub Blog
T
Tenable Blog
A
Arctic Wolf
小众软件
小众软件
Google DeepMind News
aimingoo的专栏
aimingoo的专栏
PCI Perspectives
PCI Perspectives
博客园 - 司徒正美
The Last Watchdog
The Last Watchdog
H
Hacker News: Front Page
Application and Cybersecurity Blog
Stack Overflow Blog
Stack Overflow Blog
N
News and Events Feed by Topic
Security Archives - TechRepublic
博客园 - 【当耐特】
S
Security @ Cisco Blogs
P
Proofpoint News Feed
Cloudbric
Cloudbric
H
Hackread – Cybersecurity News, Data Breaches, AI and More
Jina AI
Jina AI
Exploit-DB.com RSS Feed
月光博客
月光博客
Schneier on Security
Hacker News: Ask HN
Hacker News: Ask HN
V
Visual Studio Blog
D
DataBreaches.Net
H
Help Net Security
www.infosecurity-magazine.com
Project Zero
Project Zero
阮一峰的网络日志
阮一峰的网络日志
Cyberwarzone
Cyberwarzone
博客园 - Franky
Y
Y Combinator Blog
Spread Privacy
Spread Privacy
N
News and Events Feed by Topic
The Cloudflare Blog
Simon Willison's Weblog
S
SegmentFault 最新的问题
W
WeLiveSecurity
Cyber Security Advisories - MS-ISAC
I
Intezer
Hugging Face - Blog
Hugging Face - Blog
Attack and Defense Labs

郑泽鑫的博客

使用 Github Actions 自动更新 ANNOVAR 的 Clinvar 数据库 2020 年终总结 - 郑泽鑫的博客 解包一个 PAR 打包的 perl 程序源码 阿里云PBS作业排队管理 - 郑泽鑫的博客 VPS装机记录(2):使用mosh - 郑泽鑫的博客 2019 年终总结 - 郑泽鑫的博客 VPS装机记录(1):SSH篇 - 郑泽鑫的博客 Typecho博客被刷垃圾评论 - 郑泽鑫的博客 记录 VEP 关于 COSMIC 注释的一个坑 记录一次 Name.com 自动续费成功退款的经过 - 郑泽鑫的博客 静态编译 Tmux - 郑泽鑫的博客 基因组、cDNA、氨基酸坐标转换神器:Transvar - 郑泽鑫的博客 macOS Case Sensitive to Case Insensitive(使用 Carbon Copy Cloner) 2018 年终总结 - 郑泽鑫的博客 ANNOVAR (3): 更新 COSMIC 数据库 (v70+) ANNOVAR (2): 关于注释数据库 - 郑泽鑫的博客 PyInstaller 打包 python 脚本的一些心得 - 郑泽鑫的博客 今天是万圣节 - 郑泽鑫的博客 用 youtube-dl 下载油管视频 - 郑泽鑫的博客 伊恩结 - 郑泽鑫的博客 annovar 注释软件 - 郑泽鑫的博客 Pileup Format 学习笔记 - 郑泽鑫的博客 SAM 文件学习笔记 - 郑泽鑫的博客 Github 万圣节彩蛋 - 郑泽鑫的博客
VPS装机记录(3):任务机器人 - 郑泽鑫的博客
with / · 2020-06-27 · via 郑泽鑫的博客

VPS基本设置好后,开始想在上面放一些自动化的东西,那么我们就需要一个机器人,设想的目的是,我们在常用的社交软件发送一条命令或者设置好的指令,机器人就会在VPS上自动执行,并返回结果。

这种机器人,最好的示例可以参考湾区日报是如何运作的?湾区日报的第一个 “员工”:Slack/Hubot

但是我们暂时实现不了定制化那么高的任务机器人,刚好我在telegram上看到有一个机器人,也比较简单,那么我们就用它来搭建在telegram上的机器人。效果参考下图:
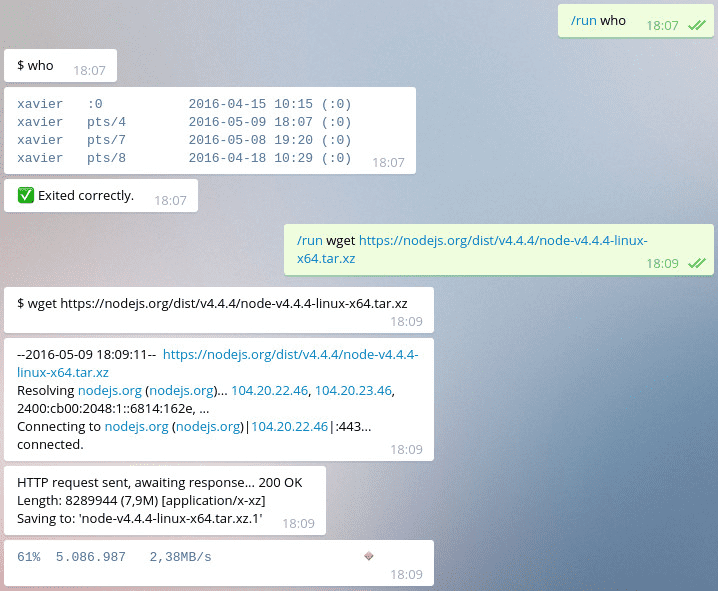
image.png
image.png
 
image.png
image.png

搭建shell-bot机器人

该机器人的repo在botgram/shell-bot,参照作者给的安装流程

创建机器人帐号

点击此链接与Telegram的BotFather聊天,发送 /newbot 指令,然后依照提示给机器人帐号起名字和账号名,然后获得一串HTTP API的token,如:

Use this token to access the HTTP API:
123456:ABC-DEF1234ghIkl-zyx57W2v1u123ew11
Keep your token secure and store it safely, it can be used by anyone to control your bot.

安装依赖项

首先,shell-bot是依赖Node.js的,因此先确定你的VPS上安装好了Node.js,使用 npm -v,确认是否已经安装。

然后,如果你是Ubuntu的系统:

sudo apt-get install build-essential git

如果你跟我一样,是CentOS的系统:

sudo yum install make automake gcc gcc-c++ kernel-devel git

安装并运行shell-bot

clone shell-bot的repo,并使用npm安装依赖的包

git clone https://github.com/botgram/shell-bot.git
cd shell-bot
npm install

然后首次运行shell-bot,它会要求你提供token,并且在Telegram的BotFather帐号,会要求你确认是否是你在连接该机器人,最后生成设置文件

node server

当shell-bot运行起来后,在你的telegram,对话你设置好的机器人,如 /help 或者需要执行的命令前加 /run,如 /run uname -a

持久化运行shell-bot

然后我们安装 forever 来持久化运行shell-bot,使用 -g 来全局安装

sudo npm install -g forever

然后在你的 /etc/rc.local 或者开机执行文件里,加入调用的命令,如:

forever start /path/to/shell-bot/server.js

至此,我们的任务机器人就搭建好了,当需要执行某些任务的时候,我们就打开telegram,然后 /run 命令,机器人就会自动帮我们在VPS上执行命令,如果是运行较久的命令,我们则静静等待机器人返回执行结果就好了。该机器人支持的命令,可以使用/help命令,或者在该文件中查看到。

下一篇文章,我会介绍一些服务器监控的APP。


npm install一直报错的解决方法

可能是由于你的Node.js版本太久导致,因此更新Node.js到最新版本,如果你跟我一样是CentOS,需要先更新内核(注意更新内核该操作比较危险,请查清楚后再做,特别是更新后开机项要设置好,不然可能无法开机),然后更新Node.js版本。

更新内核

载入公钥

 rpm --import https://www.elrepo.org/RPM-GPG-KEY-elrepo.org

安装ELrepo

yum install https://www.elrepo.org/elrepo-release-7.el7.elrepo.noarch.rpm # CentOS 7,其他版本不一样

载入 elrepo-kernel 元数据

 yum --disablerepo=\* --enablerepo=elrepo-kernel repolist

更新内核

 yum --disablerepo=\* --enablerepo=elrepo-kernel install  kernel-ml.x86_64  -y

删除旧工具包

yum remove kernel-tools-libs.x86_64 kernel-tools.x86_64  -y

安装新版本工具包

yum --disablerepo=\* --enablerepo=elrepo-kernel install kernel-ml-tools kernel-ml-devel kernel-ml-headers -y

查看内核插入顺序

默认新内核是从头插入,默认启动顺序也是从 0 开始。

grep "^menuentry" /boot/grub2/grub.cfg | cut -d "'" -f2

CentOS Linux (3.10.0-1127.10.1.el7.x86_64) 7 (Core)
CentOS Linux (5.7.2-1.el7.elrepo.x86_64) 7 (Core)
CentOS Linux (0-rescue-96820b9851c24560b5f942f2496b9aeb) 7 (Core)

查看当前实际启动顺序

grub2-editenv list

saved_entry=CentOS Linux (3.10.0-1127.10.1.el7.x86_64) 7 (Core)

设置默认启动

grub2-set-default 'CentOS Linux (5.7.2-1.el7.elrepo.x86_64) 7 (Core)'

重启并检查

reboot
uname -r

更新Node.js

yum remove nodejs npm -y
yum install -y nodejs

Reference