近期在使用2.5G速率的USB有线网卡的时候遇到诸多问题,特整理驱动安装过程如下。
市面上常见的2.5G USB网卡通常使用RTL8156或RTL8156B芯片(例如绿联、比亚兹的2.5G有线网卡USB-A/TypeC采用的便是此芯片)。
如果在爱快或ESXI安装2.5G网卡驱动或安装的是无线网卡,请阅读相关文章:《ESXI+爱快+OpenWRT 使用2.5G USB网卡 RTL8156》、《ESXi 安装USB网卡驱动》、《Linux安装无线网卡驱动通用方法》。
下面以OMV(OpenMediaVault)安装RTL8156/8156B芯片的2.5G USB网卡为例,即Debian平台(Ubuntu或Kali等发行版安装方法一致)。注意,OMV需要先升级到OMV6《OMV5 升级 OMV6》。
Linux内核版本最好升级到5.15+。
到官网下载最新的2.5G USB网卡驱动。
Debian/Ubuntu/Kali:
sudo apt-get install linux-headers-$(uname -r) make build-essential dkms
RedHot/CentOS/Fedora:
sudo yum install linux-headers-$(uname -r) mak dkms
将文件scp到服务器。
tar -jxvf r8152.53.56-2.15.0.tar.bz2
cd r8152-2.15.0
make
make install
安装完成后,根据不同操作系统执行对应命令。
RedHot/CentOS/Fedora:
dracut -f
Debian/Ubuntu/Kali:
sudo depmod -a
sudo update-initramfs -u
以上操作相当于实现开机加载mod驱动。可通过下述命令检查是否写入到加载文件(看输出是否存在r8152相关内容):
cd /lib/modules/`uname -r`/
cat modules.dep|grep r8152
然后重新启动,查看内核模块加载情况:
lsmod |grep r8152
最后插入2.5G USB有线网卡。
通过lsusb可以看到加载的网卡芯片型号相关信息:
ID 0bda:8156 Realtek Semiconductor Corp.
查看驱动加载情况:
dmesg
可以看到驱动被加载:[ 6.870920] r8152: loading out-of-tree module taints kernel.。
USB相关部分可以看到:
[    4.910957] usb 2-1: new SuperSpeed Gen 1 USB device number 2 using xhci_hcd
[    4.931399] usb 2-1: New USB device found, idVendor=0bda, idProduct=8156, bcdDevice=30.00
[    4.931407] usb 2-1: New USB device strings: Mfr=1, Product=2, SerialNumber=6
[    4.931412] usb 2-1: Product: USB 10/100/1G/2.5G LAN
[    4.931416] usb 2-1: Manufacturer: Realtek
[    4.931420] usb 2-1: SerialNumber: 000000001

...

[    7.347433] r8152 2-1:1.0 eth0: v2.15.0 (2021/04/15)
[    7.347437] r8152 2-1:1.0 eth0: This product is covered by one or more of the following patents:
                       US6,570,884, US6,115,776, and US6,327,625.

[    7.374753] r8152 2-1:1.0 enx2c16dba13d39: renamed from eth0
说明网卡被正常识别,网卡名称为:enx2c16dba13d39,此时通过ifconfig -a可以看到该网卡的信息。
通过ethtool enx2c16dba13d39可以查看该网卡协商速率:
Settings for enx2c16dba13d39:
    Supported ports: [ MII ]
    Supported link modes:   10baseT/Half 10baseT/Full
                            100baseT/Half 100baseT/Full
                            1000baseT/Full
                            2500baseT/Full
    Supported pause frame use: No
    Supports auto-negotiation: Yes
    Supported FEC modes: Not reported
    Advertised link modes:  10baseT/Half 10baseT/Full
                            100baseT/Half 100baseT/Full
                            1000baseT/Full
                            2500baseT/Full
    Advertised pause frame use: Symmetric Receive-only
    Advertised auto-negotiation: Yes
    Advertised FEC modes: Not reported
    Link partner advertised link modes:  10baseT/Half 10baseT/Full
                                         100baseT/Half 100baseT/Full
                                         1000baseT/Full
                                         2500baseT/Full
    Link partner advertised pause frame use: No
    Link partner advertised auto-negotiation: Yes
    Link partner advertised FEC modes: Not reported
    Speed: 2500Mb/s
    Duplex: Full
    Port: MII
    PHYAD: 32
    Transceiver: internal
    Auto-negotiation: on
    Supports Wake-on: pumbg
    Wake-on: g
    Current message level: 0x00007fff (32767)
                   drv probe link timer ifdown ifup rx_err tx_err tx_queued intr tx_done rx_status pktdata hw wol
    Link detected: yes
可以看到正常运行在2500Mb/s。如果此处Speed显示1000Mb/s,可以通过下述命令开启2.5G速率:
# 2.5G before kernel v4.10
ethtool -s eth0 autoneg on advertise 0x802f

# 2.5G for kernel v4.10 and later
ethtool -s eth0 autoneg on advertise 0x80000000002f
正常情况下,只要驱动加载正常应该就已经是2.5G速率,如果还是1G速率需要强行开启的情况,很有可能是由于网卡插在了USB2.0口或者速率被降级为USB2.0。
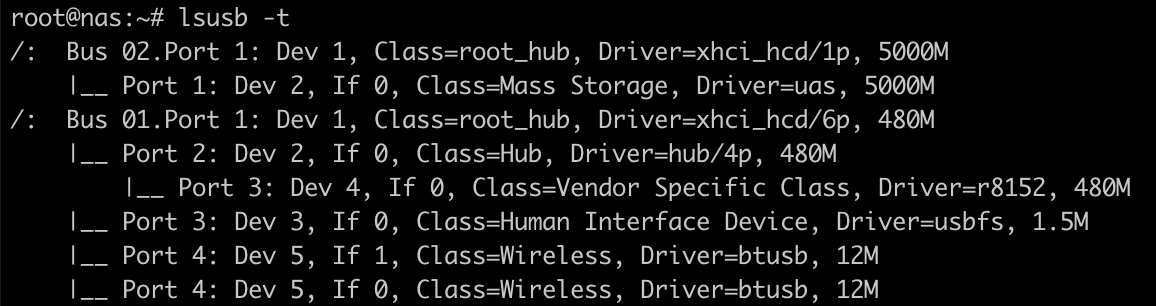
可以通过lsusb -t查看当前网卡的USB接口速率,确保USB接口运行在5000M速率(即USB 3.0 5Gbps)。
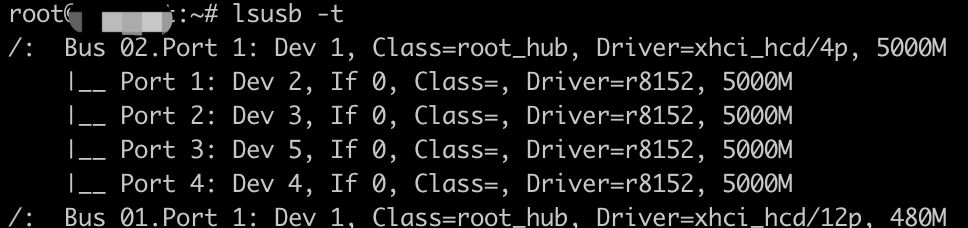
检查USB接口和网卡协商到的速率都正常,说明驱动安装完成。
注意,非专业用户,请不要在一个USB端口插入多个同型号USB网卡,否则会导致环回异常,网络在大流量的情况下产生断流。
在对端启动iperf3服务器端:
iperf3 -s -i 1 -p 5201
如果目标设备中有其它网卡,先关闭该网卡ifconfig eth0 down,然后使用以下命令测试传输速度。
iperf3 -c 服务器端IP -p 5201
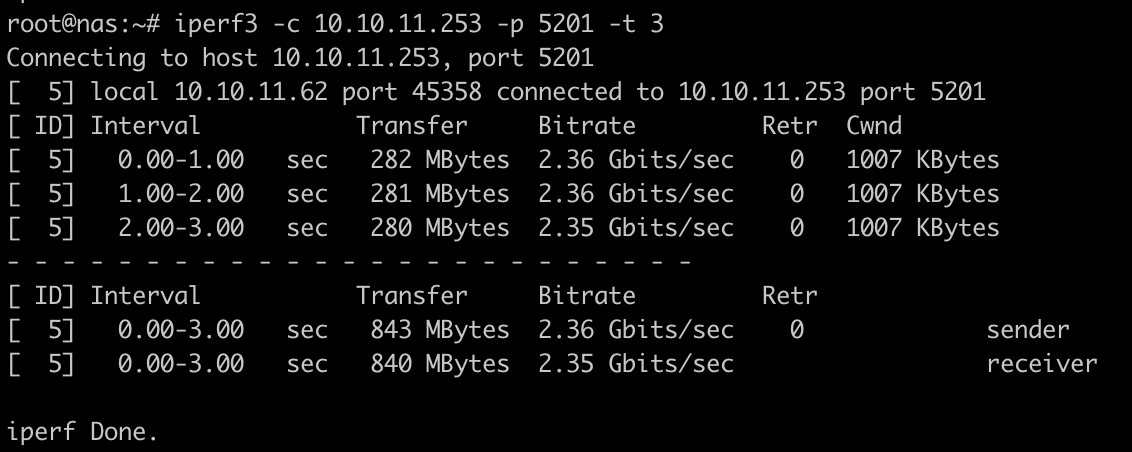
如果网卡工作一切正常,应该能跑到2.35Gbits/sec左右。
此内容由惯性聚合(RSS阅读器)自动聚合整理,仅供阅读参考。 原文来自 — 版权归原作者所有。