
惯性聚合 高效追踪和阅读你感兴趣的博客、新闻、科技资讯
阅读原文 在惯性聚合中打开

推荐订阅源

Threat Intelligence Blog | Flashpoint
The GitHub Blog
The GitHub Blog
B
Blog
小众软件
小众软件
Jina AI
Jina AI
WordPress大学
WordPress大学
V
V2EX
MongoDB | Blog
MongoDB | Blog
Blog — PlanetScale
Blog — PlanetScale
P
Proofpoint News Feed
Y
Y Combinator Blog
cs.AI updates on arXiv.org
人人都是产品经理
人人都是产品经理
Microsoft Azure Blog
aimingoo的专栏
aimingoo的专栏
C
CERT Recently Published Vulnerability Notes
C
Cisco Blogs
Project Zero
Project Zero
云风的 BLOG
云风的 BLOG
K
Kaspersky official blog
Google DeepMind News
宝玉的分享
宝玉的分享
T
Threat Research - Cisco Blogs
S
Securelist
V
Vulnerabilities – Threatpost
雷峰网
雷峰网
F
Fortinet All Blogs
D
DataBreaches.Net
I
Intezer
D
Docker
The Hacker News
The Hacker News
The Last Watchdog
The Last Watchdog
SecWiki News
SecWiki News
MyScale Blog
MyScale Blog
腾讯CDC
博客园_首页
Martin Fowler
Martin Fowler
cs.CV updates on arXiv.org
Application and Cybersecurity Blog
H
Help Net Security
GbyAI
GbyAI
奇客Solidot–传递最新科技情报
奇客Solidot–传递最新科技情报
L
Lohrmann on Cybersecurity
I
InfoQ
H
Hacker News: Front Page
T
Threatpost
Stack Overflow Blog
Stack Overflow Blog
博客园 - 叶小钗
T
Troy Hunt's Blog
Microsoft Security Blog

个人博客

leetcode经典动态规划解题报告 Netty启动原理 web安全基础知识一 SpringBoot自动配置原理 跟踪SpringMVC请求过程 Netty之ChannelHandler 负载均衡的实现方式与算法 Netty线程模型 段页式内存管理 fork()与写时复制 fork()与写时复制 Linux内核设计与实现读书笔记一 Dubbo小知识点总结 MyBatis的使用回顾 Dubbo集群容错 Dubbo服务调用过程 InnoDB的锁 SpringBoot启动原理 Maven和Git命令的一些总结 高可用Redis:Redis Cluster
Netty之ByteBuf
zofun · 2020-05-17 · via 个人博客

文章导航

简介

ByteBuf是Netty的数据容器,它解决了JDK API的局限性,能为网络应用程序的开发者提供更好的API支持。
ByteBufAPI的优点如下:

  • 它可以被用户自定义的缓冲区类型拓展
  • 通过内置的复合缓冲区类型实现了透明的零拷贝。
  • 容量可以按需增长
  • 在读和写这两种模式下切换不需要调用BuyteBufferflip()方法
  • 读和写使用了不同的索引
  • 方式支持链式调用
  • 支持引用计数
  • 支持池化

工作原理

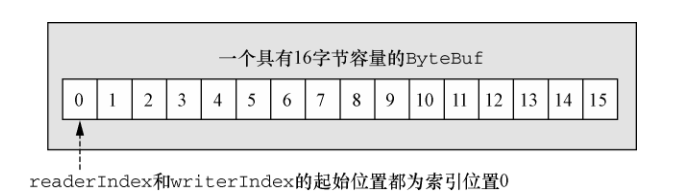
ByteBuf内部维护了两个不同的索引,一个用于读取,一个用于写入。
Y2JhY8.png

使用模式

堆缓冲区

最常见的ByteBuf模式,是将数据存储到JVM的堆空间中。这种模式被称为支持数组。它能够在没有使用池化的情况下,提供较为快速的分配和释放。

1
2
3
4
5
6
7
8
ByteBuf heapBuf = ...;
//检查是否是数组支撑
if (heapBuf.hasArray()) {
byte[] array = heapBuf.array();
int offset = heapBuf.arrayOffset() + heapBuf.readerIndex();
int length = heapBuf.readableBytes();
handleArray(array, offset, length);
}

直接缓冲区

直接缓冲区是指内存空间是通过本地调用分配而来的。因此直接缓冲区的内容将驻留在堆外。
通过使用直接缓冲区,避免了依次将JVM堆中的缓冲区复制到直接缓冲区的国产,因此效率更高。但是直接缓冲区的创建和释放的成本比较高。

1
2
3
4
5
6
7
8
9
ByteBuf directBuf = ...;
if (!directBuf.hasArray()) {
//如果不是数组支撑,那么就是一个直接缓冲区
int length = directBuf.readableBytes();
byte[] array = new byte[length];
//从直接缓冲区中读取数据到array中
directBuf.getBytes(directBuf.readerIndex(), array);
handleArray(array, 0, length);
}

复合缓冲区

复合缓冲区可以为多个ByteBuf提供一个聚合视图。我们可以根据需要添加或删除ByteBuf实例。Netty通过ByteBuf的一个子类CompositeByteBuf来实现复合缓冲区。

1
2
3
4
5
6
7
8
9
10
11
public static void byteBufComposite() {
// 复合缓冲区,只是提供一个视图
CompositeByteBuf messageBuf = Unpooled.compositeBuffer();
ByteBuf headerBuf = Unpooled.buffer(); // can be backing or direct
ByteBuf bodyBuf = Unpooled.directBuffer(); // can be backing or direct
messageBuf.addComponents(headerBuf, bodyBuf);
messageBuf.removeComponent(0); // remove the header
for (ByteBuf buf : messageBuf) {
System.out.println(buf.toString());
}
}

字节级操作

随机访问索引

和普通的Java数组一样,ByteBuf的索引也是从零开始的。

1
2
3
4
5
ByteBuf buffer = ...;
for (int i = 0; i < buffer.capacity(); i++) {
byte b = buffer.getByte(i);
System.out.println((char)b);
}

顺序访问索引

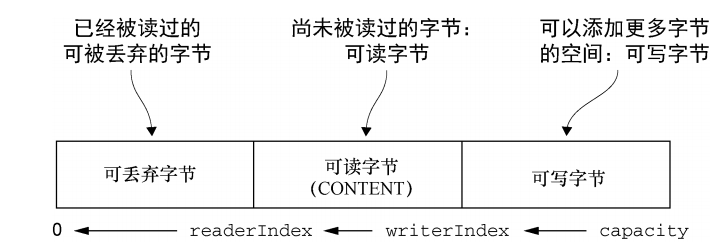
ByteBuf同时具有读索引和写索引,因此两个索引把ByteBuf分为了三个部分。分贝是可丢弃字节区,可读字节区,可写字节区。
Y2yPnf.png

查找操作

查找ByteBuf指定的指。可以利用indexOf()来直接查询,也可以利用ByteProcessor作为参数来查找某个指定的值。

1
2
3
4
5
6
7
public static void byteProcessor() {
ByteBuf buffer = Unpooled.buffer(); //get reference form somewhere
// 使用indexOf()方法来查找
buffer.indexOf(buffer.readerIndex(), buffer.writerIndex(), (byte)8);
// 使用ByteProcessor查找给定的值
int index = buffer.forEachByte(ByteProcessor.FIND_CR);
}

派生缓冲区

派生缓冲区为ByteBuf提供了以专门的方式来呈现其内容的视图,这类视图是通过以下方法被创建的:

1
2
3
4
5
6
duplicate();
slice();
slice(int,int);
Upooled.ummodifiableBuffer(...);
order(ByteOrder);
readSlice(int);

ByteBufHolder接口

ByteBufHolderByteBuf的容器,可以通过子类实现ByteBufHolder接口,根据自身需要添加自己需要的数据字段。可以用于自定义缓冲区类型扩展字段。
ByteBufHolder接口提供了几种用于访问底层数据和引用计数的方法。

1
2
3
content();//返回持有的所有的ByteBuf
copy();//返回一个深拷贝
duplicate();//返回一个浅拷贝

ByteBuf分配

按需分配ByteBufAllocator接口

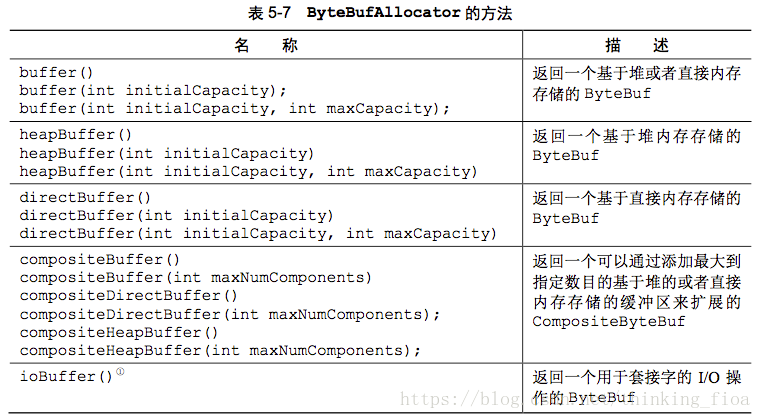
为了降低分配和释放内存的开销,Netty通过ByteBufAllocator实现ByteBuf池化。
Y22ixs.png
如何获取ByteBufAllocator实例:

1
2
3
4
5
6
7
Channel channel = ...;
//从Channel中获取
ByteBufAllocator allocator = channel.alloc();

//从ChannelHandlerContext中获取
ChannelHandlerContext ctx = ...;
ByteBufAllocator allocator2 = ctx.alloc();

Unpooled缓冲区

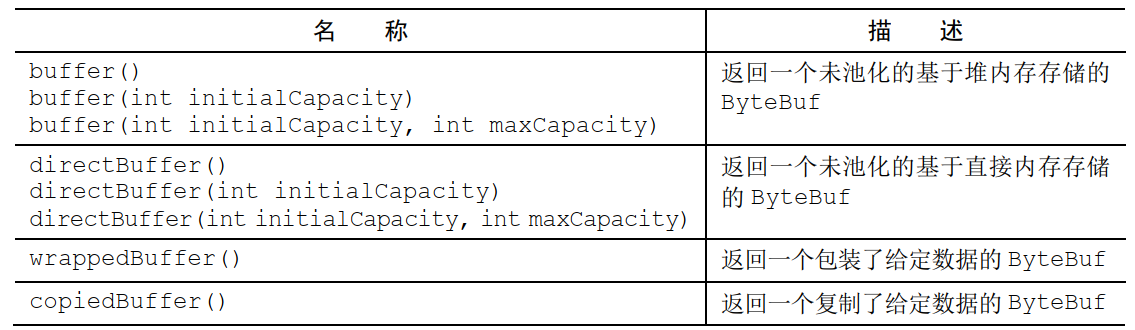
在不能获取到ByteBufAllocator中情况下,可以使用Unpooled获取缓冲区。
Y22wzd.png

引用计数

引用计数是一种通过在某个对象所持有的资源不再被其它对象引用时释放该对象所持有的资源来优化内存使用和性能的计数。

一个ReferencceCounted实现的实例通常以活动的引用计数为1作为开始。只要引用计数大于0,旧能保证对象不会被释放。当活动引用的数量减少到0时,该实例就会被释放。

1
2
3
4
5
6
7
ByteBuf buffer = ...
// 引用计数加1
buffer.retain();
// 输出引用计数
buffer.refCnt();
// 引用计数减1
buffer.release();

零拷贝

零拷贝是指在操作数据的时候,不需要将数据buffer从一个内存区域拷贝到另一个内存区域,因为少了一次内存的拷贝,因此CPU的效率就得到了较大的提升。

OS层面的零拷贝

OS层面的零拷贝通常是指避免在用户态与内核态之间来回进行数据拷贝。比如Linux提供了mmap系统调用,它可以将用户内存空间映射到内核空间。这样用户对这段内存空间的操作就可以直接反映到内核。

Netty层面的零拷贝

Netty层面的零拷贝主要体现在这几个方法:

  • 提供了CompositeByteBuf,它可以将多个ByteBuf合并为一个逻辑上的ByteBif,避免了ByteBuf之间的拷贝。
  • 通过wrap操作,我们可以将byte[]数组,ByteBufByteBuffer包装为一个ByteBuf对象,进而避免了拷贝操作。

    1
    2
    byte[] bytes = ...
    ByteBuf byteBuf = Unpooled.wrappedBuffer(bytes);
  • ByteBuf 支持 slice操作, 因此可以将 ByteBuf 分解为多个共享同一个存储区域ByteBuf, 避免了内存的拷贝.

    1
    2
    3
    ByteBuf byteBuf = ...
    ByteBuf header = byteBuf.slice(0, 5);
    ByteBuf body = byteBuf.slice(5, 10);
  • 通过 FileRegion 包装的FileChannel.tranferTo 实现文件传输, 可以直接将文件缓冲区的数据发送到目标 Channel, 避免了传统通过循环 write 方式导致的内存拷贝问题.

    1
    2
    3
    4
    5
    6
    7
    8
    9
    10
    RandomAccessFile srcFile = new RandomAccessFile(srcFileName, "r");
    FileChannel srcFileChannel = srcFile.getChannel();

    RandomAccessFile destFile = new RandomAccessFile(destFileName, "rw");
    FileChannel destFileChannel = destFile.getChannel();

    long position = 0;
    long count = srcFileChannel.size();
    //直接传输,而不是通过while进行循环的
    srcFileChannel.transferTo(position, count, destFileChannel);