


最近了解了一下认证体系中的 OIDC ,整理成一篇博客,主要包含 OIDC 中的概念,流程以及使用。在介绍这些之前,我们先要弄清楚 两个名词 Authorization 和 Authentication。
这是 OKTA 对这两个名词的定义:
Authentication 通常是指校验是否是用户本人的这个过程,而 Authorization 则更多的是指用户是否有权限。通常我们都是先校验 是否是用户本人,然后再校验用户是否有权限。也就是先开始 Authentication,再开始 Authorization。下图是 Auth0 文章中 整理的两者的区别。
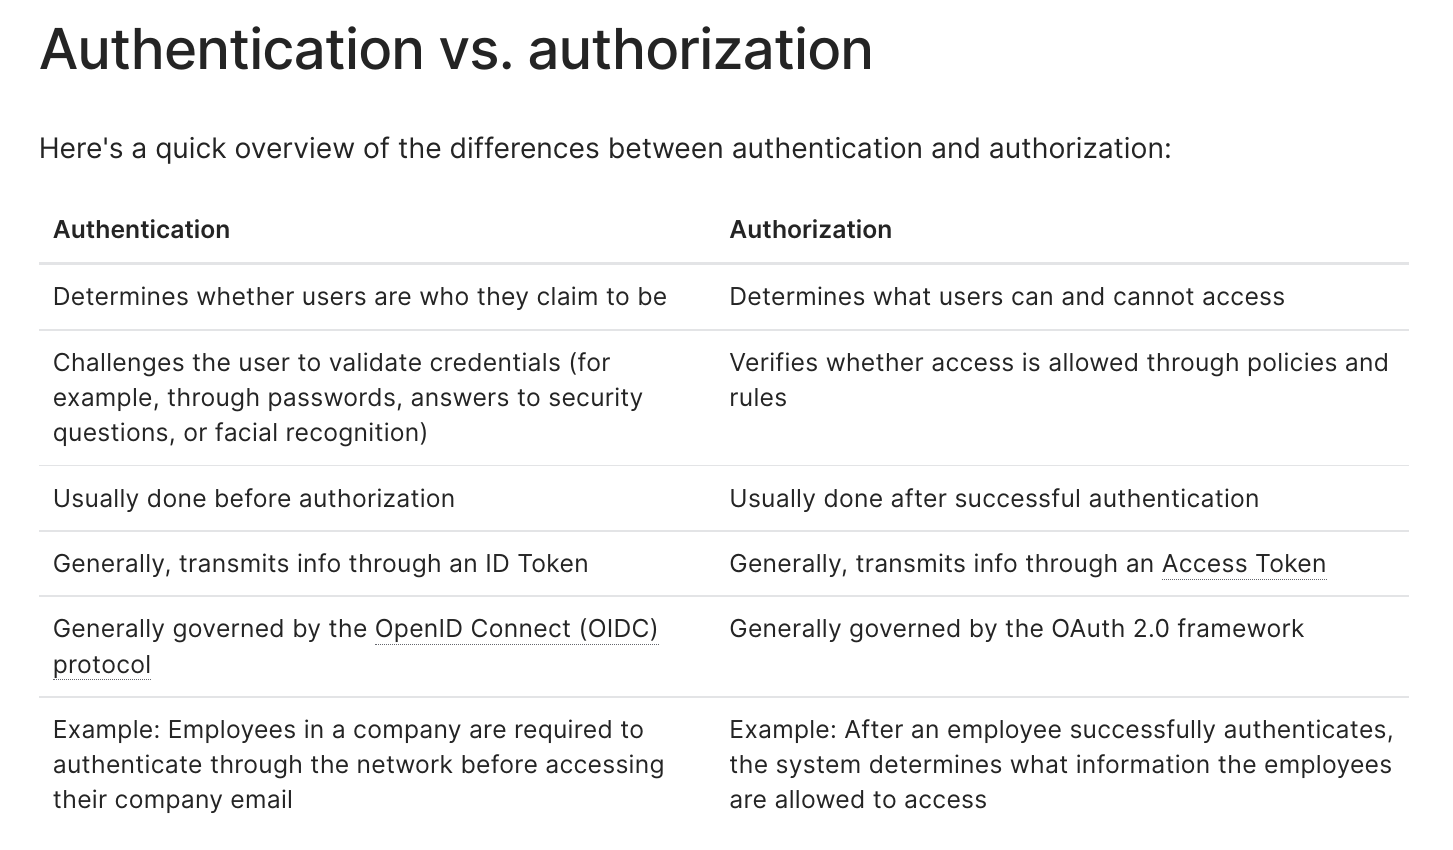
在了解 OIDC 之前,我们需要先了解 OAuth 2,因为 OIDC 是基于 OAuth 2 的流程之上的。在此之前,我们先以一个例子的方式来引入 整个场景。
假设现在我们想要以 Google 帐号来登录 Slack iOS 客户端,我们需要怎么做呢?有一种简单的方式是把用户名密码交给 Slack,这样 Slack 就能以我们的身份登录,但是这样有很大的安全隐患,如果Slack不小心泄漏了用户名密码,或者当我们想要撤销授权的时候,基本 就没有一个很好的办法。
因此我们需要一种授权协议,我们并不直接给第三方应用用户名密码,而是引入一个中间层,access_token。access_token 绑定代表 用户授权给三方应用某一些权限,比如读取用户用户名等资料、更新用户名等。OAuth 2 就是用来做这件事的协议。
OAuth 2 一共提供了4种授权模式,2015 年为 authorization code 模式新增加了一种增强模式。我们先从简单的看起:
这种模式是最简单的,其实就是客户端告诉服务端自己是哪个客户端,服务器就将 access_token 下发:
     +---------+                                  +---------------+
     |         |                                  |               |
     |         |>--(A)- Client Authentication --->| Authorization |
     | Client  |                                  |     Server    |
     |         |<--(B)---- Access Token ---------<|               |
     |         |                                  |               |
     +---------+                                  +---------------+

                     Figure 6: Client Credentials Flow

   The flow illustrated in Figure 6 includes the following steps:

   (A)  The client authenticates with the authorization server and
        requests an access token from the token endpoint.

   (B)  The authorization server authenticates the client, and if valid,
        issues an access token.
这种模式很少用,主要用于客户端非常可靠的情况,例如登录托管的云桌面系统,系统向服务器请求token,服务器立刻下发,之后 用户就以云桌面特定用户的身份进行使用。
用户名密码模式,这种流程相对来说,比较适用于可信任的客户端,例如自家研发的客户端,客户端要求用户输入用户名和密码,之后 向服务器请求,服务区校验用户名密码之后,下发 access_token:
     +----------+
     | Resource |
     |  Owner   |
     |          |
     +----------+
          v
          |    Resource Owner
         (A) Password Credentials
          |
          v
     +---------+                                  +---------------+
     |         |>--(B)---- Resource Owner ------->|               |
     |         |         Password Credentials     | Authorization |
     | Client  |                                  |     Server    |
     |         |<--(C)---- Access Token ---------<|               |
     |         |    (w/ Optional Refresh Token)   |               |
     +---------+                                  +---------------+

            Figure 5: Resource Owner Password Credentials Flow

   The flow illustrated in Figure 5 includes the following steps:

   (A)  The resource owner provides the client with its username and
        password.

   (B)  The client requests an access token from the authorization
        server's token endpoint by including the credentials received
        from the resource owner.  When making the request, the client
        authenticates with the authorization server.

   (C)  The authorization server authenticates the client and validates
        the resource owner credentials, and if valid, issues an access
        token.
Implicit Grant 模式,适用于不方便暴露 client_secret 的地方,比如浏览器端(网页),分发出去的App,都属于容易被逆向的程序, 这种情况就可以使用 Implicit Grant:
     +----------+
     | Resource |
     |  Owner   |
     |          |
     +----------+
          ^
          |
         (B)
     +----|-----+          Client Identifier     +---------------+
     |         -+----(A)-- & Redirection URI --->|               |
     |  User-   |                                | Authorization |
     |  Agent  -|----(B)-- User authenticates -->|     Server    |
     |          |                                |               |
     |          |<---(C)--- Redirection URI ----<|               |
     |          |          with Access Token     +---------------+
     |          |            in Fragment
     |          |                                +---------------+
     |          |----(D)--- Redirection URI ---->|   Web-Hosted  |
     |          |          without Fragment      |     Client    |
     |          |                                |    Resource   |
     |     (F)  |<---(E)------- Script ---------<|               |
     |          |                                +---------------+
     +-|--------+
       |    |
      (A)  (G) Access Token
       |    |
       ^    v
     +---------+
     |         |
     |  Client |
     |         |
     +---------+

   Note: The lines illustrating steps (A) and (B) are broken into two
   parts as they pass through the user-agent.

                       Figure 4: Implicit Grant Flow

   The flow illustrated in Figure 4 includes the following steps:

   (A)  The client initiates the flow by directing the resource owner's
        user-agent to the authorization endpoint.  The client includes
        its client identifier, requested scope, local state, and a
        redirection URI to which the authorization server will send the
        user-agent back once access is granted (or denied).

   (B)  The authorization server authenticates the resource owner (via
        the user-agent) and establishes whether the resource owner
        grants or denies the client's access request.

   (C)  Assuming the resource owner grants access, the authorization
        server redirects the user-agent back to the client using the
        redirection URI provided earlier.  The redirection URI includes
        the access token in the URI fragment.

   (D)  The user-agent follows the redirection instructions by making a
        request to the web-hosted client resource (which does not
        include the fragment per [RFC2616]).  The user-agent retains the
        fragment information locally.

   (E)  The web-hosted client resource returns a web page (typically an
        HTML document with an embedded script) capable of accessing the
        full redirection URI including the fragment retained by the
        user-agent, and extracting the access token (and other
        parameters) contained in the fragment.

   (F)  The user-agent executes the script provided by the web-hosted
        client resource locally, which extracts the access token.

   (G)  The user-agent passes the access token to the client.
以最开始我们的例子,Slack 弹出webview,加载Google的授权页面,Google显示选择对应帐号,下面会提示会让客户端读取 用户信息,当用户点击确认之后,Google校验完毕,会将页面重定向到客户端指定的地址,并且在 URL fragment 中带上 access_token。
Authorization Code 模式,这是最复杂,也是最安全的一种授权模式,流程如下:
     +----------+
     | Resource |
     |   Owner  |
     |          |
     +----------+
          ^
          |
         (B)
     +----|-----+          Client Identifier      +---------------+
     |         -+----(A)-- & Redirection URI ---->|               |
     |  User-   |                                 | Authorization |
     |  Agent  -+----(B)-- User authenticates --->|     Server    |
     |          |                                 |               |
     |         -+----(C)-- Authorization Code ---<|               |
     +-|----|---+                                 +---------------+
       |    |                                         ^      v
      (A)  (C)                                        |      |
       |    |                                         |      |
       ^    v                                         |      |
     +---------+                                      |      |
     |         |>---(D)-- Authorization Code ---------'      |
     |  Client |          & Redirection URI                  |
     |         |                                             |
     |         |<---(E)----- Access Token -------------------'
     +---------+       (w/ Optional Refresh Token)

   Note: The lines illustrating steps (A), (B), and (C) are broken into
   two parts as they pass through the user-agent.

                     Figure 3: Authorization Code Flow

   The flow illustrated in Figure 3 includes the following steps:

   (A)  The client initiates the flow by directing the resource owner's
        user-agent to the authorization endpoint.  The client includes
        its client identifier, requested scope, local state, and a
        redirection URI to which the authorization server will send the
        user-agent back once access is granted (or denied).

   (B)  The authorization server authenticates the resource owner (via
        the user-agent) and establishes whether the resource owner
        grants or denies the client's access request.

   (C)  Assuming the resource owner grants access, the authorization
        server redirects the user-agent back to the client using the
        redirection URI provided earlier (in the request or during
        client registration).  The redirection URI includes an
        authorization code and any local state provided by the client
        earlier.

   (D)  The client requests an access token from the authorization
        server's token endpoint by including the authorization code
        received in the previous step.  When making the request, the
        client authenticates with the authorization server.  The client
        includes the redirection URI used to obtain the authorization
        code for verification.

   (E)  The authorization server authenticates the client, validates the
        authorization code, and ensures that the redirection URI
        received matches the URI used to redirect the client in
        step (C).  If valid, the authorization server responds back with
        an access token and, optionally, a refresh token.
首先 Slack 客户端打开webview,加载Google的授权页面,并且指定模式为 Authorization Code,Google让用户确认之后,重定向 回 Slack 指定的URL,并且在参数中附带一个参数,叫做 code,随后 Slack 的服务端拿着 code,带上 client_id, client_secret 再次请求 Google,此时 Google 校验token,如成功,则下发 access_token。由于是Slack的服务器直接请求获得的token,因此会 比前面三种都更加安全。
这个模式,和 Authorization Code 基本相同,不同的地方在于不暴露 client_secret,因此可以用于浏览器等。流程如下:
接着我们来看一眼JWT,JWT的全称是 JSON Web Token,简单来说,就是用点号将三个JSON连接起来,例如
eyJhbGciOiJIUzI1NiIsInR5cCI6IkpXVCJ9.eyJzdWIiOiIxMjM0NTY3ODkwIiwibmFtZSI6IkpvaG4gRG9lIiwiaWF0IjoxNTE2MjM5MDIyfQ.SflKxwRJSMeKKF2QT4fwpMeJf36POk6yJV_adQssw5c
其实就是三部分:
例如上面的JWT,我们进行解码:
In [1]: import base64

In [2]: header = b"eyJhbGciOiJIUzI1NiIsInR5cCI6IkpXVCJ9"

In [3]: payload = b"eyJzdWIiOiIxMjM0NTY3ODkwIiwibmFtZSI6IkpvaG4gRG9lIiwiaWF0IjoxNTE2MjM5MDIyfQ"

In [4]: payload = payload + b'=' * (-len(payload) % 4)

In [5]: base64.urlsafe_b64decode(header)
Out[5]: b'{"alg":"HS256","typ":"JWT"}'

In [6]: base64.urlsafe_b64decode(payload)
Out[6]: b'{"sub":"1234567890","name":"John Doe","iat":1516239022}'
JWT 相比于服务端下发Session的方式,优点在于不用每一次都读取数据库进行获取信息,信息都在payload里存着,只要拿出来解析, 然后对比 Signature 和 是否过期就行。但是缺点在于,一旦发出去以后,是无法撤销的,只要有人拿到了这个JWT,在过期之前,都 可以以这个身份进行操作。有补救方法,就是在数据库里存储被禁用的JWT,但是这样又要每次都读数据库了,所以个人不是很喜欢JWT。
终于来到了我们的重点,OIDC,OIDC主要的目的在于登录用户,获取用户信息,而不是获取其它权限。前面我们说了,OIDC基于 OAuth 2, 因此,OIDC可以使用 Authorization Code 模式,也可以使用 Implicit 模式,还有一种 Hybrid 模式。
The Authorization Code Flow goes through the following steps:
基本就是 OAuth 2 Authorization Code 模式的流程,区别在于,在 scope 参数中,一定有一项叫做 openid,另外一点就在于最终
的返回结果里,多了一项 id_token:
{
    "access_token": "SlAV32hkKG",
    "token_type": "Bearer",
    "refresh_token": "8xLOxBtZp8",
    "expires_in": 3600,
    "id_token": "eyJhbGciOiJSUzI1NiIsImtpZCI6IjFlOWdkazcifQ.ewogImlzc
        yI6ICJodHRwOi8vc2VydmVyLmV4YW1wbGUuY29tIiwKICJzdWIiOiAiMjQ4Mjg5
        NzYxMDAxIiwKICJhdWQiOiAiczZCaGRSa3F0MyIsCiAibm9uY2UiOiAibi0wUzZ
        fV3pBMk1qIiwKICJleHAiOiAxMzExMjgxOTcwLAogImlhdCI6IDEzMTEyODA5Nz
        AKfQ.ggW8hZ1EuVLuxNuuIJKX_V8a_OMXzR0EHR9R6jgdqrOOF4daGU96Sr_P6q
        Jp6IcmD3HP99Obi1PRs-cwh3LO-p146waJ8IhehcwL7F09JdijmBqkvPeB2T9CJ
        NqeGpe-gccMg4vfKjkM8FcGvnzZUN4_KSP0aAp1tOJ1zZwgjxqGByKHiOtX7Tpd
        QyHE5lcMiKPXfEIQILVq0pc_E2DzL7emopWoaoZTF_m0_N0YzFC6g6EJbOEoRoS
        K5hoDalrcvRYLSrQAZZKflyuVCyixEoV9GfNQC3_osjzw2PAithfubEEBLuVVk4
        XUVrWOLrLl0nx7RkKU8NXNHq-rvKMzqg"
}
这就是一个JWT,解析出来之后,里面就是用户的信息:
{
  "iss": "http://server.example.com",
  "sub": "248289761001",
  "aud": "s6BhdRkqt3",
  "nonce": "n-0S6_WzA2Mj",
  "exp": 1311281970,
  "iat": 1311280970
}
其中:
还有少数几个其他的字段,具体可以参考 https://openid.net/specs/openid-connect-core-1_0.html#IDToken
步骤如下:
流程也基本和OAuth 2的 Implicit 模式一致,区别在于response_type的值不是 token,而是 id_token token 或者 id_token,
对于响应结果,也是会新增加一个 id_token 在 URL fragment 里。
步骤如下:
区别在于,请求参数中,response_type 的值是 code id_token 或 code token 或 code id_token token:
code token 时,会返回 code, access_tokencode id_token 时,会返回 code, id_tokencode id_token token 时,会返回 code, id_token, access_token以上就是OIDC的三种授权方式,通过OIDC,我们可以以第三方系统的身份来登录另外一个系统,并且获取一些基本的资料,例如first name, last name, username, email, avatar url等。
这篇文章总结了 OAuth 2 的5种授权流程,然后在此基础上,介绍了 OIDC 的流程,以及作用。希望对读者有所帮助。
ref:
此内容由惯性聚合(RSS阅读器)自动聚合整理,仅供阅读参考。 原文来自 — 版权归原作者所有。