


部署 frp 内网穿透服务
Deployment of frp NAT Traversal Service
分类: Tech101, 教程 / 字数: 1500 / 标签: frp, 内网穿透, acme.sh, OpenWrt
frp 是一款高性能的反向代理应用,专注于内网穿透。它支持多种协议,包括 TCP、UDP、HTTP、HTTPS 等,并且具备 P2P 通信功能。使用 frp,您可以安全、便捷地将内网服务暴露到公网,通过拥有公网 IP 的节点进行中转 1。
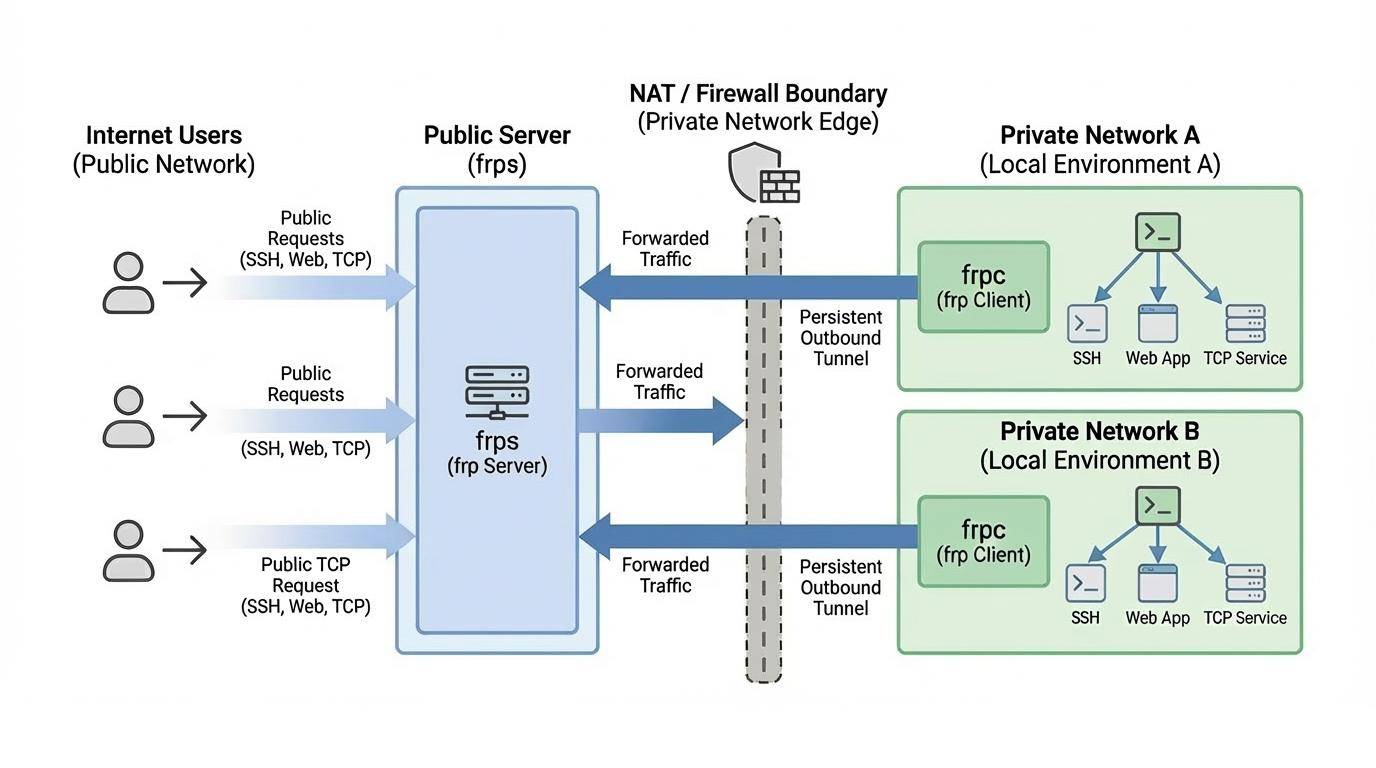
本教程将介绍在具有公网 IP 的服务器和内网路由器上部署 frp 内网穿透服务。本教程涉及到的环境信息如下:
| 环境 | 系统 | |
|---|---|---|
| 服务端 | 外网服务器系统 | Ubuntu 24.04 |
| 客户端 | 内网路由器系统 | OpenWRT 24.10 |
注意
将后续命令中的 example.com 替换为实际域名。
在本地创建 cert 目录,将 OpenSSL 配置文件复制到该目录。通常情况下 Linux 系统位于 /etc/pki/tls/openssl.cnf,macOS 系统位于 /System/Library/OpenSSL/openssl.cnf。
运行如下命令生成 ca 证书:
openssl genrsa -out ca.key 2048
openssl req -x509 -new -nodes -key ca.key -subj "/CN=example.com" -days 36500 -out ca.crt
运行如下命令生成服务端证书:
openssl genrsa -out server.key 2048
openssl req -new -sha256 -key server.key \
  -subj "/C=XX/ST=DEFAULT/L=DEFAULT/O=DEFAULT/CN=example.com" \
  -reqexts SAN \
  -config <(cat openssl.cnf <(printf "\n[SAN]\nsubjectAltName=DNS:localhost,IP:127.0.0.1,DNS:*.example.com")) \
  -out server.csr
openssl x509 -req -days 36500 -sha256 \
  -in server.csr -CA ca.crt -CAkey ca.key -CAcreateserial \
  -extfile <(printf "subjectAltName=DNS:localhost,IP:127.0.0.1,DNS:example.com") \
  -out server.crt
运行如下命令生成客户端证书:
openssl genrsa -out client.key 2048
openssl req -new -sha256 -key client.key \
  -subj "/C=XX/ST=DEFAULT/L=DEFAULT/O=DEFAULT/CN=example.com" \
  -reqexts SAN \
  -config <(cat openssl.cnf <(printf "\n[SAN]\nsubjectAltName=DNS:localhost,IP:127.0.0.1,DNS:*.example.com")) \
  -out client.csr
openssl x509 -req -days 36500 -sha256 \
  -in client.csr -CA ca.crt -CAkey ca.key -CAcreateserial \
  -extfile <(printf "subjectAltName=DNS:localhost,IP:127.0.0.1,DNS:example.com") \
  -out client.crt
由于 server.crt 和 client.crt 都是由 ca 签发的,因此他们对于 ca 来说都是合法的。
在服务器上运行如下命令安装 acme.sh:
curl https://get.acme.sh | sh -s email=my@example.com
安装脚本将执行如下动作:
$HOME 目录创建 .acme.sh 目录并安装 acme.sh。acme.sh 指向 $HOME/.acme.sh/acme.sh。以阿里云域名管理为例,在 https://ram.console.aliyun.com/ 页面创建用户,并为用户赋予 DNS 相关管理权限。为用户创建 AccessKey,并设置如下环境变量:
export Ali_Key="xxx"
export Ali_Secret="xxx"
运行如下命令申请证书:
acme.sh --issue --dns dns_ali -d example.com -d *.example.com
注意
将后续命令中的 /path/to 替换为对应文件的实际路径,将 xxx 替换为实际内容。
在服务端创建 frp 目录,配置 frps.toml 文件参数如下,更多参数设置请参阅 frp 文档:
bindAddr = "0.0.0.0"
bindPort = 7000
quicBindPort = 7000
vhostHTTPPort = 8080
vhostHTTPSPort = 8443
tcpmuxHTTPConnectPort = 5002

auth.method = "token"
auth.token = "xxx"

transport.tls.certFile = "/path/to/server.crt"
transport.tls.keyFile = "/path/to/server.key"
transport.tls.trustedCaFile = "/path/to/ca.crt"

webServer.addr = "0.0.0.0"
webServer.port = 7500
webServer.user = "xxx"
webServer.password = "xxx"

log.to = "/path/to/frps.log"
log.level = "info"
log.maxDays = 3
注意
请确保将上述配置中的端口针对 0.0.0.0/0 关闭防火墙拦截。
在 /etc/systemd/system 路径创建 frps.service 服务,配置内容如下:
[Unit]
Description = frp server
After = network.target syslog.target
Wants = network.target

[Service]
Type = simple
ExecStart = /path/to/frps -c /path/to/frps.toml

[Install]
WantedBy = multi-user.target
运行如下命令管理 frps 服务:
# 自启动 frps
sudo systemctl enable frps

# 启动 frps
sudo systemctl start frps

# 停止 frps
sudo systemctl stop frps

# 重启 frps
sudo systemctl restart frps

# 查看 frps 状态
sudo systemctl status frps
添加如下内容至 Nginx 配置文件中:
server {
    listen 80;
    listen [::]:80;

    server_name *.example.com;

    return 301 https://$host$request_uri;
}

server {
    listen 443 ssl http2;
    listen [::]:443 ssl http2;

    server_name *.example.com;

    ssl_certificate /path/to/example.com.cer;
    ssl_certificate_key /path/to/example.com.key;

    location / {
        proxy_pass http://127.0.0.1:8080;
        proxy_redirect off;
        proxy_ssl_server_name on;

        proxy_set_header Host $host:80;
        proxy_set_header Referer $http_referer;
        proxy_set_header Cookie $http_cookie;
        proxy_set_header X-Real-IP $remote_addr;
        proxy_set_header X-Forwarded-For $proxy_add_x_forwarded_for;
        proxy_set_header X-Forwarded-Proto $scheme;
    }
}
运行如下命令重启 Nginx:
sudo systemctl restart nginx
注意
将后续命令中的 x.x.x.x 替换为本地服务对应的 IP 地址。
在客户端创建 frp 目录,配置 frpc.toml 文件参数如下,更多参数设置请参阅 frp 文档:
auth.method = "token"
auth.token = "xxx"

user = "xxx"

serverAddr = "frps.example.com"
serverPort = 7000

transport.protocol = "quic"
transport.proxyProtocolVersion = "v2"
transport.tls.certFile = "/path/to/client.crt"
transport.tls.keyFile = "/path/to/client.key"
transport.tls.trustedCaFile = "/path/to/ca.crt"

webServer.addr = "0.0.0.0"
webServer.port = 7400
webServer.user = "xxx"
webServer.password = "xxx"

log.to = "/path/to/frpc.log"
log.level = "info"
log.maxDays = 3

[[proxies]]
name = "example-http"
type = "http"
localIP = "x.x.x.x"
localPort = 80
customDomains = ["example-http.example.com"]

[[proxies]]
name = "example-ssh"
type = "tcpmux"
multiplexer = "httpconnect"
localIP = "x.x.x.x"
localPort = 22
customDomains = ["example-ssh.example.com"]
其中,example-http 采用了通过自定义域名的方式访问内网 Web 服务,更多示例请参考 frp 文档;example-ssh 采用了多个 SSH 服务复用同一端口的方式连接内网 SSH 服务,更多示例请参考 frp 文档。
在 /etc/init.d 路径下创建 frpc 服务,配置内容如下:
#!/bin/sh /etc/rc.common

# 使用 procd
USE_PROCD=1
# 启动顺序
START=95
# 停止顺序
STOP=15

# frpc
FRPC=/path/to/frpc
CONF=/path/to/frpc.toml

start_service() {
    procd_open_instance "frpc"
    procd_set_param command $FRPC -c $CONF
    procd_set_param respawn
    procd_set_param stdout 1
    procd_set_param stderr 1
    procd_set_param pidfile /var/run/frpc.pid
    procd_close_instance
}

service_triggers() {
    procd_add_reload_mount_trigger $CONF
}
运行如下命令管理 frpc 服务:
# 赋予执行权限
chmod +x /etc/init.d/frpc

# 自启动 frpc
/etc/init.d/frpc enable

# 启动 frpc
/etc/init.d/frpc start

# 停止 frpc
/etc/init.d/frpc stop

# 重启 frpc
/etc/init.d/frpc restart

# 查看 frpc 状态
/etc/init.d/frpc status
在服务商中配置 DNS 将 example-http.example.com 和 example-ssh.example.com 解析至 frp 服务器的 IP 地址。
此时,通过浏览器访问 https://example-http.example.com 即可实现访问内网 IP 地址 x.x.x.x 在端口 80 上的 Web 服务。
此时,通过如下命令即可实现访问内网 IP 地址 x.x.x.x 在端口 22 上的 SSH 服务:
ssh -o 'proxycommand socat - PROXY:frps.example.com:%h:%p,proxyport=5002' test@example-ssh.example.com
此内容由惯性聚合(RSS阅读器)自动聚合整理,仅供阅读参考。 原文来自 — 版权归原作者所有。