


当我谈修图时,我谈些什么
色彩篇 Part 1
分类: 科普, 当我谈, 生活 / 字数: 2780 / 标签: 修图, 色彩空间, 色彩模型, RGB, 加法混色模型, CMYK, 减法混色模型, HSV, HSL, 色相, 饱和度, 明度, 亮度, 直方图, 色温, 色调
文本是「当我谈」系列的第一篇博客,后续「当我谈」系列会从程序员的视角一起科普认知未曾触及的其他领域。
色彩空间是对色彩的组织方式,借助色彩空间和针对物理设备的测试,可以得到色彩的固定模拟和数字表示。色彩模型是一种抽象数学模型,通过一组数字来描述颜色。由于“色彩空间”有着固定的色彩模型和映射函数组合,非正式场合下,这一词汇也被用来指代色彩模型。
红绿蓝(RGB)色彩模型,是一种加法混色模型,将红(Red)、绿(Green)、蓝(Blue)三原色的色光以不同的比例相加,以合成产生各种色彩光。三原色的原理不是出于物理原因,而是由于生理原因造成的。
RGB 色彩模型可以映射到一个立方体上,如下图所示:
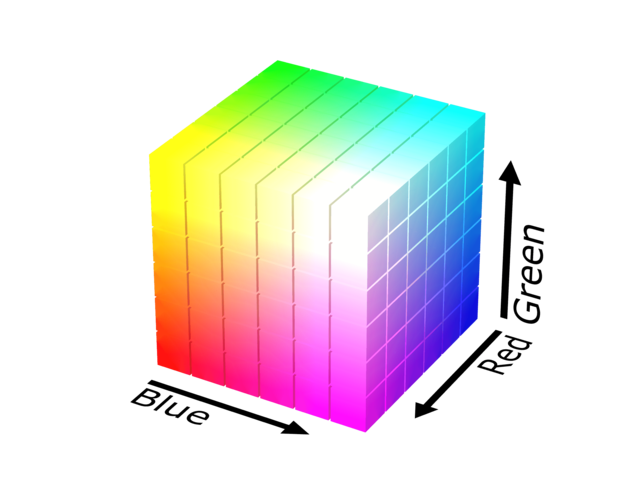
红绿蓝的三原色光显示技术广泛用于电视和计算机的显示器,利用红、绿、蓝三原色作为子像素组成的真色彩像素,透过眼睛及大脑的模糊化,“人类看到”不存在于显示器上的感知色彩。
印刷四分色模式(CMYK)是彩色印刷中采用的一种减法混色模型,利用色料的三原色混色原理,加上黑色油墨,共计四种颜色混合叠加,形成所谓的“全彩印刷”。四种标准颜色分别是:
CMY 叠色的示意图如下所示:

利用 $0$ 到 $1$ 的浮点数表示 $R, G, B$ 和 $C, M, Y, K$,从四分色向三原光转换公式如下:
$$ \begin{aligned} R &= \left(1 - C\right) \left(1 - K\right) \\ G &= \left(1 - M\right) \left(1 - K\right) \\ B &= \left(1 - Y\right) \left(1 - K\right) \end{aligned} $$
从三原光向四分色转换公式如下:
$$ \begin{aligned} C &= 1 - \dfrac{R}{\max \left(R, G, B\right)} \\ M &= 1 - \dfrac{G}{\max \left(R, G, B\right)} \\ Y &= 1 - \dfrac{B}{\max \left(R, G, B\right)} \\ K &= 1 - \max \left(R, G, B\right) \\ \end{aligned} $$
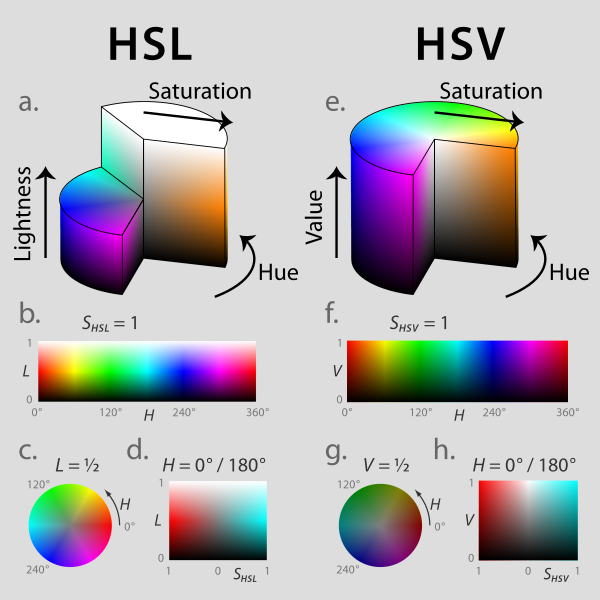
HSL 和 HSV 都是一种将 RGB 色彩模型中的点在圆柱坐标系中的表示法。这两种表示法试图做到比基于笛卡尔坐标系的几何结构 RGB 更加直观。HSL 即色相、饱和度、亮度(Hue,Saturation,Lightness),HSV 即色相、饱和度、明度(Hue,Saturation,Value),又称 HSB,其中 B 为 Brightness。另种色彩空间定义如下图所示:
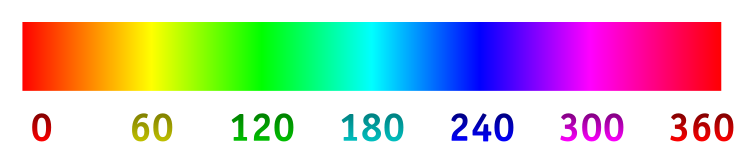
色相(Hue)指的是色彩的外相,是在不同波长的光照射下,人眼所感觉到的不同的颜色。在 HSL 和 HSV 色彩空间中,色相是以红色为 0 度(360 度)、黄色为 60 度、绿色为 120 度、青色为 180 度、蓝色为 240 度、洋红色为 300 度。如下图所示:
饱和度(Saturation)指的是色彩的纯度,饱和度由光强度和它在不同波长的光谱中分布的程度共同决定。下图为红色从最小饱和度到最大饱和度的示例:

明度值是与同样亮的白色物体相比,某物的亮的程度。如果我们拍摄一张图像,提取图像色相、饱和度和明度值,然后将它们与不同色彩空间的明度值进行比较,可以迅速地从视觉上得出差异。如下图所示,HSV 色彩空间中的 V 值和 HSL 色彩空间中的 L 值与感知明度值明显不同:
HSV 和 HSL 两者对于色相(H)的定义一致,但对于饱和度(S)和亮度与明度(L 与 B)的定义并不一致。
在 HSL 中,饱和度独立于亮度存在,也就是说非常浅的颜色和非常深的颜色都可以在 HSL 中非常饱和。而在 HSV 中,接近于白色的颜色都具有较低的饱和度。
以 Photoshop 和 Afiinity Photo 两款软件的拾色器为例:
两个软件分别采用 HSV 和 HSL 色彩空间,其横轴为饱和度(S),纵轴分别为明度(V)和亮度(L)。不难看出,在 Photoshop 拾色器中,越往上混入的黑色越少,明度越高;越往右混入的白色越少,纯度越高。在 Afiinity Photo 拾色器中,下部为纯黑色,亮度最小,从下往上,混入的黑色逐渐减少,直到 50% 位置处完全没有黑色混入,继续往上走,混入的白色逐渐增加,直到 100% 位置处完全变为纯白色,亮度最高。
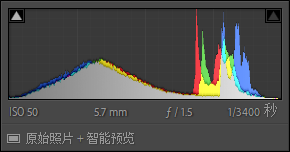
图像直方图是反映图像色彩亮度的直方图,其中 $x$ 轴表示亮度值,$y$ 轴表示图像中该亮度值像素点的个数。以 $8$ 位图像为例,亮度的取值范围为 $\left[0, 2^8-1\right]$,即 $\left[0, 255\right]$。以如下图片为例(原始图片:链接):
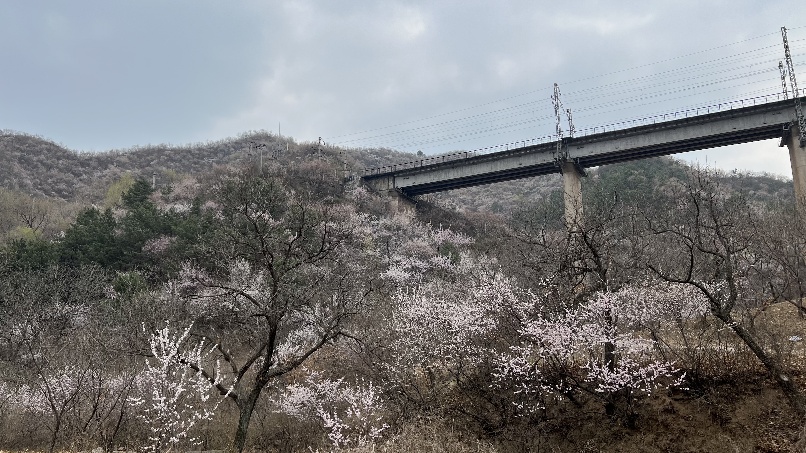
在 Lightroom 中直方图如下所示:
利用 Python 绘制的直方图如下所示:
import cv2

import numpy as np
import matplotlib.pyplot as plt

gray_img = cv2.imread('demo.jpg', cv2.IMREAD_GRAYSCALE)
img = cv2.imread('demo.jpg')
img_channels = cv2.split(img)
height, width = gray_img.shape
gray_img_hist = cv2.calcHist([gray_img], [0], None, [256], [0, 256])
img_channels_hist = [
    cv2.calcHist([img_channel], [0], None, [256], [0, 256])
    for img_channel in img_channels
]

fig, ax = plt.subplots(1, 1)

ax.plot(gray_img_hist, color='0.6', label='灰')

for img_channel_hist, color, label in zip(
    img_channels_hist, ['#6695ff', '#70df5f', '#f74048'], ['蓝', '绿', '红']
):
    ax.plot(img_channel_hist, color=color, label=label)

segments = [0, 28, 85, 170, 227, 255]
segments_text = ['黑色', '阴影', '曝光', '高光', '白色']

for left_border, right_border, segment_text in zip(
    segments[:-1], segments[1:], segments_text
):
    if left_border != 0:
        ax.axvline(x=left_border, ymin=0, color='black')

    ax.annotate(
        segment_text,
        xy=((left_border + right_border) / 2, np.max(img_channels_hist) / 3),
        ha='center',
    )

ax.legend(loc='upper center')
plt.xlim([0, 256])
ax.set_xticks([0, 32, 64, 96, 128, 160, 192, 224, 256])
ax.axes.get_yaxis().set_visible(False)

plt.tight_layout()
fig.set_size_inches(8, 4)
plt.savefig('demo-image-histgram.png', dpi=100)
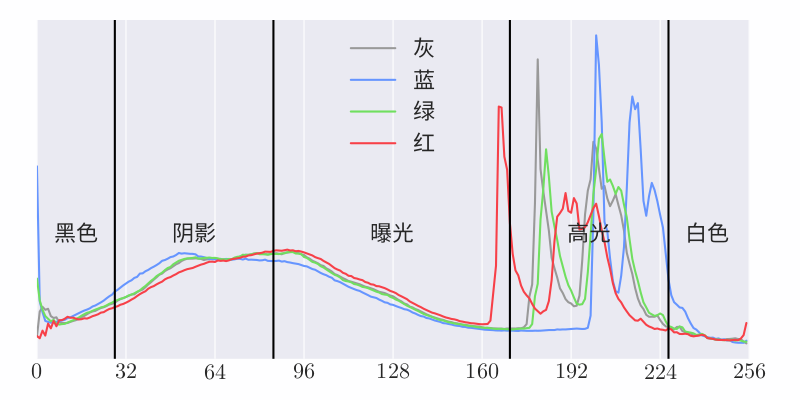
直方图以 $28, 85, 170, 227$ 为分界线可以划分为黑色、阴影、曝光、高光、白色共 5 个区域。其中曝光区域以适中的亮度保留了图片最多的细节,阴影和高光对应了照片中较暗和较亮的区域,黑色和白色两个部分则几乎没有任何细节。当整个直方图过于偏左时表示欠曝,过于偏右时则表示过曝。
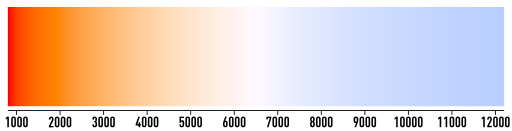
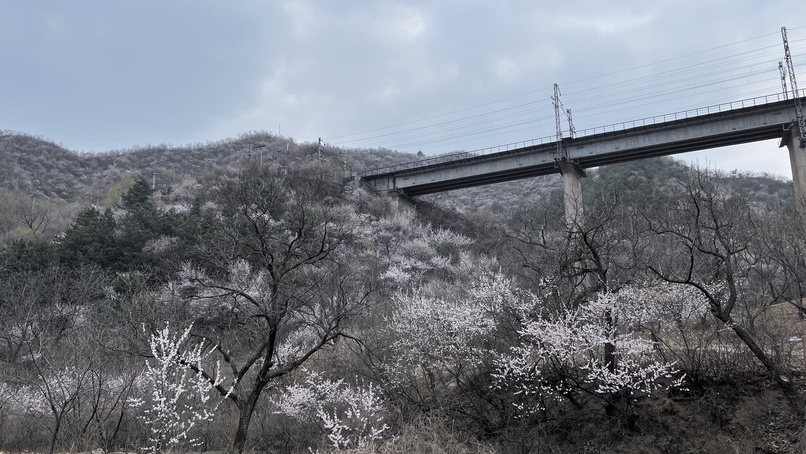
色温(Temperature)是指照片中光源发出相似的光的黑体辐射体所具有的开尔文温度。开尔文温度越低光越暖,开尔文温度越高光越冷,如下图所示:
针对图片分别应用 5000K 和 10000K 色温的对比结果如下图所示:
import math
import cv2

import numpy as np


def __kelvin_to_rgb(kelvin: int) -> (int, int, int):
    kelvin = np.clip(kelvin, min_val=1000, max_val=40000)
    temperature = kelvin / 100.0

    # 红色通道
    if temperature < 66.0:
        red = 255
    else:
        # a + b x + c Log[x] /.
        # {a -> 351.97690566805693`,
        # b -> 0.114206453784165`,
        # c -> -40.25366309332127
        # x -> (kelvin/100) - 55}
        red = temperature - 55.0
        red = (
            351.97690566805693
            + 0.114206453784165 * red
            - 40.25366309332127 * math.log(red)
        )

    # 绿色通道
    if temperature < 66.0:
        # a + b x + c Log[x] /.
        # {a -> -155.25485562709179`,
        # b -> -0.44596950469579133`,
        # c -> 104.49216199393888`,
        # x -> (kelvin/100) - 2}
        green = temperature - 2
        green = (
            -155.25485562709179
            - 0.44596950469579133 * green
            + 104.49216199393888 * math.log(green)
        )
    else:
        # a + b x + c Log[x] /.
        # {a -> 325.4494125711974`,
        # b -> 0.07943456536662342`,
        # c -> -28.0852963507957`,
        # x -> (kelvin/100) - 50}
        green = temperature - 50.0
        green = (
            325.4494125711974
            + 0.07943456536662342 * green
            - 28.0852963507957 * math.log(green)
        )

    # 蓝色通道
    if temperature >= 66.0:
        blue = 255
    elif temperature <= 20.0:
        blue = 0
    else:
        # a + b x + c Log[x] /.
        # {a -> -254.76935184120902`,
        # b -> 0.8274096064007395`,
        # c -> 115.67994401066147`,
        # x -> kelvin/100 - 10}
        blue = temperature - 10.0
        blue = (
            -254.76935184120902
            + 0.8274096064007395 * blue
            + 115.67994401066147 * math.log(blue)
        )

    return np.clip(red, 0, 255), np.clip(green, 0, 255), np.clip(blue, 0, 255)


def __mix_color(v1, v2, ratio: float):
    return np.array((1.0 - ratio) * v1 + 0.5).astype(np.uint8) + np.array(
        ratio * v2
    ).astype(np.uint8)


def __keep_original_lightness(original_image, image):
    original_l = cv2.cvtColor(original_image, cv2.COLOR_BGR2HLS)[..., 1]
    h, l, s = cv2.split(cv2.cvtColor(image, cv2.COLOR_BGR2HLS))

    return cv2.cvtColor(cv2.merge([h, original_l, s]), cv2.COLOR_HLS2BGR)


def apply_temperature(image, temperature, keep_original_lightness: bool = True):
    b, g, r = cv2.split(image)
    n_b = np.clip(b.astype(np.single) - temperature, 0, 255).astype(np.uint8)
    n_r = np.clip(r.astype(np.single) + temperature, 0, 255).astype(np.uint8)
    ret_image = cv2.merge([n_b, g, n_r])

    return (
        __keep_original_lightness(image, ret_image)
        if keep_original_lightness
        else ret_image
    )


def apply_kelvin(
    image, kelvin: int, strength: float = 0.6, keep_original_lightness: bool = True
):
    b, g, r = cv2.split(image)
    k_r, k_g, k_b = __kelvin_to_rgb(kelvin)
    n_r, n_g, n_b = (
        __mix_color(r, k_r, strength),
        __mix_color(g, k_g, strength),
        __mix_color(b, k_b, strength),
    )
    ret_image = cv2.merge([n_b, n_g, n_r])

    return (
        __keep_original_lightness(image, ret_image)
        if keep_original_lightness
        else ret_image
    )


img = cv2.imread('demo.jpg')
cv2.imwrite('demo-color-temperature-cold.jpg', apply_kelvin(img, 5000))
cv2.imwrite('demo-color-temperature-cold.jpg', apply_kelvin(img, 10000))
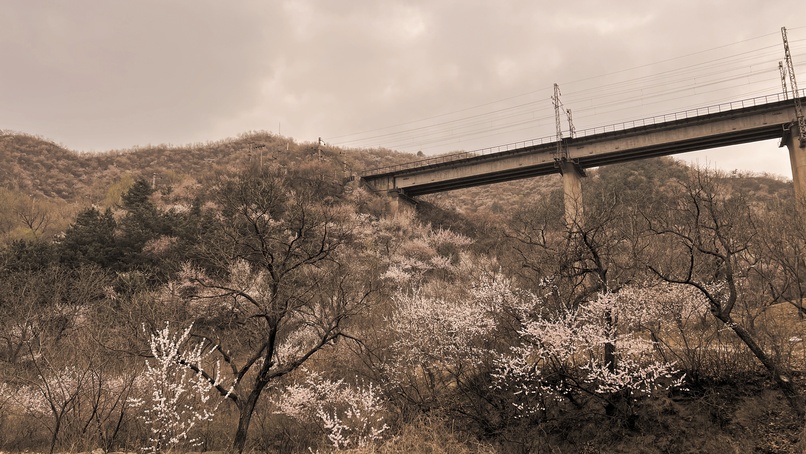
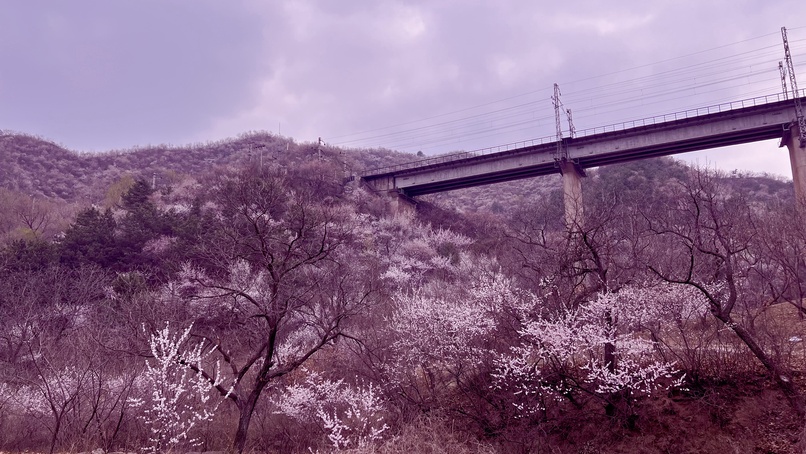
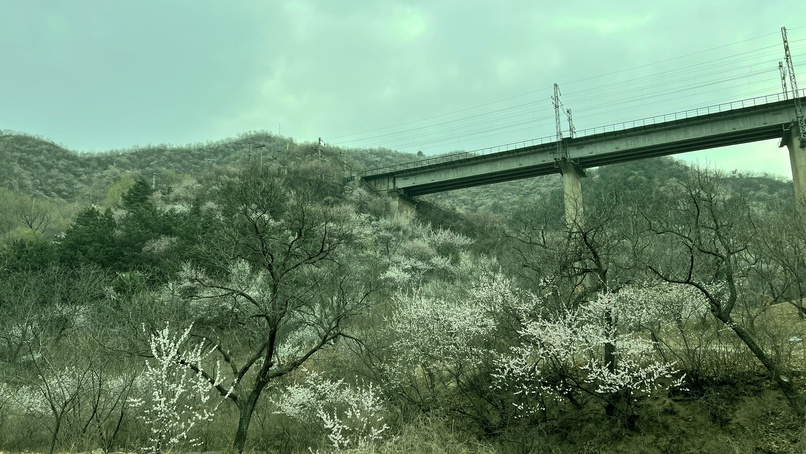
色调(Tint)允许我们为了实现中和色偏或增加色偏的目的,而将色偏向绿色或洋红色转变。针对图片分别应用 -30 和 +30 色调的对比结果如下图所示:
import cv2

import numpy as np


def __keep_original_lightness(original_image, image):
    original_l = cv2.cvtColor(original_image, cv2.COLOR_BGR2HLS)[..., 1]
    h, l, s = cv2.split(cv2.cvtColor(image, cv2.COLOR_BGR2HLS))

    return cv2.cvtColor(cv2.merge([h, original_l, s]), cv2.COLOR_HLS2BGR)


def apply_tint(image, tint, keep_original_lightness: bool = True):
    b, g, r = cv2.split(image)
    n_g = np.clip(g.astype(np.single) + tint, 0, 255).astype(np.uint8)
    ret_image = cv2.merge([b, n_g, r])

    return (
        __keep_original_lightness(image, ret_image)
        if keep_original_lightness
        else ret_image
    )


img = cv2.imread('demo.jpg')
cv2.imwrite('demo-color-tint-negative.jpg', apply_tint(img, -30))
cv2.imwrite('demo-color-tint-positive.jpg', apply_tint(img, +30))
此内容由惯性聚合(RSS阅读器)自动聚合整理,仅供阅读参考。 原文来自 — 版权归原作者所有。