- 前言
- 简介
- 代码仓库
- 效果预览
- 使用方式
- 原理
- Actions官方文档
- Actions的默认环境
- Actions语法
- Actions模板
- Qt项目的编译流程
- Qt相关的Actions模板
- install-qt-action
- action-setup-qt
- 扩展
- Windows平台
- 默认mingw不能用
- Windows平台指定shell
- Ubuntu平台
- MacOS平台
- Android平台
- IOS平台
前言
几个月前写过两篇持续集成的教程,当时使用的是travis和appveyor这两个第三方网址提供的服务。
由于配置比较复杂,劝退了很多同学……
2019年8月份,github正式上线了Actions功能,提供了十分强大的CI(持续集成)/CD(持续部署)服务,
使用非常简单、方便,再加上github的Marketplace(github的应用商店)有各路大神开源的Actions模板, 完全可以抛弃那些落后的第三方服务了。
注:Actions也能在私有仓库上用(微软良心)。
简介
这回涛哥将给大家提供一个简易的Qt项目的Action模板,让每一个有追求的Qter,都能轻松地用上强大的CI/CD功能。
(本文先说自动化编译,自动化发布下次说。)
代码仓库
我创建了一个新的代码仓库,地址在这:
https://github.com/jaredtao/HelloActions-Qt
效果预览
先来看看效果吧
这是github的Actions页面
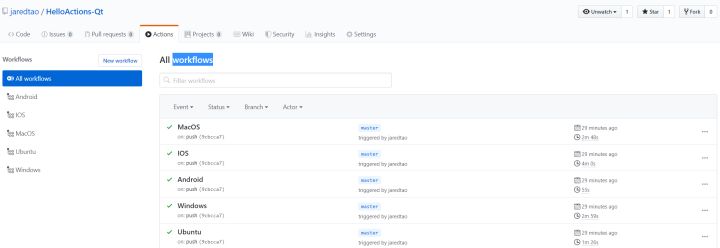
图中可以看到,最后一次提交的代码,在Windows、Ubuntu、MacOS、Android、IOS五个平台都编译通过了(通过显示绿色的对勾✔,未通过显示红色的叉❌)。
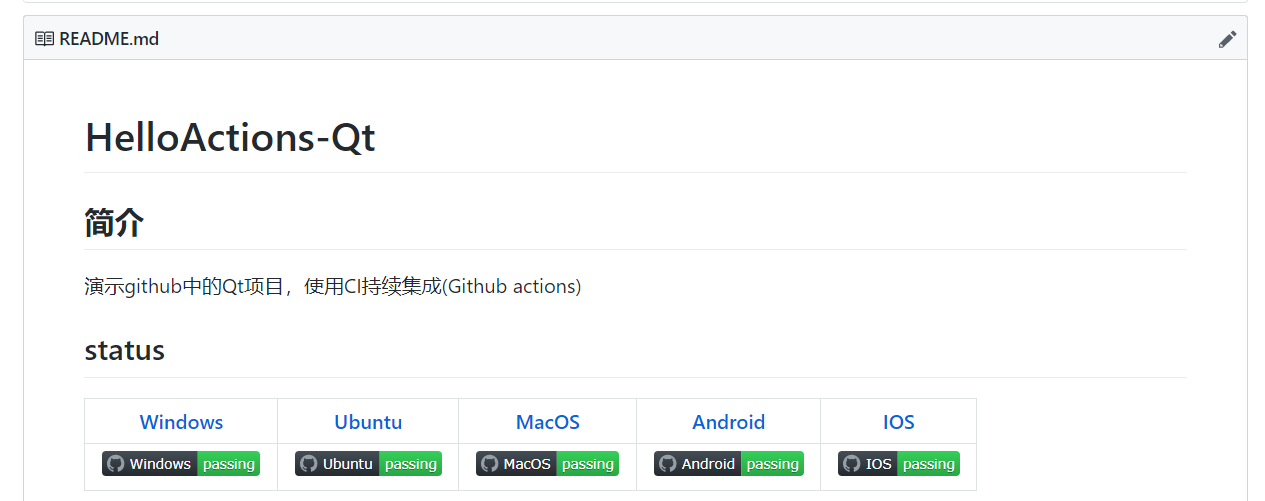
涛哥是个徽章爱好者,把这些徽章都链接进了README文件中。别人在预览代码仓库的时候,很容易就能看到仓库的编译状态。
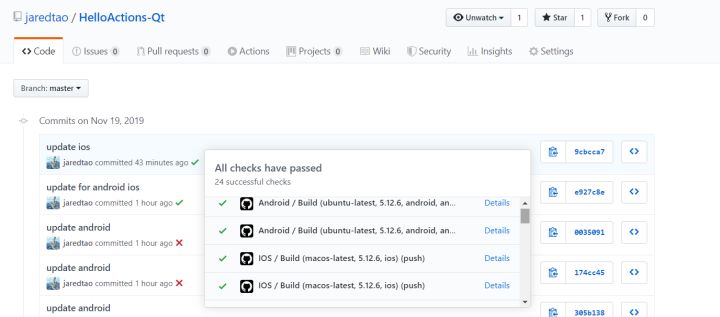
当然,在commit页面,还可以详细查看每一次commit的代码,是否都编译通过
使用方式
(这里假设各位读者会使用基本的git、github操作,不会的请去搜索相关教程)
- 下载涛哥的仓库HelloActions-Qt
1
| git clone https://github.com/jaredtao/HelloActions-Qt
|
拷贝文件夹’.github’到你的代码仓库根目录
在你的仓库中commit并添加.github文件夹中的文件
push你的仓库到github
push完就可以了,到你的github相应仓库页面-Actions子页面查看状态吧。
没错,复制、粘贴,就这么简单。
.github/workflows文件夹中包括写好的5个模板:
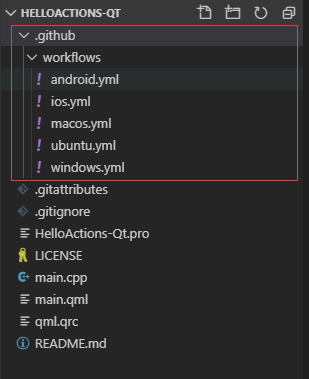
你也可以根据你的需要,只选择你需要的。
原理
授人以鱼,不如授人以渔
这里再来介绍一些基本的原理。
Actions官方文档
可以参考 github Actions官方文档
中文文档目前翻译不全面,建议优先看英文的。
Actions的默认环境
github-Actions 主要提供了windows server 2019、macos 10.15、ubuntu 18.04三个平台的docker环境,
并预装了大量开发者常用的软件,比如Java SDK、Android SDK、VisualStudio、python、golang、nodejs等,
可以在文档github Actions默认环境及预装软件 中看到详细的信息。
Actions语法
github-Actions和大部分docker环境一样,使用yaml/yml格式的配置文件。
同时github-Actions还提供了一些便利的功能、函数,可以参考
github Actions配置文件语法
更多细节请大家参考文档,这里就不赘述了。
Actions模板
每个github仓库,都有一个Actions页面,在这里可以创建、管理Actions
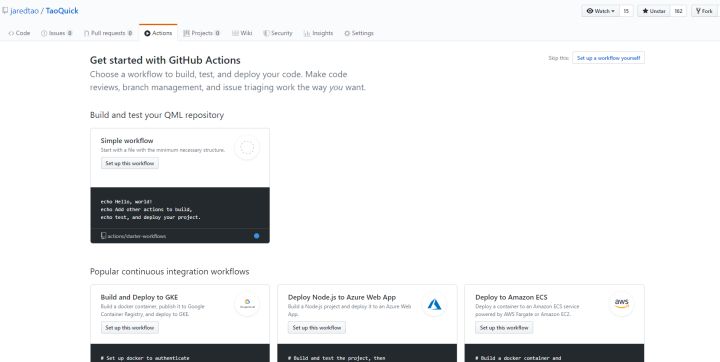
一般使用nodejs、python、golang等环境的项目,github提供了现成的Actions模板,可以
直接在Actions创建页面或者Marketplace(github的应用商店)进行搜索、引用。
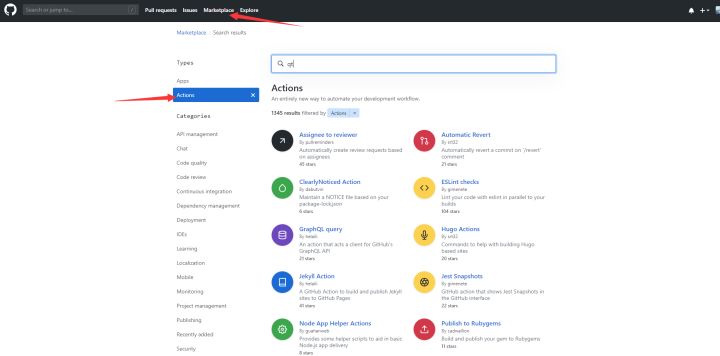
有闲暇的开发者,也可以开发自己的Actions并提交到github商店,甚至可以赚点零花钱哦。
(Actions开发使用TypeScript)
Qt项目的编译流程
简单总结一下Qt项目的编译流程
安装Qt环境
这一步用下文的Action模板:install-qt-action
获取项目代码
这一步用Actions官方核心模板:actions/checkout@v1
执行qmake、make
这一步用自定义脚本,可以换成qbs、cmake、gn、ninja等构建工具
执行test
这一步可以引入单元测试、自动化UI测试等。以后再说。
执行deployment
等我下一篇文章
Qt相关的Actions模板
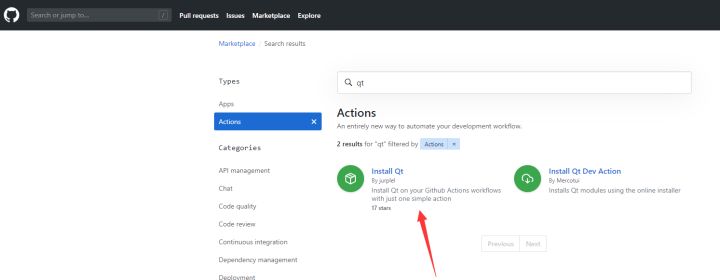
install-qt-action
Qt项目暂时没有公开、完整的Actions模板,不过有一个安装Qt的Actions,解决了在不同平台安装不同版本Qt的问题。
install-qt-action
github的Actions有一个非常强大的功能,就是引用外部模板。
比如要引入这个install-qt-Actions模板,只要在配置文件中添加两行即可:
1
2
3
4
| ...
- name: Install Qt
uses: jurplel/install-qt-action@v2
...
|
Qt的安装路径、版本、目标平台、目标架构都有默认配置,当然你也可以手动配置
1
2
3
4
5
6
7
8
9
10
11
12
13
14
15
| ...
- name: Install Qt
uses: jurplel/install-qt-action@v2
with:
version: 5.12.6
target: desktop
arch: win64_msvc2017_64
...
|
这个Actions模板的实现,是按照Actions的工作原理(TypeScript),调用另一个python仓库aqtinstall,
把配置参数传递过去,由该库完成Qt的安装。
aqtinstall由一位日本的程序员使用python开发,直接访问Qt官方的发布仓库
http://download.qt.io/online/qtsdkrepository/ , 下载指定平台的各模块压缩包,并解压到指定目录。
直接绕过了我们平常使用的Qt安装器。
aqtinstall没有实现‘只安装指定模块’,默认全安装。希望后续能做支持,毕竟Qt全安装太大了。
action-setup-qt
涛哥还发现一个开源的action,并没有进商店,功能是适配所有平台的Qt环境变量
https://github.com/Skycoder42/action-setup-qt
可以在该作者的’Json序列化库’中,看到实际应用
https://github.com/Skycoder42/QtJsonSerializer
目前是固定在Qt5.13.2版本,包含winrt、wasm等所有平台。
扩展
接下来,说一下涛哥提供的模板,对各平台的配置。
以方便那些,需要对模板做修改的同学。
Windows平台
涛哥在这个配置文件中,写了一些注释。
1
2
3
4
5
6
7
8
9
10
11
12
13
14
15
16
17
18
19
20
21
22
23
24
25
26
27
28
29
30
31
32
33
34
35
36
37
38
39
40
41
42
43
44
45
46
47
48
49
50
51
52
53
54
55
56
57
58
59
60
61
62
63
64
65
66
67
68
69
70
|
name: Windows
on:

  push:

    paths-ignore:
      - 'README.md'
      - 'LICENSE'

  pull_request:

    paths-ignore:
      - 'README.md'
      - 'LICENSE'
jobs:
  build:
    name: Build

    runs-on: windows-latest
    strategy:

      matrix:
        qt_ver: [5.9.8,5.12.6]
        qt_target: [desktop]


        qt_arch: [win64_msvc2017_64, win32_msvc2017]

        exclude:

          - qt_ver: 5.9.8
            qt_arch: win32_msvc2017


        include:
          - qt_arch: win64_msvc2017_64
            msvc_arch: x64
          - qt_arch: win32_msvc2017
            msvc_arch: x86

    steps:

      - name: Install Qt

        uses: jurplel/install-qt-action@v2.0.0
        with:

          version: ${{ matrix.qt_ver }}

          target: ${{ matrix.qt_target }}

          arch: ${{ matrix.qt_arch }}

      - uses: actions/checkout@v1
        with:
          fetch-depth: 1

      - name: build-msvc
        shell: cmd
        env:
          vc_arch: ${{ matrix.msvc_arch }}
        run: |
          call "C:\Program Files (x86)\Microsoft Visual Studio\2019\Enterprise\VC\Auxiliary\Build\vcvarsall.bat" %vc_arch%
          qmake
          nmake
|
大部分配置都是显而易见的,这里对一些特殊情况做一些说明吧。
默认mingw不能用
windows平台优先推荐用msvc编译,不过有些情况不得不用mingw。
github-Actions提供的Windows Server 2019环境,预装Mingw为8.1.0,版本太高了。
Qt5.9需要的mingw版本是5.3,而5.12则需要7.3,涛哥试过简单的HelloWorld程序,都会报链接失败。
所以需要使用MinGW的同学,需要自己安装了。
Windows平台指定shell
github-Actions在Windows平台默认的shell是PowerShell,其它平台是bash。
使用msvc命令行编译项目时,一般要先调用’vcvarsxxx.bat’脚本来设置环境变量。
Powershell虽然强大,却不太方便直接调用这个bat。要么安装Powershell扩展Pcsx,要么
用一些取巧的方式:
https://stackoverflow.com/questions/2124753/how-can-i-use-powershell-with-the-visual-studio-command-prompt
github-Actions当然也可以直接指定使用cmd。
1
2
3
4
5
6
7
8
9
10
11
| ...
- name: build-msvc
shell: cmd
env:
vc_arch: ${{ matrix.msvc_arch }}
run: |
call "C:\Program Files (x86)\Microsoft Visual Studio\2019\Enterprise\VC\Auxiliary\Build\vcvarsall.bat" %vc_arch%
qmake
nmake
...
|
Ubuntu平台
Ubuntu 平台看配置吧。
1
2
3
4
5
6
7
8
9
10
11
12
13
14
15
16
17
18
19
20
21
22
23
24
25
26
27
28
29
30
31
32
33
34
|
name: Ubuntu

on:
  push:
    paths-ignore:
      - 'README.md'
      - 'LICENSE'
  pull_request:
    paths-ignore:
      - 'README.md'
      - 'LICENSE'
jobs:
  build:
    name: Build
    runs-on: ${{ matrix.os }}
    strategy:
      matrix:
        os: [ubuntu-16.04,ubuntu-18.04]
        qt_ver: [5.9.8,5.12.6]
    steps:
      - name: Install Qt
        uses: jurplel/install-qt-action@v2.0.0
        with:
          version: ${{ matrix.qt_ver }}
      - name: ubuntu install GL library
        run: sudo apt-get install -y libglew-dev libglfw3-dev
      - uses: actions/checkout@v1
        with:
          fetch-depth: 1
      - name: build ubuntu
        run: |
          qmake
          make
|
MacOS平台
MacOS平台和Ubuntu差别不大
1
2
3
4
5
6
7
8
9
10
11
12
13
14
15
16
17
18
19
20
21
22
23
24
25
26
27
28
29
30
31
|
name: MacOS
on:
  push:
    paths-ignore:
      - 'README.md'
      - 'LICENSE'
  pull_request:
    paths-ignore:
      - 'README.md'
      - 'LICENSE'
jobs:
  build:
    name: Build
    runs-on: ${{ matrix.os }}
    strategy:
      matrix:
        os: [macos-latest]
        qt_ver: [5.9.8,5.12.6]
    steps:
      - name: Install Qt
        uses: jurplel/install-qt-action@v2.0.0
        with:
          version: ${{ matrix.qt_ver }}
      - uses: actions/checkout@v1
        with:
          fetch-depth: 1
      - name: build macos
        run: |
          qmake
          make
|
Android平台
Android使用ubuntu编译,Windows那个ndk似乎没装,未尝试。
如果只使用Qt5.12.6,默认的配置可以直接用,编译前设置环境变量 ANDROID_SDK_ROOT
和ANDROID_NDK_ROOT就可以了。
Qt5.9.8要指定低版本的NDK、SDK才行,这里涛哥没有进一步尝试。
1
2
3
4
5
6
7
8
9
10
11
12
13
14
15
16
17
18
19
20
21
22
23
24
25
26
27
28
29
30
31
32
33
34
35
36
37
38
39
40
41
42
43
44
45
46
47
|
name: Android
on:
  push:
    paths-ignore:
      - 'README.md'
      - 'LICENSE'
  pull_request:
    paths-ignore:
      - 'README.md'
      - 'LICENSE'
jobs:
  build:
    name: Build
    runs-on: ${{ matrix.os }}
    strategy:
      matrix:
        os: [ubuntu-latest]

        qt_ver: [5.12.6]
        qt_target: [android]


        qt_arch: [android_x86,android_armv7]


    steps:
      - name: Install Qt

        uses: jurplel/install-qt-action@v2.0.0
        with:

          version: ${{ matrix.qt_ver }}

          target: ${{ matrix.qt_target }}

          arch: ${{ matrix.qt_arch }}
      - uses: actions/checkout@v1
        with:
          fetch-depth: 1
      - name: build android
        run: |
          export ANDROID_SDK_ROOT=$ANDROID_HOME
          export ANDROID_NDK_ROOT=$ANDROID_HOME/ndk-bundle
          qmake
          make
|
IOS平台
ios只能使用MacOS编译。
qmake的时候要指定平台、release模式等。
1
2
3
4
5
6
7
8
9
10
11
12
13
14
15
16
17
18
19
20
21
22
23
24
25
26
27
28
29
30
31
32
33
34
|
name: IOS
on:
  push:
    paths-ignore:
      - 'README.md'
  pull_request:
    paths-ignore:
      - 'README.md'
jobs:
  build:
    name: Build
    runs-on: ${{ matrix.os }}
    strategy:
      matrix:
        os: [macos-latest]
        qt_ver: [5.12.6]
        qt_target: [ios]
    steps:
      - name: Install Qt

        uses: jurplel/install-qt-action@v2.0.0
        with:

          version: ${{ matrix.qt_ver }}

          target: ${{ matrix.qt_target }}
      - uses: actions/checkout@v1
        with:
          fetch-depth: 1
      - name: build ios
        run: |
          qmake -r -spec macx-ios-clang CONFIG+=release CONFIG+=iphoneos
          make
|



