很多现代化的软件,都会有向导功能,相信大家并不陌生。
“用户向导”的作用,可以帮助新用户快速了解产品,也可以用来提醒用户该如何操作。
这次涛哥就分享一个Qml制作“用户向导”的方案。
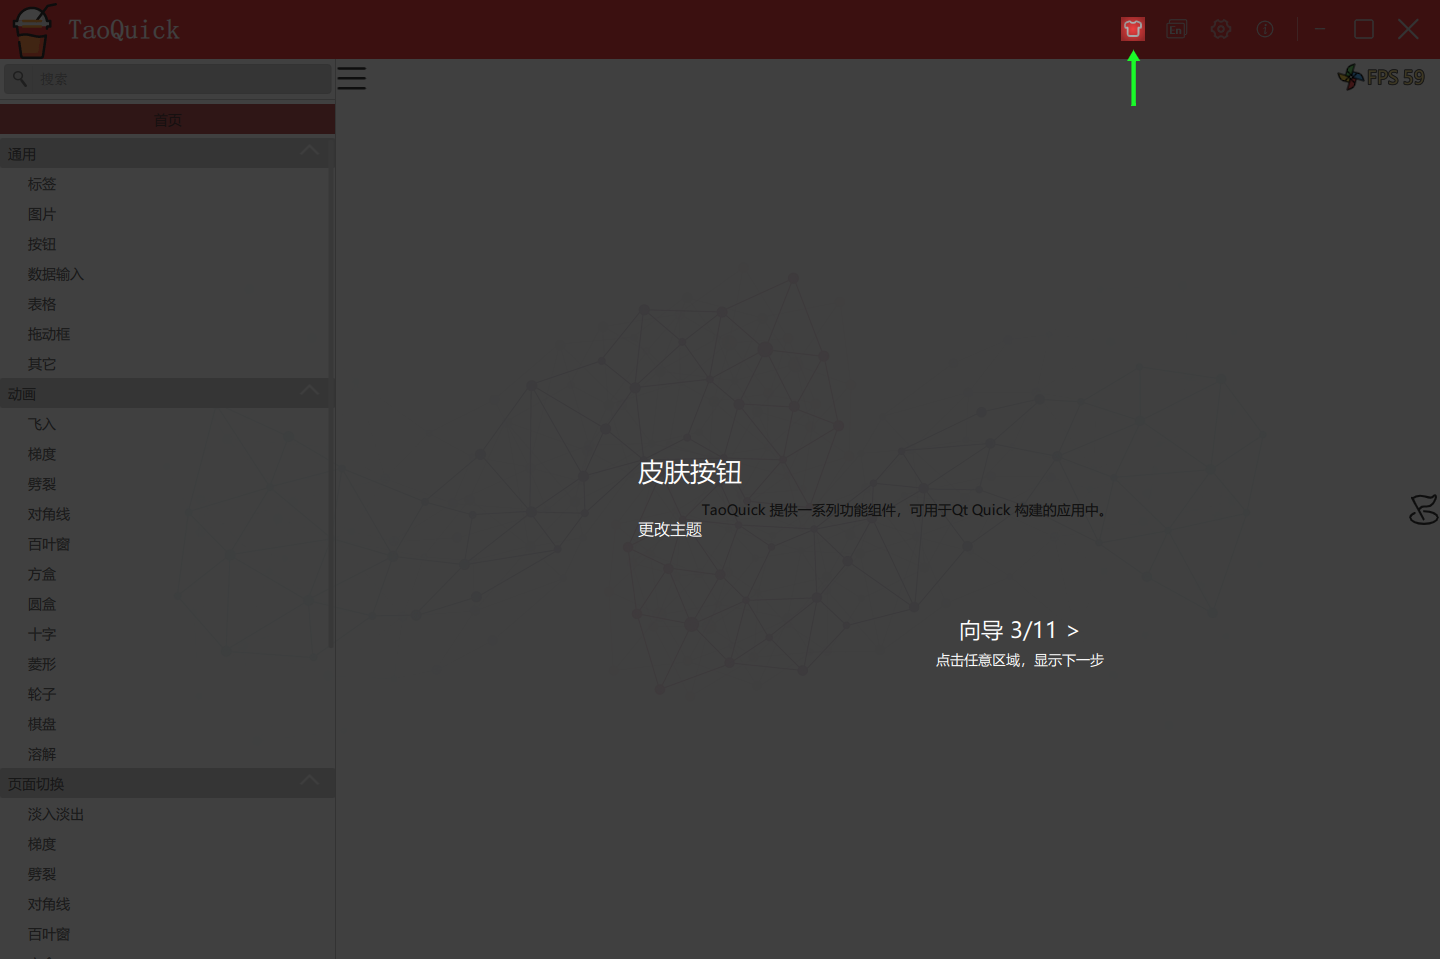
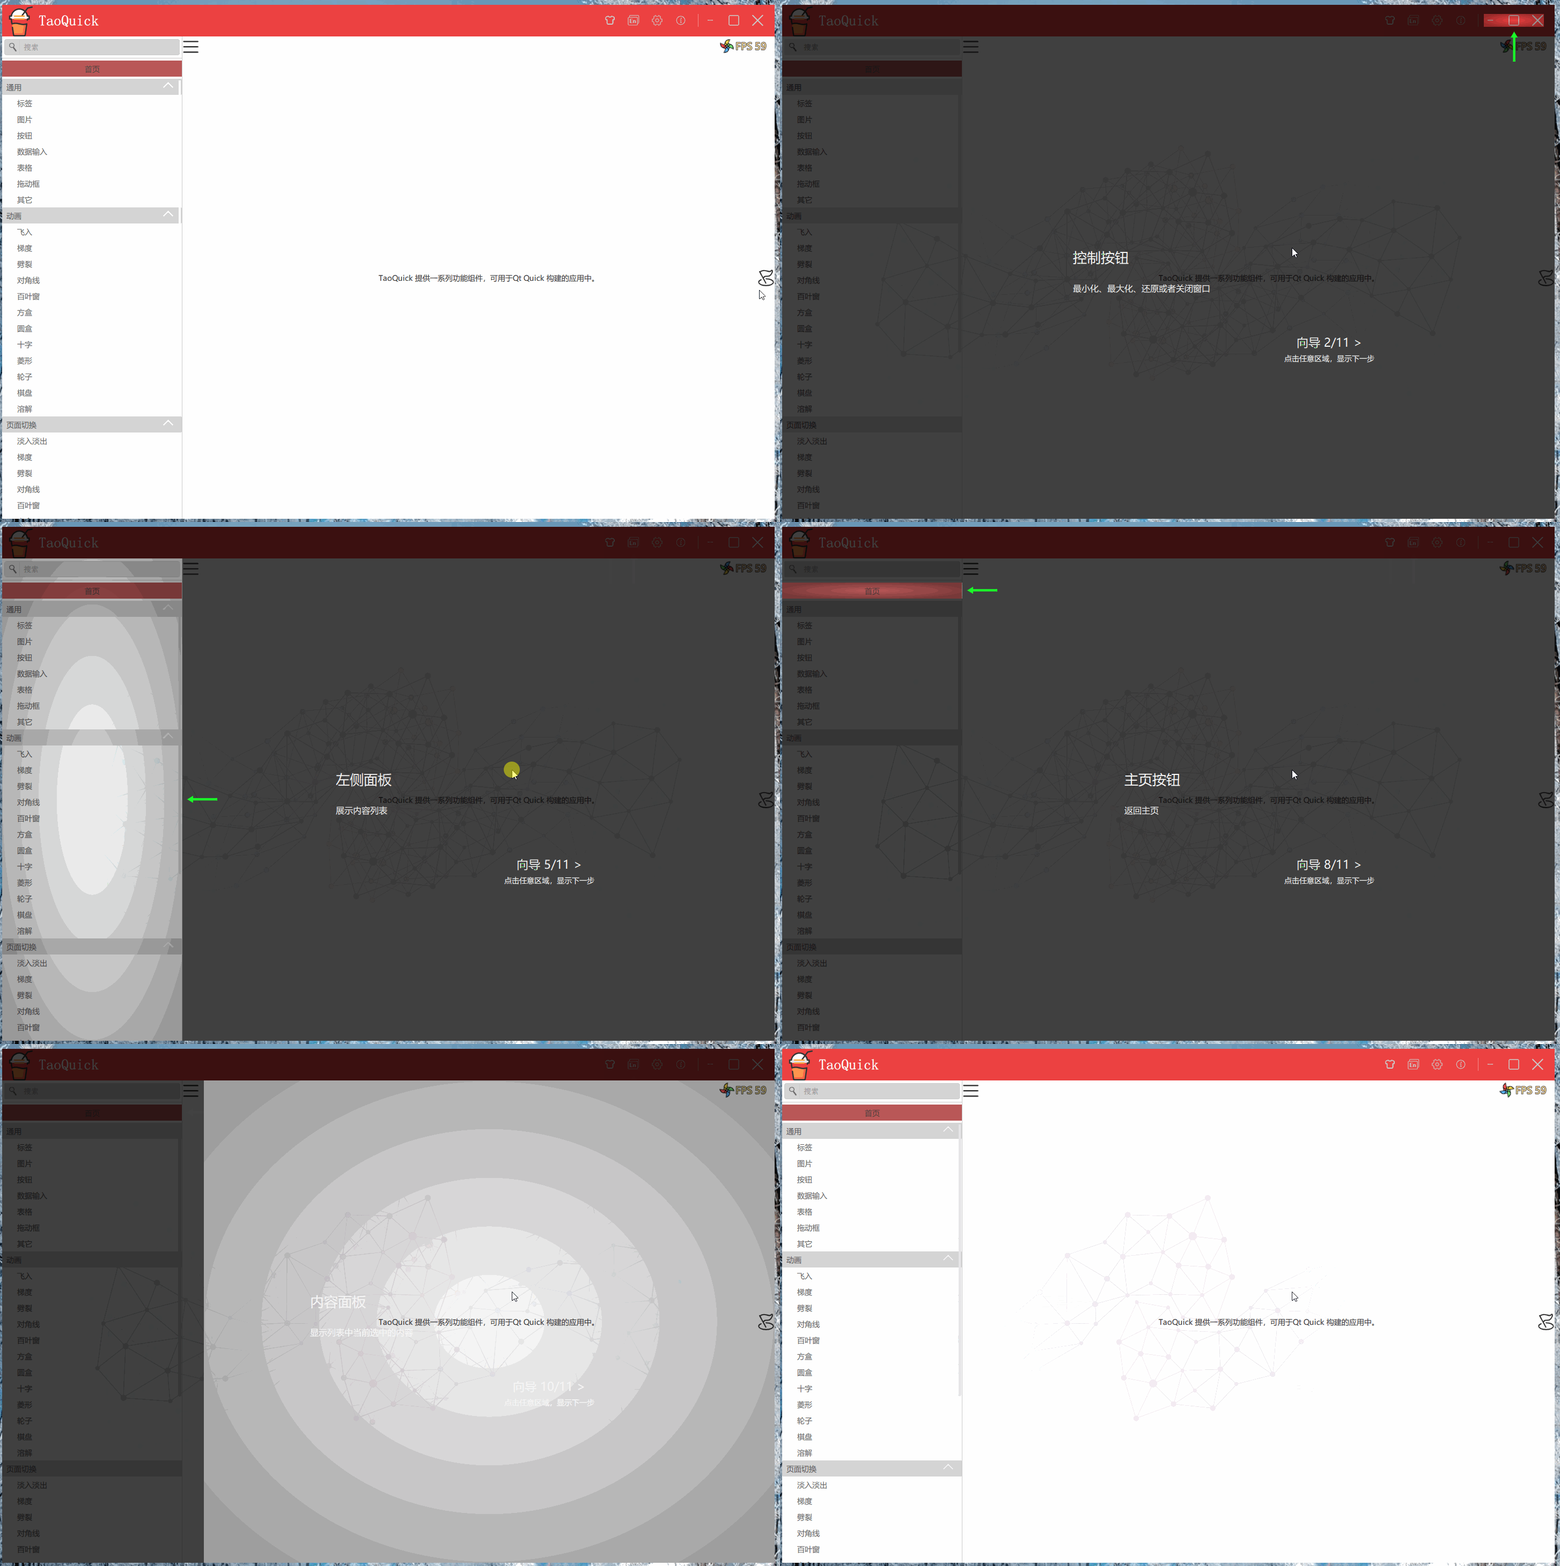
看一下最终效果
在整个软件界面上,覆盖一层遮罩,只保留一部分镂空区域,并用箭头指向镂空区域,
以此,将用户的眼球聚焦到镂空区域,并用适当的文字,说明镂空区域的作用。
这个遮罩层是不能操作到软件界面的,点击任意区域,会转到下一步的向导,直到最后向导退出。
《玩转Qml》系列文章,配套了一个优秀的开源项目:TaoQuick
github https://github.com/jaredtao/TaoQuick
访问不了或者速度太慢,可以用国内的镜像网站gitee
https://gitee.com/jaredtao/TaoQuick
向导的实现方案有很多,比如贴图之类的。按不同的需求,方案也不尽相同。
这里先列一个涛哥的需求,再讨论方案才有意义。
窗口大小不固定
焦点区域可以是Qml界面中的任意可视组件
向导功能要独立实现,且对已有代码改动最小
遮罩的制作,在Qml中就是几个半透明的Rectangle拼在一起,附带一个顶层MouseArea,
将所有鼠标事件都过滤掉,这些都比较简单。
焦点区域才是本文的核心。
先来说一下Qml中的对象作用域吧。
如果你阅读过《Qml Book》或者有一定的Qml经验,就知道Qml中的对象,都是通过id相互引用的。
像html / Android,都有类似findElementById这样的接口,获取任意的组件。
在Qml,省去了find这一步,可以直接使用id进行访问。
不过呢,Qml这个id的可访问性,不是任何场景都能直接用的,有诸多情况下,不能直接使用, 例如:
平级的两个组件,它们的子组件不能互相访问到(同一个文件作用域中的除外)
各种View的delegate中的组件id,view外部不能直接访问(这是因为delegate有多个实例的情况下,id不能唯一标识)
Loader/Component动态加载后的子组件,不能被直接访问(动态加载,都不知道它什么时候创建,当然不能用它)
诸如此类,都不能直接访问。
扩展说明:
顶层组件的id,可以被所有子组件访问,因此可以用来存储全局对象;
Qml单例组件,或者C++上下文对象,也可以被所有子组件访问。
这两种方式也可以用来实现向导功能,有兴趣的读者可自己探索。
Qml中的所有可视化组件,大都是继承于Item,Item的继承关系是 Item ==> QQuickItem ==> QObject
因此呢,Qml中的所有对象,都在一个QObject树上,具有父子关系。
我们可以从任意节点,向上找到根节点,也可以通过根节点的findChild的方式,找到任意一个带objectName的节点。
涛哥的向导方案,便是基于此实现。
在已有的Qml代码中,对于想当作焦点区域的组件,最小改动是增加一个objectName
例如涛哥想把已有的标题栏按钮,作为焦点区域:
改动前:
1
2
3
4
5
6
7
... SkinBtn { width : 24 height : 24 anchors.verticalCenter : parent .verticalCenter } ...
改动后:
1
2
3
4
5
6
7
8
... SkinBtn { width : 24 height : 24 anchors.verticalCenter : parent .verticalCenter objectName : "skinBtn" } ...
像前面的组件,只要有了objectName,就可以从任意位置获取到它了
这需要一点C++代码扩展
1
2
3
4
5
6
7
QQuickItem *getObject (QObject * pRootObject, const QString &targetObjName) if (!pRootObject) { return nullptr ; } return pRootObject->findChild<QQuickItem *>(targetObjName); }
通过findChild就可以拿到目标对象了, rootObject是根节点,可以从任意节点向上找到,
也可以通过QQmlContex直接获取到。
找到了对象,就可以计算它的坐标,用于向导了。
为了方便计算,同时避免处理繁杂的父子关系,可以直接把坐标映射到顶层窗口。向导的坐标也以顶层窗口为准即可。
这里进一步封装了C++代码,直接计算好坐标
1
2
3
4
5
6
7
8
9
10
11
12
13
14
15
16
17
18
QRect getItemGeometryToScene (const QString &targetObjName) const if (!pRootObject) { return {}; } auto pItem = pRootObject->findChild<QQuickItem *>(targetObjName); if (pItem) { if (pItem->parentItem()) { auto pos = pItem->parentItem()->mapToScene(pItem->position()); return QRectF { pos.x(), pos.y(), pItem->width(), pItem->height() }.toRect(); } else { return pItem->boundingRect().toRect(); } } return {}; }
完整的代码,可以在TaoQuick项目中看到, 封装了一个QuickTool类,
所在路径是TaoQuick/3rdparty/TaoCommon/QuickTool
接下来就是封装一个向导页面了,遮罩围绕在焦点四周,同时带上箭头和文字说明即可
1
2
3
4
5
6
7
8
9
10
11
12
13
14
15
16
17
18
19
20
21
22
23
24
25
26
27
28
29
30
31
32
33
34
35
36
37
38
39
40
41
42
43
44
45
46
47
48
49
50
51
52
53
54
55
56
57
58
59
60
61
62
63
64
65
66
67
68
69
70
71
72
73
74
75
76
77
78
79
80
81
82
83
84
85
86
87
88
89
90
91
92
93
94
95
96
97
98
99
100
101
102
103
104
105
106
107
108
109
110
111
112
113
114
115
116
117
118
119
120
121
122
123
124
125
126
127
128
129
130
131
132
133
134
135
136
137
138
139
140
141
142
143
144
145
146
147
148
149
150
151
152
153
154
155
156
157
158
159
160
161
162
163
164
165
166
167
168
169
170
171
172
173
174
175
import QtQuick 2.9 import QtQuick.Controls 2.2 import QtGraphicalEffects 1.0 import ".." import "../.." Item { id: pageItem z: 998 anchors.fill: parent property string wizardName property string wizardDescript property string targetObjectName property int pageType: pageTypeDown property color maskColor: "black" property real maskOpacity: 0.75 property rect focusRect readonly property int pageTypeDown: Qt.DownArrow readonly property int pageTypeUp: Qt.UpArrow readonly property int pageTypeLeft: Qt.LeftArrow readonly property int pageTypeRight: Qt.RightArrow Component.onCompleted: { var rect = quickTool.getItemGeometryToScene(targetObjectName) focusRect = rect } Item { id: focusItem x: focusRect.x y: focusRect.y width: focusRect.width height: focusRect.height RadialGradient { anchors.fill: parent gradient: Gradient { GradientStop { position: 0.0 ; color: "transparent" } GradientStop { position: 0.6 ; color: maskColor } } opacity: maskOpacity / 2 } } Rectangle { x: 0 y: 0 width: focusRect.x height: parent.height color: maskColor opacity: maskOpacity } Rectangle { x: focusRect.x + focusRect.width y: 0 width: pageItem.width - x height: parent.height color: maskColor opacity: maskOpacity } Rectangle { x: focusRect.x width: focusRect.width y: 0 height: focusRect.y color: maskColor opacity: maskOpacity } Rectangle { x: focusRect.x width: focusRect.width y: focusRect.y + focusRect.height height: pageItem.height - y color: maskColor opacity: maskOpacity } Row { id: leftRow spacing: 10 visible: pageType === pageTypeLeft z: 998 anchors { left: focusItem.right leftMargin: 5 verticalCenter: focusItem.verticalCenter } CusImage { source: CusConfig.imagePathPrefix + "arrow-left.png" anchors.verticalCenter: parent.verticalCenter } } Row { id: rightRow spacing: 10 layoutDirection: Qt.RightToLeft visible: pageType === pageTypeRight z: 998 anchors { right: focusItem.left rightMargin: 5 verticalCenter: focusItem.verticalCenter } CusImage { source: CusConfig.imagePathPrefix + "arrow-right.png" anchors.verticalCenter: parent.verticalCenter } } Column { id: downColumn spacing: 10 visible: pageType === pageTypeDown width: 300 z: 998 anchors { bottom: focusItem.top bottomMargin: 5 horizontalCenter: focusItem.horizontalCenter } CusImage { source: CusConfig.imagePathPrefix + "arrow-down.png" anchors.horizontalCenter: parent.horizontalCenter } } Column { id: upColumn spacing: 10 visible: pageType === pageTypeUp width: 300 z: 998 anchors { top: focusItem.bottom topMargin: 5 horizontalCenter: focusItem.horizontalCenter } CusImage { source: CusConfig.imagePathPrefix + "arrow-up.png" anchors.horizontalCenter: parent.horizontalCenter } } CusLabel { id: wizardDescriptLabel z: 998 text: qsTr(wizardDescript) + CusConfig.transString font.pixelSize: 16 color: "white" anchors { horizontalCenter: parent.horizontalCenter verticalCenter: parent.verticalCenter verticalCenterOffset: 50 horizontalCenterOffset: -50 } } CusLabel { z: 998 text: qsTr(wizardName) + CusConfig.transString font.pixelSize: 26 color: "white" anchors { left: wizardDescriptLabel.left bottom: wizardDescriptLabel.top bottomMargin: 30 } } }
向导一般不止一页,而是很多页,这里就封装了一个向导组件。
使用model-view的方式,数据源由外部设置,组件只管按照model去实例化对应的向导页即可
1
2
3
4
5
6
7
8
9
10
11
12
13
14
15
16
17
18
19
20
21
22
23
24
25
26
27
28
29
30
31
32
33
34
35
36
37
38
39
40
41
42
43
44
45
46
47
48
49
50
51
52
53
54
55
56
57
58
59
import QtQuick 2.9 import QtQuick.Controls 2.2 import ".." import "../.." Item { id: cusWizardItem signal wizardFinished property string totlaString : qsTr("Wizard %1/%2 >" ).arg(currentIndex + 1 ).arg(count) + CusConfig.transString property string operatorString : qsTr("Click any area to show next" ) + CusConfig.transString MouseArea { anchors.fill : parent hoverEnabled : true onClicked : { currentIndex++ if (currentIndex >= count) { wizardFinished() } } } property var model property int count : model.count property int currentIndex : 0 Repeater { model : cusWizardItem.model delegate : CusWizardPage { anchors.fill : parent visible : index === currentIndex wizardName : model.name wizardDescript : model.descript targetObjectName : model.targetObjectName pageType : model.arrowType } } CusLabel { z : 999 id: centerLabel anchors { centerIn : parent horizontalCenterOffset : 300 verticalCenterOffset : 150 } text : totlaString font.pixelSize : 22 color : "white" } CusLabel { z : 999 anchors { centerIn : parent horizontalCenterOffset : 300 verticalCenterOffset : 150 + centerLabel.height } text : operatorString color : "white" } }
最后来看一下,TaoQuick项目的首页,提供的向导数据model
1
2
3
4
5
6
7
8
9
10
11
12
13
14
15
16
17
18
19
20
21
22
23
24
25
26
27
28
29
30
31
32
33
34
35
36
37
38
39
40
41
42
43
44
45
46
47
48
49
50
51
52
53
54
55
56
57
58
59
60
61
62
63
64
65
66
67
68
69
ListModel { id: wizardModel ListElement { name : "TitleBar" descript : "drag change window pos, double click change window state" targetObjectName : "blankItem" arrowType : Qt.UpArrow } ListElement { name : "Control Buttons" descript : "minimize, maximize, normal or close main window" targetObjectName : "controlButtonsRow" arrowType : Qt.UpArrow } ListElement { name : "Skin Button" descript : "switch theme" targetObjectName : "skinBtn" arrowType : Qt.UpArrow } ListElement { name : "Language Button" descript : "switch language" targetObjectName : "langBtn" arrowType : Qt.UpArrow } ListElement { name : "Left Pane" descript : "show content list" targetObjectName : "leftPane" arrowType : Qt.LeftArrow } ListElement { name : "Drawer Button" descript : "show or hide left pane" targetObjectName : "menuBtn" arrowType : Qt.LeftArrow } ListElement { name : "Search Input" descript : "search content" targetObjectName : "searchInput" arrowType : Qt.LeftArrow } ListElement { name : "Home Button" descript : "go back home page" targetObjectName : "homeBtn" arrowType : Qt.LeftArrow } ListElement { name : "Content List" descript : "switch content" targetObjectName : "contentListView" arrowType : Qt.LeftArrow } ListElement { name : "Content Pane" descript : "show current selected content by list" targetObjectName : "contentRect" arrowType : Qt.RightArrow } ListElement { name : "Tool Buttons" descript : "special function buttons such as Wizard, View Source Code and so on" targetObjectName : "wizardBtn" arrowType : Qt.RightArrow } }