惯性聚合 高效追踪和阅读你感兴趣的博客、新闻、科技资讯
阅读原文 在惯性聚合中打开

推荐订阅源

让小产品的独立变现更简单 - ezindie.com
小众软件
小众软件
V
Vulnerabilities – Threatpost
P
Proofpoint News Feed
The Register - Security
A
About on SuperTechFans
L
LINUX DO - 热门话题
Blog — PlanetScale
Blog — PlanetScale
V
Visual Studio Blog
The Cloudflare Blog
The Last Watchdog
The Last Watchdog
Google DeepMind News
L
LangChain Blog
博客园_首页
M
MIT News - Artificial intelligence
C
CERT Recently Published Vulnerability Notes
Recent Announcements
NISL@THU
NISL@THU
P
Privacy & Cybersecurity Law Blog
MongoDB | Blog
MongoDB | Blog
C
Check Point Blog
C
Cybersecurity and Infrastructure Security Agency CISA
G
GRAHAM CLULEY
Scott Helme
Scott Helme
P
Palo Alto Networks Blog
博客园 - Franky
The Hacker News
The Hacker News
Microsoft Security Blog
爱范儿
爱范儿
Security Latest
Security Latest
腾讯CDC
Threat Intelligence Blog | Flashpoint
T
Threat Research - Cisco Blogs
Know Your Adversary
Know Your Adversary
P
Proofpoint News Feed
T
The Exploit Database - CXSecurity.com
T
Tenable Blog
V
V2EX
Hacker News: Ask HN
Hacker News: Ask HN
大猫的无限游戏
大猫的无限游戏
MyScale Blog
MyScale Blog
Cyber Security Advisories - MS-ISAC
S
SegmentFault 最新的问题
Latest news
Latest news
S
Schneier on Security
博客园 - 三生石上(FineUI控件)
L
Lohrmann on Cybersecurity
cs.CV updates on arXiv.org
T
Tor Project blog
Application and Cybersecurity Blog

Mohuishou

如何实现支持多集群的 Kubernetes Operator? 第三方应用如何调用我们 kubebuilder 生成的自定义资源? Kubernetes 简明教程 k8s job 为何迟迟不能结束? Go 工程化(十一) 如何优雅的写出 repo 层代码 Go 工程化(十) 如何在整洁架构中使用事务? 给博客添加章节目录 使用 Notion Database 管理静态博客文章 一个普通 Go 开发的三年 4. localhost 就一定是 localhost 么? Go可用性(七) 总结: 一张图串联可用性知识点 Go可用性(六) 熔断 10. 总结 9. kubebuilder 进阶: 源码分析 8. kubebuilder 进阶: webhook 7. kubebuilder 进阶: 测试 6. kubebuilder 实战: status & event 5. kubebuilder 实战: CRUD 4. kustomize 简明教程 3. KubeBuilder 简明教程 1. Operator概述: 如何对 Kubernetes 进行扩展 Go可用性(五) 自适应限流 Go可用性(四) 漏桶算法 Go可用性(三) 令牌桶的实现 rate/limt Go可用性(二) 令牌桶原理及使用 Go可用性(一) 隔离设计 Go并发编程(十二) Singleflight Go工程化(九) 项目重构实践 Go工程化(八) 单元测试 Go工程化(七) Go Module Go工程化(六) 配置管理 Go工程化(五) API 设计下: 基于 protobuf 自动生成 gin 代码 Go工程化(四) API 设计上: 项目结构 & 设计 Go工程化(三) 依赖注入框架 wire Go工程化(二) 项目目录结构 Go工程化(一) 架构整洁之道阅读笔记 Go并发编程(十一) 总结 Go并发编程(十) 深入理解 Channel Go并发编程(九) 深入理解 Context Go并发编程(八) 深入理解 sync.Once Go并发编程(七) 深入理解 errgroup Go并发编程(六) 深入理解 WaitGroup Go并发编程(五) 深入理解 sync/atomic Go并发编程(四) 深入理解 Mutex Go并发编程(三) data race Go并发编程(二) Go 内存模型 Go并发编程(一) goroutine Go错误处理最佳实践 微服务(二) 服务发现&多租户 微服务(一) 微服务概览 5. 栈下: 深入理解 defer 4. 栈上: 如何实现一个计算器 Go Struct 初始化风格的抉择 3. 数组下: 使用 GDB 调试 Golang 代码 2. 数组上: 深入理解 slice 1. 链表: 深入理解container/list&LRU缓存的实现 Go设计模式24-总结(更新完毕) Go设计模式23-中介模式 Go设计模式22-解释器模式 Go设计模式21-命令模式 Go设计模式20-备忘录模式 Go设计模式19-访问者模式 Go设计模式18-迭代器模式 Go设计模式17-状态模式 Go设计模式16-职责链模式(Gin的中间件实现) Go设计模式15-策略模式 Go模板模式14-模板模式 Go设计模式13-观察者模式(实现简单的EventBus) Go设计模式12-享元模式 Go设计模式11-组合模式 Go设计模式10-门面模式 Go设计模式09-适配器模式 Go设计模式08-装饰器模式 Go设计模式07-桥接模式 Go设计模式06-代理模式(generate实现类似动态代理) Go设计模式05-创建型模式总结 Go设计模式04-原型模式 Go设计模式03-建造者模式 Go设计模式02-工厂模式&DI容器 笔记-让你最快速地改善代码质量的20条编程规范 Go设计模式01-单例模式 一点拙见-如何写好一个技术预研报告? Go Web小技巧(四)在单个仓库中支持多个 go mod 模块 Go Web 小技巧(三)Gin 参数绑定 Go Web 小技巧(二)GORM 使用自定义类型 Go Web 小技巧(一)简化Gin接口代码 善用工具之postman高级用法概述 go generate and ast hexo-next-algolia-search全文搜索 docker镜像瘦身&优化 GORM避坑指南之含关联关系的更新 Github Actions介绍&自动构建Github Pages博客 在blog中内嵌在线PPT 记一次net http内存泄漏 使用TravisCI自动部署Blog 使用Goland调试Go程序 一个十分边缘的gorm的bug Httprouter介绍及源码阅读 Gin源码阅读 从0.1开始
2. Kind: 如何快速搭建本地 K8s 开发环境?
Mohuishou · 2021-05-07 · via Mohuishou

注:本文已发布超过一年,请注意您所使用工具的相关版本是否适用

上篇文章中我们讲到了 k8s 中有哪些扩展点,开始 Operator 开发相关之前我们需要先把本地环境搭建好

一、依赖检查

开始之前需要先检查一下

  • 是否已经安装好了 Docker 环境
    • 如果还没安装 Mac/Windows 的用户可以直接安装 Docker Desktop
    • Windows 用户推荐使用 WSL2
  • 是否已经安装好了 Golang 环境, Go 版本最好 >= 1.15

2.1 安装

如果本地存在 Golang 环境可以直接执行下方命令进行安装

1
GO111MODULE="on" go install sigs.k8s.io/kind@latest 

如果不想通过源码安装可以查看官方文档直接安装编译好的二进制文件

执行下方命令可以输出 kind 的版本就表示安装好了

1
2
❯ kind version
kind v0.10.0 go1.16 linux/amd64

2.2 创建一个 K8s 集群

使用下方命令即可创建一个简单的单节点 K8s 集群

1
kind create clutser

集群的创建时间和你的网络环境以及机器的性能有关系,kind 会去 docker hub 上拉取 kindest/node 镜像,这个镜像大概有 400M 的大小,当出现下方的提示的时候就说明集群创建好了

1
2
3
4
5
6
7
8
9
10
11
12
13
14
❯ kind create cluster
Creating cluster "kind" ...
✓ Ensuring node image (kindest/node:v1.20.2) 🖼
✓ Preparing nodes 📦
✓ Writing configuration 📜
✓ Starting control-plane 🕹️
✓ Installing CNI 🔌
✓ Installing StorageClass 💾
Set kubectl context to "kind-kind"
You can now use your cluster with:

kubectl cluster-info --context kind-kind

Thanks for using kind! 😊

我们可以使用 kind get clusters 获取我们创建的集群列表,kind 支持创建多个集群,不手动指定集群名称的时候默认名为 kind ,我们也可以像下面一样在创建集群的时候使用 --name 指定集群名称

1
kind create cluster --name mohuishou

可以看到我们两个集群都创建好了

1
2
3
❯ kind get clusters
kind
mohuishou

现在我们只需要一个集群,所以可以先使用 kind delete clusters mohuishou 将刚刚创建的集群先删除掉

2.3 使用集群

下面我们来看一下 kubectl 的常用命令是否都可以正常使用,并且部署一个简单的 web 服务试试

查看集群信息

1
2
3
4
5
❯ kubectl  cluster-info --context kind-kind
Kubernetes master is running at https://127.0.0.1:41801
KubeDNS is running at https://127.0.0.1:41801/api/v1/namespaces/kube-system/services/kube-dns:dns/proxy

To further debug and diagnose cluster problems, use 'kubectl cluster-info dump'.

可以看到我们 k8s master 地址和 dns 的地址,注意一般情况下我们只创建一个集群不需要指定 --context cluster name 但是创建了多个集群时这个基本就是必须的一个命令了。如果不加这个参数可能会报下面的错误

1
The connection to the server localhost:8080 was refused - did you specify the right host or port?

这是因为 kubectl默认连接的 apiserver 地址是 localhost:8080但是我们的 apiserver 地址不是这个所以报错。

为什么我们使用 --context cluster-name 就可以了呢?

这是因为 kind 在创建集群的时候会修改 $HOME/.kube/config 的配置,将集群的 apiserver 地址,证书等相关信息都自动写入进去了

每次命令都要加上这个参数好麻烦怎么办?

我们可以使用 kubectl config use-context context-name 来进行设置,设置好了之后我们后续就不用每次都加上 –context 的参数了,同时还可以通过 kubectl config current-context 查询我们当前默认操作的集群是哪一个

查看集群节点列表

可以发现我们部署的是一个单节点的 v1.20.2 的集群

1
2
3
❯ kubectl get no
NAME STATUS ROLES AGE VERSION
kind-control-plane Ready control-plane,master 20m v1.20.2

部署一个 Nginx 服务

使用下方代码创建一个 nginx.yml 文件,然后使用 kubectl apply -f nginx.yml 就可以完成部署了

1
2
3
4
5
6
7
8
9
10
11
12
13
14
15
16
17
18
19
20
21
22
apiVersion: apps/v1
kind: Deployment
metadata:
name: nginx-deployment
labels:
app: nginx
spec:
replicas: 3
selector:
matchLabels:
app: nginx
template:
metadata:
labels:
app: nginx
spec:
containers:
- name: nginx
image: nginx:1.14.2
ports:
- containerPort: 80

查看当前 deployment 的状态

1
2
3
❯ kubectl get deployment
NAME READY UP-TO-DATE AVAILABLE AGE
nginx-deployment 0/3 3 0 39s

查看 pod 的状态

1
2
3
4
5
❯ kubectl get pods         
NAME READY STATUS RESTARTS AGE
nginx-deployment-66b6c48dd5-2s5cb 1/1 Running 0 84s
nginx-deployment-66b6c48dd5-8wf8b 1/1 Running 0 84s
nginx-deployment-66b6c48dd5-zc6vd 1/1 Running 0 84s

由于我们没有做服务暴露,所以是不能直接访问对应的服务的,我们可以用 kubectl 提供的端口转发功能来讲流量从本地转发给 k8s 集群

1
2
3
4
❯ kubectl port-forward nginx-deployment-66b6c48dd5-2s5cb 30080:80
Forwarding from 127.0.0.1:30080 -> 80
Forwarding from [::1]:30080 -> 80
Handling connection for 30080

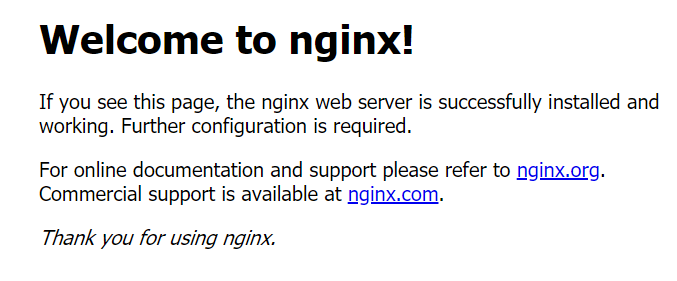
我们访问 http://localhost:30080 就会发现这个熟悉的 nginx 界面

image-20210424210804343

到这里可以发现我们集群已经是可以使用了

2.4 进阶使用

2.4.1 创建一个多节点的集群

kind 默认创建的是一个单节点的集群,我们可以通过修改配置创建一个高可用的集群,我们创建一个 3 个 master 节点,两个 worker 节点的集群

kind create cluster --name mohuishou-ha --config kind-ha.yml

1
2
3
4
5
6
7
8
kind: Cluster
apiVersion: kind.x-k8s.io/v1alpha4
nodes:
- role: control-plane
- role: worker
- role: worker

看一下节点即可验证

1
2
3
4
5
6
7
❯ kubectl --context kind-mohuishou-ha get no                 
NAME STATUS ROLES AGE VERSION
mohuishou-ha-control-plane Ready control-plane,master 16m v1.20.2
mohuishou-ha-control-plane2 Ready control-plane,master 14m v1.20.2
mohuishou-ha-control-plane3 Ready control-plane,master 13m v1.20.2
mohuishou-ha-worker Ready <none> 5m52s v1.20.2
mohuishou-ha-worker2 Ready <none> 5m52s v1.20.2

2.4.2 Load Image

一般来说我们在 k8s 内部署应用需要先把容器镜像推送到到镜像仓库当中,这样在本地开发的时候相对来说会比较麻烦,特别是镜像比较大的时候,往返会有两次网络消耗,为了解决这个问题我们可以使用 kind load 镜像的功能直接把镜像加载到集群中

1
kind load docker-image my-custom-image-0 my-custom-image-1 --name kind

排坑指南:load image 成功,但是部署 pod 报错

1
Failed to pull image "controller:latest": rpc error: code = Unknown desc = failed to pull and unpack image "docker.io/library/controller:latest": failed to resolve reference "docker.io/library/controller:latest": pull access denied, repository does not exist or may require authorization: server message: insufficient_scope: authorization failed

这个问题之前卡了我很久,还是有点坑

  1. 进入节点查看: 镜像是否存在

    • 获取节点名

      1
      2
      3
      ▶ kubectl get nodes
      NAME STATUS ROLES AGE VERSION
      kind-control-plane Ready control-plane,master 2d1h v1.20.2
    • 进入终端

      1
      docker exec -it kind-control-plane bash
    • 查看镜像是否存在,kind 创建的集群使用的是 containerd 所以我们使用 crictl 命令来获取

      1
      2
      crictl img | grep controller
      docker.io/library/controller latest 421cbf77618ba 72.1MB
  2. 如果镜像存在,也就是我们上面看到的情况,这时候就要检查一下我们部署的 yaml 文件

    1
    kubectl -n node-pool-operator-system  get deployment -o yaml | grep imagePullPolicy

    是否存在: imagePullPolicy: Always 如果我们没有改 yaml 的话默认会是这个配置,这个配置会导致每次都去镜像仓库拉取镜像,改成 imagePullPolicy: IfNotPresent 就可以了

  3. 如果镜像不存在:这时候要检查一下有没有指定 cluster-name,在存在多个集群的情况下可能没有加载到我们想要的集群,加上 --name cluster-name 即可

总结

kind 在创建集群的时候实际上使用的是 kubeadm 所以还可以修改 kubeadm 的配置来修改默认的镜像地址,节点标签污点等信息,除此之外还可以配置 PV/PVC CNI 插件等配置,如果有需求的话可以查阅 kind 的官方文档

不过要注意的是 kind 不支持给运行的集群添加节点,如果需要多节点集群的话得提前规划好节点数量

参考文献

关注我获取更新

猜你喜欢