





在几个月前,我购买了一个 8845HS 的主机,尝试了一番 ROCm,AMD 在 API 的 iGPU 支持上可以说相当慢了,直到目前也只是在利用 DirectML 和 ONNX 的能力实现 iGPU 上运行模型,非常费劲。
Intel 这边就优雅且慷慨的多,oneAPI 统一了 CPU GPU NPU 多端的运行,看起来非常的靠谱,并且提供了 PyTorch+XPU 的后端,已经并入官方仓库,意味着 PyTorch 项目只需要简单的修改下模型的 device 就可以推理了,真是一种方便你我他的好方案。
不过有了上次 8845HS 的经验后,我也没有贸然下单,总想着先找个机器测一测吧,几经辗转,发现 Intel 的 Tiber Cloud 已经可以用了,开了台机器简单测了几个场景,相较 ROCm 之前在 iGPU 的各种报错,Intel 的 XPU 后端顺利的过于幸福。
Tiber 虽然提供的是 Intel 的商用 GPU,但既然官方表示是一视同仁,我相信 iGPU 的支持也不会差,立刻购入了一个摸到支持门坎的 Ultra 5 225H 的迷你主机,瞧瞧是什么情况。
PyTorch+XPU 安装起来也非常简单,通过这个命令即可:
pip3 install torch torchvision torchaudio --index-url https://download.pytorch.org/whl/xpu先测一下 Kokoro 这个 TTS 模型
from kokoro import KPipeline
from IPython.display import display, Audio
import soundfile as sf
pipeline = KPipeline(lang_code='a', device='xpu')

text = '''
[Kokoro](/kˈOkəɹO/) is an open-weight TTS model with 82 million parameters. Despite its lightweight architecture, it delivers comparable quality to larger models while being significantly faster and more cost-efficient. With Apache-licensed weights, [Kokoro](/kˈOkəɹO/) can be deployed anywhere from production environments to personal projects.
'''
generator = pipeline(text, voice='af_heart')
for i, (gs, ps, audio) in enumerate(generator):
    print(i, gs, ps)
    display(Audio(data=audio, rate=24000, autoplay=i==0))
    sf.write(f'{i}.wav', audio, 24000)
这个 20s 的音频首次生成大概是 4s,之后大概花费 2s 左右
import soundfile as sf
from misaki import en, espeak

from kokoro_onnx import Kokoro

# Misaki G2P with espeak-ng fallback
fallback = espeak.EspeakFallback(british=False)
g2p = en.G2P(trf=False, british=False, fallback=fallback)

# Kokoro
kokoro = Kokoro("kokoro-v1.0.onnx", "voices-v1.0.bin")

# Phonemize
text = '''
[Kokoro](/kˈOkəɹO/) is an open-weight TTS model with 82 million parameters. Despite its lightweight architecture, it delivers comparable quality to larger models while being significantly faster and more cost-efficient. With Apache-licensed weights, [Kokoro](/kˈOkəɹO/) can be deployed anywhere from production environments to personal projects.
'''
phonemes, _ = g2p(text)

# Create
samples, sample_rate = kokoro.create(phonemes, "af_heart", is_phonemes=True)

# Save
sf.write("audio.wav", samples, sample_rate)
print("Created audio.wav")
Intel 可以通过 pip install onnxruntime-openvino 来开启 GPU 的支持,稍微修改下 Kokoro 这个类
providers = [('OpenVINOExecutionProvider', {'device_type': 'GPU'})]很遗憾,出错了
RuntimeException: [ONNXRuntimeError] : 6 : RUNTIME_EXCEPTION : Exception during initialization: /onnxruntime/onnxruntime/core/providers/openvino/ov_interface.cc:98 onnxruntime::openvino_ep::OVExeNetwork onnxruntime::openvino_ep::OVCore::CompileModel(std::shared_ptr<const ov::Model>&, std::string&, ov::AnyMap&, const std::string&) [OpenVINO-EP]  Exception while Loading Network for graph: OpenVINOExecutionProvider_OpenVINO-EP-subgraph_1_0Exception from src/inference/src/cpp/core.cpp:109:
Exception from src/inference/src/dev/plugin.cpp:53:
Check 'inputRank == 2 || inputRank == 4 || inputRank == 5' failed at src/plugins/intel_gpu/src/plugin/ops/interpolate.cpp:37:
Mode 'linear_onnx' supports only 2D or 4D, 5D tensors
PaddleOCR-onnx 需要修改一下 PredictBase 这个类
       if use_gpu:
            providers = [('OpenVINOExecutionProvider', {
                          'device_type': 'GPU'})]
也可以使用 'device_type': 'NPU' 'device_type': 'HETERO:GPU,CPU' 这类方式指定计算方式
然后运行项目自带的 test_ocr.py 即可,开启 use_gpu=True
import cv2
import time
from onnxocr.onnx_paddleocr import ONNXPaddleOcr, sav2Img
import sys
import time

model = ONNXPaddleOcr(use_angle_cls=False, use_gpu=True)

img = cv2.imread('./onnxocr/test_images/00006737.jpg')
s = time.time()
result = model.ocr(img)
e = time.time()

for box in result[0]:
    print(box)
print("total time: {:.3f}".format(e - s))
sav2Img(img, result, name=str(time.time())+'.jpg')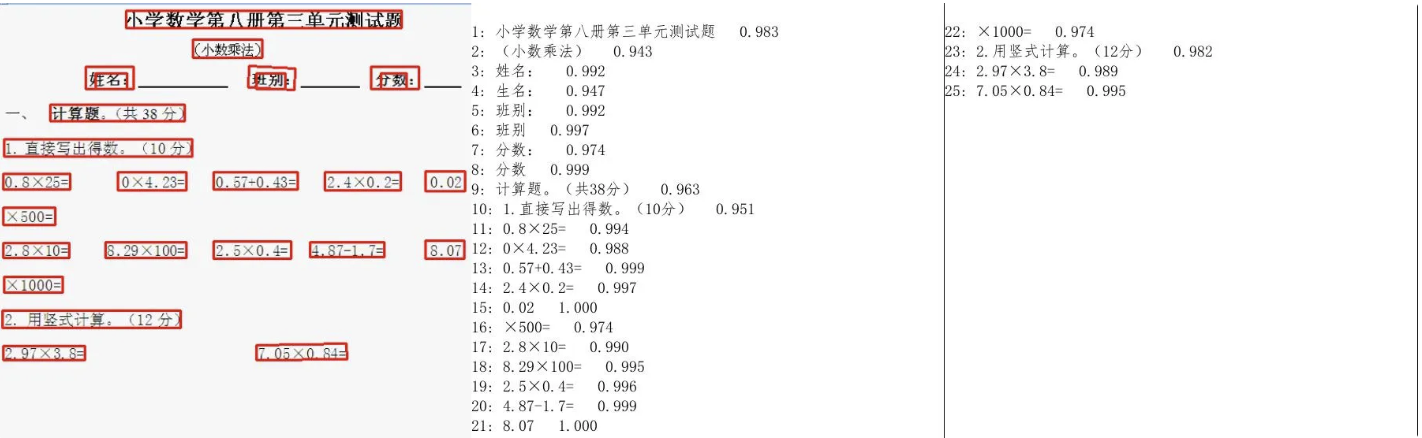
运行良好,花费了大概 1s
Ollama 的 Intel 支持需要通过 https://github.com/intel/ipex-llm 这个项目,使用 Intel 编译的 Ollama 在运行时可以看到
get_memory_info: [warning] ext_intel_free_memory is not supported (export/set ZES_ENABLE_SYSMAN=1 to support), use total memory as free memory
get_memory_info: [warning] ext_intel_free_memory is not supported (export/set ZES_ENABLE_SYSMAN=1 to support), use total memory as free memory
看来自己不需要解决 iGPU 有多少显存的问题
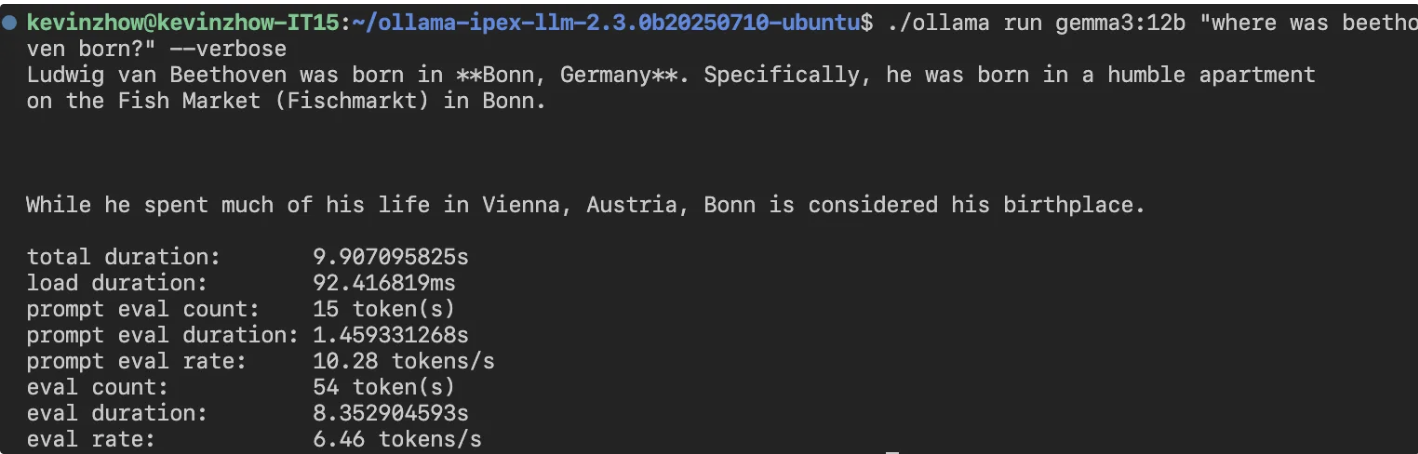
比 8845HS 的 8 tokens/s 慢一些,不知道未来 ipex-llm 是不是还能在这里加把劲。
这次玩下来,PyTorch 的支持挺不错,足以作为一个推理机器使用。
SD 有两个选择,一个是 Diffusers,一个则是 stable-diffusion.cpp
Flux 占用的内存真的不少,32GB 内存跑 FP16 完全不够,官方也给出了的例子使用 GGUF 量化模型的方法,不过这个方案还是不够省内存
import torch

from diffusers import FluxPipeline, FluxTransformer2DModel, GGUFQuantizationConfig

ckpt_path = (
    "./models/flux1-dev-Q4_0.gguf"
)
transformer = FluxTransformer2DModel.from_single_file(
    ckpt_path,
    quantization_config=GGUFQuantizationConfig(compute_dtype=torch.bfloat16),
    torch_dtype=torch.bfloat16,
)
pipe = FluxPipeline.from_pretrained(
    "black-forest-labs/FLUX.1-dev",
    transformer=transformer,
    torch_dtype=torch.bfloat16
)
pipe.enable_model_cpu_offload()
prompt = "A cat holding a sign that says hello world"
image = pipe(prompt,
    generator=torch.manual_seed(0),
    num_inference_steps=20,
    height=512,
    width=512
 ).images[0]
image.save("flux-gguf.png")这部分我参考了此处的实现 ,通过分步的方式节省了不少内存
import torch
from diffusers import FluxPipeline, FluxTransformer2DModel, GGUFQuantizationConfig
import gc

def flush():
    gc.collect()
    torch.xpu.empty_cache()

def main():
    # downloaded from https://huggingface.co/city96/FLUX.1-dev-gguf
    gguf_file = "./models/flux1-dev-Q4_K_S.gguf"
    model_id = "black-forest-labs/FLUX.1-dev"

    pipeline = FluxPipeline.from_pretrained(
            model_id,
            transformer=None,
            vae=None,
            torch_dtype=torch.bfloat16
    ).to("xpu")

    prompt = "a lovely cat holding a sign says 'hello world'"

    with torch.no_grad():
        prompt_embeds, pooled_prompt_embeds, text_ids = pipeline.encode_prompt(
            prompt=prompt,
            prompt_2=None,
        )

    print("text_encoder:")
    print(f"torch.xpu.max_memory_allocated: {torch.xpu.max_memory_allocated()/ 1024**3:.2f} GB")

    del pipeline
    flush()

    transformer = FluxTransformer2DModel.from_single_file(
        gguf_file,
        quantization_config=GGUFQuantizationConfig(compute_dtype=torch.bfloat16),
        torch_dtype=torch.bfloat16
    )
    pipeline = FluxPipeline.from_pretrained(
        model_id,
        transformer=transformer,
        text_encoder=None,
        text_encoder_2=None,
        tokenizer=None,
        tokenizer_2=None,
        torch_dtype=torch.bfloat16
    ).to("xpu")

    image = pipeline(
        prompt_embeds=prompt_embeds,
        pooled_prompt_embeds=pooled_prompt_embeds,
        generator=torch.Generator("xpu").manual_seed(0),
        height=512,
        width=512,
        num_inference_steps=20
    ).images[0]

    save_file = gguf_file.replace(".gguf", ".jpg")
    image.save(save_file)

    print("transformer:")
    print(f"torch.xpu.max_memory_allocated: {torch.xpu.max_memory_allocated()/ 1024**3:.2f} GB")

if __name__ == "__main__":
    main()
Q4 结果如下
Loading checkpoint shards: 100%|███████████████████████████████████████████████████████████████████████████████████████████████████| 2/2 [00:00<00:00, 94.74it/s]
Loading pipeline components...:  60%|████████████████████████████████████████████████████████▍                                     | 3/5 [00:00<00:00, 28.63it/s]You set `add_prefix_space`. The tokenizer needs to be converted from the slow tokenizers
Loading pipeline components...: 100%|██████████████████████████████████████████████████████████████████████████████████████████████| 5/5 [00:00<00:00, 14.99it/s]
text_encoder:
torch.xpu.max_memory_allocated: 9.32 GB
Loading pipeline components...: 100%|██████████████████████████████████████████████████████████████████████████████████████████████| 3/3 [00:00<00:00, 48.13it/s]
100%|████████████████████████████████████████████████████████████████████████████████████████████████████████████████████████████| 20/20 [02:52<00:00,  8.62s/it]
transformer:
torch.xpu.max_memory_allocated: 9.32 GB
Q8 结果如下
Loading checkpoint shards: 100%|███████████████████████████████████████████████████████████████████████████████████████████████████| 2/2 [00:00<00:00, 19.84it/s]
Loading pipeline components...: 100%|██████████████████████████████████████████████████████████████████████████████████████████████| 5/5 [00:00<00:00, 11.03it/s]
text_encoder:
torch.xpu.max_memory_allocated: 9.32 GB
Loading pipeline components...: 100%|██████████████████████████████████████████████████████████████████████████████████████████████| 3/3 [00:00<00:00, 45.77it/s]
100%|████████████████████████████████████████████████████████████████████████████████████████████████████████████████████████████| 20/20 [01:41<00:00,  5.06s/it]
transformer:
torch.xpu.max_memory_allocated: 12.61 GB
Q8 比 Q4 更快,神奇,似乎是因为硬件有原生 Q8 的加速支持
stable-diffusion.cpp 除了对后端支持很全面( CUDA, Metal, Vulkan, OpenCL and SYCL)另一大优点应该就是占内存比较少了,结合其 Python 的绑定 stable-diffusion-cpp-python可以轻松跑起来 Q8 的模型
from stable_diffusion_cpp import StableDiffusion
import torch

def callback(step: int, steps: int, time: float):
    print("Completed step: {} of {}".format(step, steps))

gen = torch.Generator(device="xpu").manual_seed(0)

stable_diffusion = StableDiffusion(
    diffusion_model_path="./models/flux1-dev-Q8_0.gguf", # In place of model_path
    clip_l_path="./models/clip_l.safetensors",
    t5xxl_path="./models/t5xxl_fp16.safetensors",
    vae_path="./models/ae.safetensors",
    vae_decode_only=True, # Can be True if we dont use img_to_img
)
output = stable_diffusion.txt_to_img(
      prompt="a lovely cat holding a sign says 'hello world'",
      sample_steps=20,
      width=512, # Must be a multiple of 64
      height=512, # Must be a multiple of 64
      cfg_scale=1.0, # a cfg_scale of 1 is recommended for FLUX
      sample_method="euler", # euler is recommended for FLUX
      progress_callback=callback,
      seed=gen.initial_seed()
)

output[0].save("output.png")
Q4 结果如下
stable-diffusion.cpp:1525 - sampling completed, taking 113.58s
stable-diffusion.cpp:1533 - generating 1 latent images completed, taking 113.58s
stable-diffusion.cpp:1536 - decoding 1 latents
ggml_extend.hpp:1148 - vae compute buffer size: 1664.00 MB(VRAM)
stable-diffusion.cpp:1129 - computing vae [mode: DECODE] graph completed, taking 11.54s
stable-diffusion.cpp:1546 - latent 1 decoded, taking 11.54s
stable-diffusion.cpp:1550 - decode_first_stage completed, taking 11.54s
stable-diffusion.cpp:1684 - txt2img completed in 138.73s
Q8 结果如下
stable-diffusion.cpp:1525 - sampling completed, taking 117.70s
stable-diffusion.cpp:1533 - generating 1 latent images completed, taking 117.70s
stable-diffusion.cpp:1536 - decoding 1 latents
ggml_extend.hpp:1148 - vae compute buffer size: 1664.00 MB(VRAM)
stable-diffusion.cpp:1129 - computing vae [mode: DECODE] graph completed, taking 11.57s
stable-diffusion.cpp:1546 - latent 1 decoded, taking 11.57s
stable-diffusion.cpp:1550 - decode_first_stage completed, taking 11.57s
stable-diffusion.cpp:1684 - txt2img completed in 144.15s
可以使用 Intel 提供的性能查看工具 intel_gpu_top
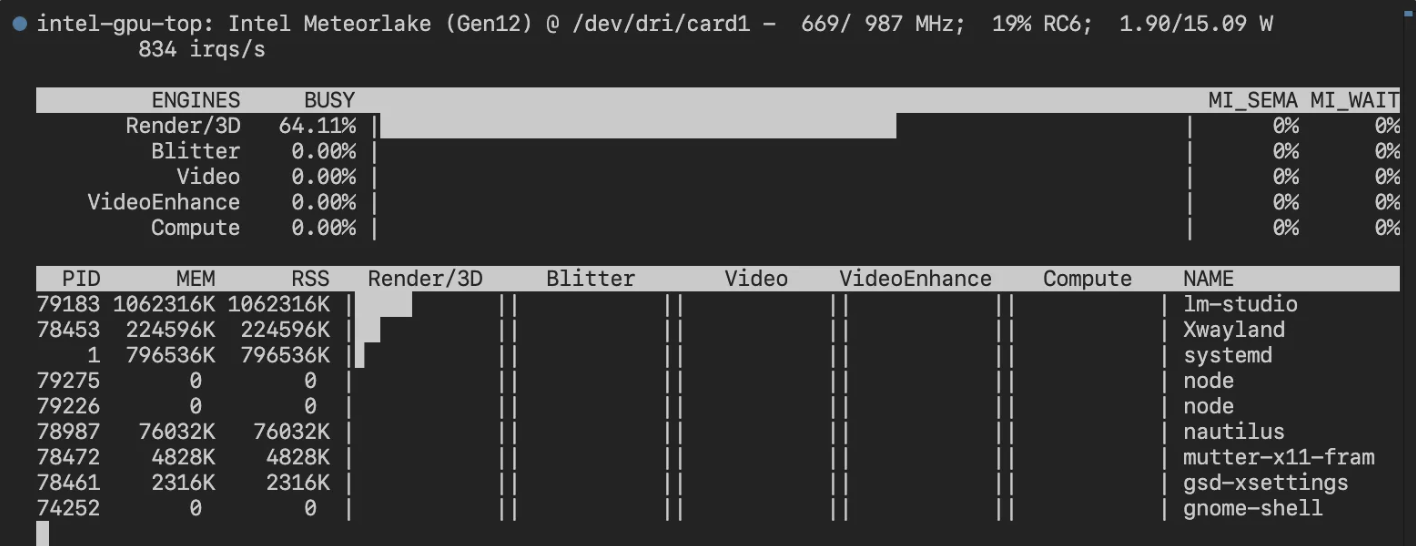
也可以使用 watch -n 1 xpu-smi stats -d 0
此内容由惯性聚合(RSS阅读器)自动聚合整理,仅供阅读参考。 原文来自 — 版权归原作者所有。