* This example shows how to employ the new extensions of HALCON's variation model operators
* to perform customary print quality tests.
* In this example the variation model is built upon a single reference image.
* The example consists of three steps:
* 1. align the print objects similar to the reference image using a shape-based model
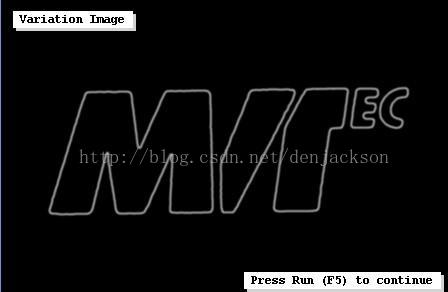
* 2. define the variation image by smoothing the object's contours
* 3. create the variation model
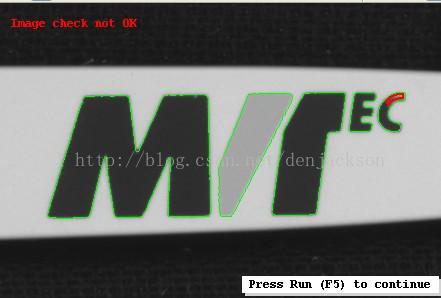
* Whether a print is labelled as OK or not, depends upon the size (area) of the difference to the reference image
*
dev_close_window ()
*读取图片
read_image (Image, 'pen/pen-01')
*获取大小
get_image_size (Image, Width, Height)
*打开窗口
dev_open_window (0, 0, Width, Height, 'black', WindowHandle)
*关闭窗口更新
dev_update_off ()
*设置字体
set_display_font (WindowHandle, 12, 'courier', 'true', 'false')
*显示图片
dev_display (Image)
*
* segment the logo and create a shape model for the alignment
*二值化图片
threshold (Image, Region, 125, 255)
*填充图片
fill_up (Region, RegionFillUp)
*计算两图片的不同,得到中间灰色有图像的部分.
difference (RegionFillUp, Region, RegionDifference)
*将区域进行凸包变换
shape_trans (RegionDifference, LogoArea, 'convex')
*肿胀区域,图片reduce区域处理完成
dilation_circle (LogoArea, LogoArea, 7)
*将图片重新剪切为有显示的区域.
reduce_domain (Image, LogoArea, ImageReduced)
*创建模板
create_shape_model (ImageReduced, 'auto', -rad(10), rad(20), 'auto', 'auto', 'use_polarity', [40,50], 40, ShapeModelID)
*计算中心点和面积
area_center (LogoArea, Area, ModelRow, ModelColumn)
*
* define the variation image by smoothing the dilated regions obtained from the object's contours:
* Besides a binomial filter a neat trick is applied to get smoothly "polished" regions along the contours.
* In particular, the edges are enlarged and after their conversion into a dilated region the image
* is zoomed back to its original size using a weighting that smoothes the images further.
*亚像素分割图片
edges_sub_pix (ImageReduced, Edges, 'sobel_fast', 0.5, 10, 20)
*创建一个变换矩阵
hom_mat2d_identity (HomMat2DIdentity)
*矩阵x,y放大
hom_mat2d_scale (HomMat2DIdentity, 4, 4, 0, 0, HomMat2DScale)
*变换矩阵
affine_trans_contour_xld (Edges, ZoomedEdges, HomMat2DScale)
*产生空白图片
gen_image_const (VarImageBig, 'byte', 4*Width, 4*Height)
*计算XLD的对象
count_obj (ZoomedEdges, NEdges)
for i := 1 to NEdges by 1
*选择对象
select_obj (ZoomedEdges, ObjectSelected, i)
*得到XLD的XY坐标点集
get_contour_xld (ObjectSelected, RowEdge, ColEdge)
*根据XLD坐标点集生成多边形
gen_region_polygon (Region1, RowEdge, ColEdge)
*肿胀区域,变得圆滑一些.
dilation_circle (Region1, RegionDilation, 2.5)
*将区域画到新的空图片上.
paint_region (RegionDilation, VarImageBig, VarImageBig, 255, 'fill')
endfor
*压缩图片大小及正常大小
zoom_image_size (VarImageBig, VarImageSmall, Width, Height, 'weighted')
*binomial平滑图片
binomial_filter (VarImageSmall, VarImage, 3, 3)
*建立一个可变化比较模板
create_variation_model (Width, Height, 'byte', 'direct', VarModelID)
*将image图片转换为可变化比较模板VarModelID
prepare_direct_variation_model (Image, VarImage, VarModelID, 15, 4)
*显示这个模板
dev_display (VarImage)
disp_message (WindowHandle, 'Variation Image', 'window', -1, -1, 'black', 'true')
disp_continue_message (WindowHandle, 'black', 'true')
stop ()
*
* print inspection
*以下开始比较图片了
for i := 1 to 30 by 1
*读取图片
read_image (Image, 'pen/pen-'+i$'02d')
* locate the logo and align it to the reference image
* 通过模板查找目标目标位置坐标和角度
find_shape_model (Image, ShapeModelID, -rad(10), rad(20), 0.5, 1, 0.5, 'least_squares', 0, 0.9, Row, Column, Angle, Score)
if (|Score| # 0)
*找到了目标,就刚性变换
vector_angle_to_rigid (Row, Column, Angle, ModelRow, ModelColumn, 0, HomMat2D)
affine_trans_image (Image, ImageAffinTrans, HomMat2D, 'constant', 'false')
*剪切图片
reduce_domain (ImageAffinTrans, LogoArea, ImageReduced1)
* 开始比较
compare_ext_variation_model (ImageReduced1, RegionDiff, VarModelID, 'absolute')
*连通区域
connection (RegionDiff, ConnectedRegions)
*通过面积选择区域,忽略太小的点啊啥的.
select_shape (ConnectedRegions, SelectedRegions, 'area', 'and', 10, 99999)
*以下开始显示结果了
dev_display (ImageAffinTrans)
*计算查找到的不同区域个数并显示ng or pass
count_obj (SelectedRegions, NDefects)
if (NDefects > 0)
dev_set_color ('red')
dev_set_draw ('margin')
dev_set_line_width (2)
dev_display (SelectedRegions)
dev_set_color ('green')
dev_set_line_width (1)
dev_display (Edges)
disp_message (WindowHandle, 'Image check not OK', 'window', -1, -1, 'red', 'false')
else
disp_message (WindowHandle, 'Image check OK', 'window', -1, -1, 'green', 'false')
endif
endif
disp_continue_message (WindowHandle, 'black', 'true')
stop ()
endfor
*
* clean up
*最后记得要清理垃圾
clear_shape_model (ShapeModelID)
clear_variation_model (VarModelID)
此内容由惯性聚合(RSS阅读器)自动聚合整理,仅供阅读参考。 原文来自 — 版权归原作者所有。