


作者:马宁
终于可以坐下来继续这个系列了,在微博和博客园里,已经有无数人催过了,实在抱歉,一个人的精力毕竟是有限的,但我会抽出一切可用的时间,尽可能尽快完成。
这一章我们来说说景深数据Depth Data,这是Kinect的Depth Camera为我们提供的全新功能,以往的技术只能够通过图像识别来完成的一些工作,我们可以借助景深来帮我们完成了。比如,前景与背景的分离,以前只能将背景设置为蓝屏或者绿屏,但是现在有了景深数据,我们就可以很容易地将前景物体从背景中分离出来。当然,需要特别说明的是,Depth Camera技术是由以色列公司PrimeSense提供的。
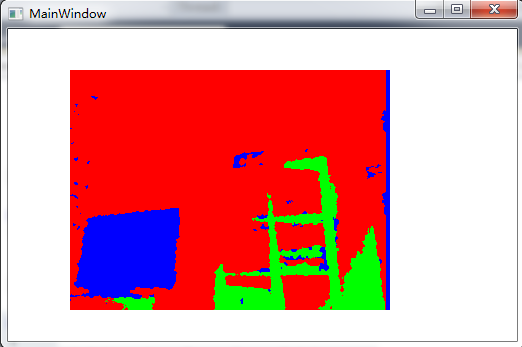
在这一章里,我们要完成的工作非常简单,根据物体距离Kinect的远近,设置成不同的颜色。首先,我们要创建一个新的WPF工程,然后添加一个Image控件:
<Image Height="240" HorizontalAlignment="Left" Margin="62,41,0,0" Name="image1" Stretch="Fill" VerticalAlignment="Top" Width="320" />
然后是MainWindow.xaml.cs中的核心代码,这部分代码与之前的代码大体一致,所以不做过多解释了:
//Kinect RuntimeRuntime

Runtime nui = new Runtime();

private void Window_Loaded(object sender, RoutedEventArgs e)

{

//UseDepthAndPlayerIndex and UseSkeletalTracking

nui.Initialize(RuntimeOptions.UseDepthAndPlayerIndex | RuntimeOptions.UseSkeletalTracking);

//register for event

nui.DepthFrameReady += new EventHandler<ImageFrameReadyEventArgs>(nui_DepthFrameReady);

//DepthAndPlayerIndex ImageType

nui.DepthStream.Open(ImageStreamType.Depth, 2, ImageResolution.Resolution320x240,

ImageType.DepthAndPlayerIndex);

}

private void Window_Closed(object sender, EventArgs e)

{

nui.Uninitialize();

}
唯一需要大家注意的是,我们在初始化函数中传递的参数是RuntimeOptions.UseDepthAndPlayerIndex,这表示景深信息中会包含PlayerIndex的信息。接下来,我们就要花点时间来理解DepthAndPlayerIndex的实际结构。
先来看DepthFrameReady事件处理函数,如下:
void nui_DepthFrameReady(object sender, ImageFrameReadyEventArgs e)

{

// Convert depth information for a pixel into color information

byte[] ColoredBytes = GenerateColoredBytes(e.ImageFrame);

// create an image based on the colored bytes

PlanarImage image = e.ImageFrame.Image;

image1.Source = BitmapSource.Create(

image.Width, image.Height, 96, 96, PixelFormats.Bgr32,

null, ColoredBytes, image.Width * PixelFormats.Bgr32.BitsPerPixel / 8);

}
DepthFrameReady事件会返回一个ImageFrame对象,其中会包含一个PlanarImage对象。PlanarImage对象会包含一个byte[]数组,这个数组中包含每个像素的深度信息。这个数组的特点是,从图像左上角开始、从左到右,然后从上到下。
该数组中每个像素由两个bytes表示,我们需要通过位运算的办法来获取每个像素的位置信息。
如果是Depth Image Type,将第二个bytes左移8位即可。
Distance (0,0) = (int)(Bits[0] | Bits[1] << 8 );如果是DepthAndPlayerIndex Image Type,第一个bytes右移三位去掉Player Index信息,第二个bytes左移5位。
Distance (0,0) =(int)(Bits[0] >> 3 | Bits[1] << 5);DepthAndPlayerIndex image类型的第一个bytes前三位包括Player Index信息。Player Index最多包含六个可能值:
0, 没有玩家;1,玩家1;2,玩家2,以此类推。
我们可以用下面的方法来获取Player Index信息:
private static int GetPlayerIndex(byte firstFrame)

{

//returns 0 = no player, 1 = 1st player, 2 = 2nd player...

return (int)firstFrame & 7;

}
接下来,我们创建一个bytes数组,用来存储颜色值。
if (distance <= 900)

{

//we are very close

colorFrame[index + BlueIndex] = 255;

colorFrame[index + GreenIndex] = 0;

colorFrame[index + RedIndex] = 0;

}

if (GetPlayerIndex(depthData[depthIndex]) > 0)

{

//we are the farthest

colorFrame[index + BlueIndex] = 0;

colorFrame[index + GreenIndex] = 255;

colorFrame[index + RedIndex] = 255;

}
当然,我们最好是设置几个边界值,来定义不同距离的不同颜色:
//equal coloring for monochromatic histogram

var intensity = CalculateIntensityFromDepth(distance);

colorFrame[index + BlueIndex] = intensity;

colorFrame[index + GreenIndex] = intensity;

colorFrame[index + RedIndex] = intensity;

const float MaxDepthDistance = 4000; // max value returned

const float MinDepthDistance = 850; // min value returned

const float MaxDepthDistanceOffset = MaxDepthDistance - MinDepthDistance;

public static byte CalculateIntensityFromDepth(int distance)

{

//formula for calculating monochrome intensity for histogram

return (byte)(255 - (255 * Math.Max(distance - MinDepthDistance, 0) / (MaxDepthDistanceOffset)));

}
最后,把所有代码放在一起,我们设定的颜色值为:
蓝色,小于900;900到2000,绿色;大于2000,红色
代码如下:
        private byte[] GenerateColoredBytes(ImageFrame imageFrame)
        {
            int height = imageFrame.Image.Height;
            int width = imageFrame.Image.Width;

            //Depth data for each pixel
            Byte[] depthData = imageFrame.Image.Bits;

            //colorFrame contains color information for all pixels in image
            //Height x Width x 4 (Red, Green, Blue, empty byte)
            Byte[] colorFrame = new byte[imageFrame.Image.Height * imageFrame.Image.Width * 4];

            //Bgr32  - Blue, Green, Red, empty byte
            //Bgra32 - Blue, Green, Red, transparency
            //You must set transparency for Bgra as .NET defaults a byte to 0 = fully transparent
            //hardcoded locations to Blue, Green, Red (BGR) index positions
            const int BlueIndex = 0;
            const int GreenIndex = 1;
            const int RedIndex = 2;
            var depthIndex = 0;

            for (var y = 0; y < height; y++)
            {
                var heightOffset = y * width;

                for (var x = 0; x < width; x++)
                {
                    var index = ((width - x - 1) + heightOffset) * 4;

                    //var distance = GetDistance(depthData[depthIndex], depthData[depthIndex + 1]);
                    var distance = GetDistanceWithPlayerIndex(depthData[depthIndex], depthData[depthIndex + 1]);

                    if (distance <= 900)
                    {
                        //we are very close
                        colorFrame[index + BlueIndex] = 255;
                        colorFrame[index + GreenIndex] = 0;
                        colorFrame[index + RedIndex] = 0;
                    }
                    else if (distance > 900 && distance < 2000)
                    {
                        //we are a bit further away
                        colorFrame[index + BlueIndex] = 0;
                        colorFrame[index + GreenIndex] = 255;
                        colorFrame[index + RedIndex] = 0;
                    }
                    else if (distance > 2000)
                    {
                        //we are the farthest
                        colorFrame[index + BlueIndex] = 0;
                        colorFrame[index + GreenIndex] = 0;
                        colorFrame[index + RedIndex] = 255;
                    }

                    //Color a player
                    if (GetPlayerIndex(depthData[depthIndex]) > 0)
                    {
                        //we are the farthest
                        colorFrame[index + BlueIndex] = 0;
                        colorFrame[index + GreenIndex] = 255;
                        colorFrame[index + RedIndex] = 255;
                    }

                    //jump two bytes at a time
                    depthIndex += 2;

                }
            }

            return colorFrame;
        }
程序的现实效果如下图:
到这里,我们就将Kinect SDK中NUI的基本内容介绍完了,接下来,我们要介绍Audio部分,或者借助一些实际的例子,来看一下Kinect SDK的实际应用。
此内容由惯性聚合(RSS阅读器)自动聚合整理,仅供阅读参考。 原文来自 — 版权归原作者所有。