









Virtual Network Computing (VNC) is a graphical remote access protocol. It streams framebuffer updates to your local screen while forwarding keyboard and mouse events to the remote machine, which matches how administrators expect to manage files, browsers, and desktop utilities without standing at the physical console.
This tutorial covers Ubuntu 22.04 and LTS versions. You will build the standard command-line install path with TigerVNC packages from Ubuntu repositories, pair them with Xfce for lightweight sessions, and optionally use GNOME when you standardize on GNOME over Xorg. TigerVNC forked from the historic TightVNC codebase and continues to ship fixes inside Ubuntu, so it replaces TightVNC in modern tutorials while preserving familiar vncserver workflows. You will set the VNC password with vncpasswd and assign display :1, wrap traffic inside an SSH tunnel, and register a systemd unit for the VNC server so restarts stay repeatable.
VNC differs from Remote Desktop Protocol (RDP) because it focuses on raw framebuffer transport rather than the Windows-centric negotiation stacks common to RDP clients. SSH X forwarding pushes individual X11 windows through SSH, while VNC delivers a full session canvas that persists even if your client disconnects. Choose VNC when you want a dedicated desktop on the server and can accept rectangle-based compression. Choose SSH X forwarding when you only need a handful of apps and already trust X11 security on your network.
Throughout this tutorial, TigerVNC stays bound to 127.0.0.1 and you reach it through SSH port forwarding instead of exposing TCP 5901 directly.
127.0.0.1 with -localhost yes and reach it through an SSH tunnel; never expose port 5901 directly.WaylandEnable=false in /etc/gdm3/custom.conf before configuring VNC. Headless servers without GDM3 are unaffected.5900 plus the display number. Display :1 listens on 5901, display :2 on 5902, and so on.vncserver@.service) handles auto-start on boot and standard systemctl management. The instance number after @ is the display number, not the username.To follow this tutorial, you need:
Match the server project to how you deliver desktops. Virtual sessions suit cloud Droplets, while mirror-style servers fit deskside workstations.
TigerVNC ships in the Ubuntu repositories as tigervnc-standalone-server and tigervnc-common, and it tracks upstream security fixes quickly. Pair it with XFCE on headless servers when you want low idle RAM.
TightVNC instructions still circulate in older blogs, yet TigerVNC supersedes that lineage inside Ubuntu. Stay on TigerVNC unless compliance mandates byte-for-byte parity with legacy docs.
RealVNC targets teams that want brokered cloud connectivity and enterprise policy bundles. Install vendor .deb packages when that tradeoff makes sense; otherwise TigerVNC covers repository-only needs.
x11vnc attaches to an existing Xorg display rather than spawning a fresh Xvnc framebuffer. Use it when you need collaboration on a physical console, not on headless servers built from scratch.
| VNC Server | Ubuntu 22.04 Support | Ubuntu 24.04 Support | Wayland Support | Authentication | License | Maintenance Status | Notes |
|---|---|---|---|---|---|---|---|
| TigerVNC | Yes (default repos) | Yes (default repos) | No (Xorg only) | VNC password, X.509 | GPL-2.0 | Active | Recommended for headless servers |
| TightVNC | Yes (universe, unmaintained upstream) | Yes (universe, unmaintained upstream) | No (Xorg only) | VNC password | GPL-2.0 | Stale (last upstream release 2009) | Functional but no upstream security patches |
| x11vnc | Yes (default repos) | Yes (default repos) | No (Xorg only) | VNC password, SSL optional | GPL-2.0 | Limited | Requires an existing Xorg session; not suitable for headless use |
| RealVNC | Yes (manual .deb) | Yes (manual .deb) | Partial (direct mode on Xorg; cloud relay mode available) | VNC password, RealVNC account | Commercial (free personal tier) | Active | Cloud relay requires account; direct mode works without one |
Note: If you previously followed the Ubuntu 20.04 version of this tutorial, the steps below replace TightVNC with TigerVNC and apply to both Ubuntu 22.04 and 24.04. See how to install and configure VNC on Ubuntu 20.04 for the legacy reference.
This step installs the graphical stack your VNC session will launch. Xfce limits RAM and CPU use, which keeps XFCE sessions responsive on small Droplets.
Update package indexes:
- sudo apt update
Hit:1 http://security.ubuntu.com/ubuntu jammy-security InRelease
Hit:2 http://archive.ubuntu.com/ubuntu jammy InRelease
Reading package lists... Done
The codename in the output reflects your Ubuntu release. Ubuntu 22.04 shows jammy; Ubuntu 24.04 shows noble. Both are expected.
Install Xfce plus helper utilities:
- sudo apt install xfce4 xfce4-goodies
Reading package lists... Done
Building dependency tree... Done
The following NEW packages will be installed:
  xfce4 xfce4-goodies
0 upgraded, 2 newly installed, 0 to remove, 0 not upgraded.
Need to get 12.4 MB of archives.
After this operation, 45.2 MB of additional disk space will be used.
Do you want to continue? [Y/n]
If the installer prompts for a default display manager, either option is acceptable on a headless server where you only launch Xfce through VNC.
Optional GNOME baseline for readers planning a GNOME-based session: install ubuntu-desktop or gnome-session only if you accept higher RAM usage and the Xorg requirement from Step 2.
Ubuntu 22.04 and 24.04 default to Wayland when GNOME and GDM3 are installed, but TigerVNC creates virtual Xorg displays and cannot share a Wayland session. This step switches GDM3 to Xorg so the local GNOME session and TigerVNC use the same display protocol, which prevents blank consoles when you troubleshoot GUI issues on the machine itself.
Check whether GDM3 is active before continuing:
- systemctl is-active gdm3
active
If the output is inactive or Unit gdm3.service could not be found, GDM3 is not running on this host. Skip the remainder of this step and proceed to Step 3.
Edit the GDM configuration:
- sudo nano /etc/gdm3/custom.conf
Under [daemon], ensure the file contains:
/etc/gdm3/custom.conf
WaylandEnable=false
Reboot to apply the setting:
- sudo reboot
Connection to your_server_ip closed by remote host.
After the instance returns, sign in through the physical or serial console if you have one, open a terminal there, and verify the session type:
- echo $XDG_SESSION_TYPE
x11
Note: Skip this step when you deploy Ubuntu Server without GDM and only ever launch TigerVNC virtual sessions. Keep it when gdm3 is installed and GNOME runs locally on the same VM.
This step applies to both Ubuntu 22.04 and Ubuntu 24.04 with no command divergence. Ubuntu 22.04 ships TigerVNC 1.12.x; Ubuntu 24.04 ships TigerVNC 1.13.x.
- sudo apt install tigervnc-standalone-server tigervnc-common
Reading package lists... Done
Building dependency tree... Done
The following NEW packages will be installed:
  tigervnc-common tigervnc-standalone-server
0 upgraded, 2 newly installed, 0 to remove, 0 not upgraded.
Need to get 1,284 kB of archives.
After this operation, 4,980 kB of additional disk space will be used.
Do you want to continue? [Y/n]
Print build metadata:
- vncserver --version
Expected output on Ubuntu 22.04 (Ubuntu 24.04 will show 1.13.x with a later build date):
TigerVNC Server version 1.12.0, built Apr  8 2022 00:00:00
Copyright (C) 1999-2022 TigerVNC Team and many others (see README.rst)
See https://www.tigervnc.org for information on TigerVNC.
Underlying X server release 12101004, The X.Org Foundation
Exact version strings change when Ubuntu publishes security rebuilds, but you should always see a TigerVNC banner after installation.
This step defines secrets and startup hooks so each display launches your desktop reliably.
Run the interactive helper:
- vncpasswd
Password:
Verify:
Would you like to enter a view-only password (y/n)? n
TigerVNC stores the password as an obfuscated byte string in ~/.vnc/passwd. The protocol truncates passwords to 8 characters regardless of what you type, so use a unique value rather than reusing your system account password.
~/.vnc/xstartupStop stray sessions before editing:
- vncserver -kill :1
Killing Xvnc process ID 17555
If you instead see Can't find, continue because no session was active.
Open the startup file:
- nano ~/.vnc/xstartup
Populate it with:
~/.vnc/xstartup
#!/bin/bash
xrdb $HOME/.Xresources 2>/dev/null
startxfce4 &
- nano ~/.vnc/xstartup
Use:
~/.vnc/xstartup
#!/bin/bash
unset SESSION_MANAGER
unset DBUS_SESSION_BUS_ADDRESS
exec dbus-run-session -- gnome-session
GNOME consumes more RAM than Xfce; monitor swap if you pick this route.
Mark the script runnable:
- chmod +x ~/.vnc/xstartup
The command produces no output on success. Verify the permission with ls -la ~/.vnc/xstartup.
- ls -la ~/.vnc/xstartup
-rwxr-xr-x 1 sammy sammy 60 May 3 14:00 /home/sammy/.vnc/xstartup
This step validates that the TigerVNC server is listening before you automate startup.
Launch display :1, which maps to TCP port 5901 because VNC binds to port 5900 plus the display number:
- vncserver :1 -geometry 1920x1080 -depth 24 -localhost yes
New 'server.example.com:1 (sammy)' desktop is server.example.com:1

Starting applications specified in /home/sammy/.vnc/xstartup
Log file is /home/sammy/.vnc/server.example.com:1.log
List active displays:
- vncserver -list
TigerVNC server sessions:

X DISPLAY #     PROCESS ID
:1              18442
Confirm that listeners bind only to loopback:
- ss -tlnp | grep 5901
LISTEN 0 5 127.0.0.1:5901 0.0.0.0:* users:(("Xvnc",pid=18442,fd=9))
If ss prints nothing, tail ~/.vnc/*.log because those files explain most failures where TigerVNC does not start.
This step hands lifecycle control to systemd so TigerVNC returns after kernel updates.
Create the template unit:
- sudo nano /etc/systemd/system/vncserver@.service
Insert:
/etc/systemd/system/vncserver@.service
[Unit]
Description=TigerVNC for display %i
After=network.target

[Service]
Type=forking
User=sammy
Group=sammy
WorkingDirectory=/home/sammy
PIDFile=/home/sammy/.vnc/%H:%i.pid

ExecStartPre=-/usr/bin/vncserver -kill :%i >/dev/null 2>&1
ExecStart=/usr/bin/vncserver :%i -geometry 1920x1080 -depth 24 -localhost yes
ExecStop=/usr/bin/vncserver -kill :%i

[Install]
WantedBy=multi-user.target
ExecStart must pass -localhost yes, not a bare -localhost flag, so TigerVNC refuses remote-origin TCP connects without SSH.
Reload systemd metadata:
- sudo systemctl daemon-reload
Enable and start the service for display 1:
- sudo systemctl enable vncserver@1.service
Created symlink /etc/systemd/system/multi-user.target.wants/vncserver@1.service → /etc/systemd/system/vncserver@.service.
- sudo systemctl start vncserver@1.service
A successful start produces no output. Run systemctl status immediately after to confirm the service came up.
Inspect runtime state:
- sudo systemctl status vncserver@1.service
● vncserver@1.service - TigerVNC for display 1
     Loaded: loaded (/etc/systemd/system/vncserver@.service; enabled; vendor preset: enabled)
     Active: active (running) since <day> <date> <time> UTC; 5s ago
    Process: 20111 ExecStartPre=/usr/bin/vncserver -kill :1 (code=exited, status=2)
    Process: 20115 ExecStart=/usr/bin/vncserver :1 -geometry 1920x1080 -depth 24 -localhost yes (code=exited, status=0/SUCCESS)
   Main PID: 20126 (vncserver)
      Tasks: 86 (limit: 4647)
     Memory: 168.2M
        CPU: 4.932s
     CGroup: /system.slice/system-vncserver.slice/vncserver@1.service
             └─20126 /usr/bin/Xvnc :1 -localhost=yes ...
Review further operations in how to use systemctl to manage systemd services and units when you extend this pattern.
This step keeps TigerVNC off the public internet while still letting your desktop client attach.
Warning: Do not open TCP 5901 in UFW or cloud firewalls. Automated scanners probe VNC constantly. Keep the port closed and rely on SSH instead. Review how to set up a firewall with UFW on Ubuntu when you adjust rules.
From Linux or macOS terminals on your laptop, run:
- ssh -L 59000:localhost:5901 -C -N -f sammy@your_server_ip
-L 59000:localhost:5901 binds local port 59000 to localhost:5901 on the remote host after authentication succeeds.-C enables compression for slower residential uplinks.-N tells SSH not to execute a remote shell, which keeps the session dedicated to forwarding only.-f backgrounds SSH after you authenticate so your shell prompt returns while the tunnel stays attached.sammy@your_server_ip specifies the remote user and host in user@host form.ASCII overview of the forwarding path:
[Laptop] VNC viewer --> localhost:59000 --> SSH session --> server localhost:5901 --> Xvnc display :1
Windows 10 and later include OpenSSH; run the same command shown above from PowerShell or Command Prompt with no flag changes.
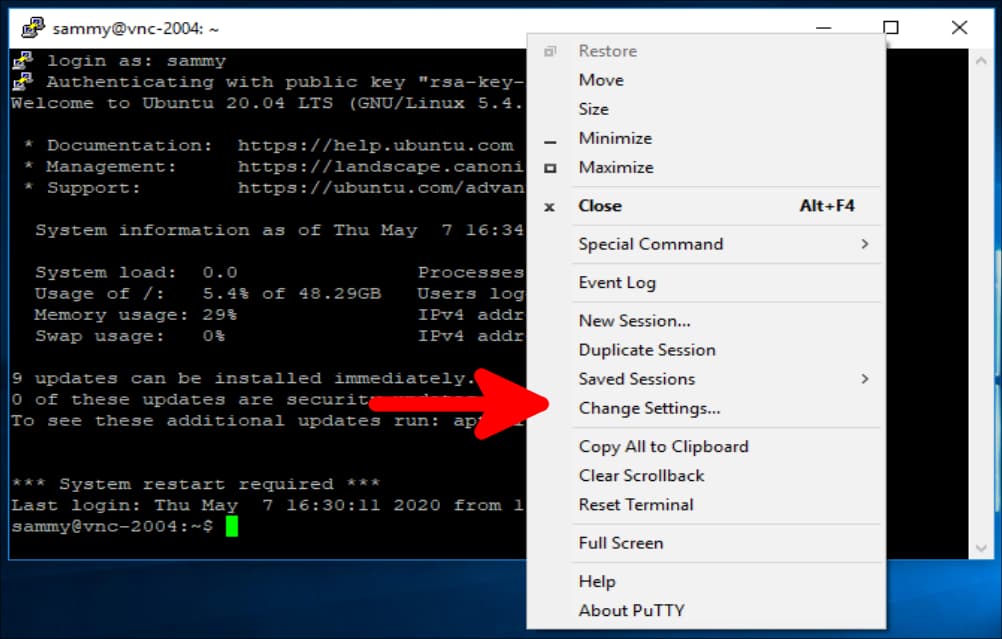
If you use PuTTY on Windows, right-click the window title bar and choose Change Settings…:
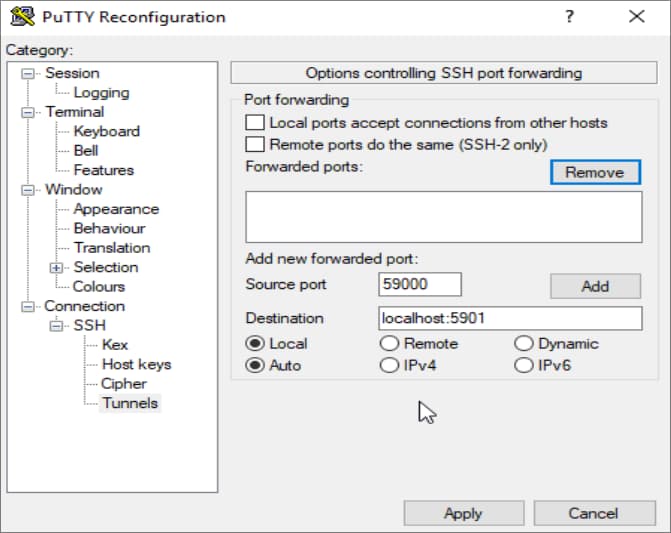
Navigate to Connection, expand SSH, select Tunnels, enter 59000 as Source port, enter localhost:5901 as Destination, click Add, then click Apply:
Read how to use SSH tunneling for reverse tunnels and jump-host arrangements.
Regardless of client, the viewer always targets the local forward (localhost:59000 here), not the public IP of the Droplet.
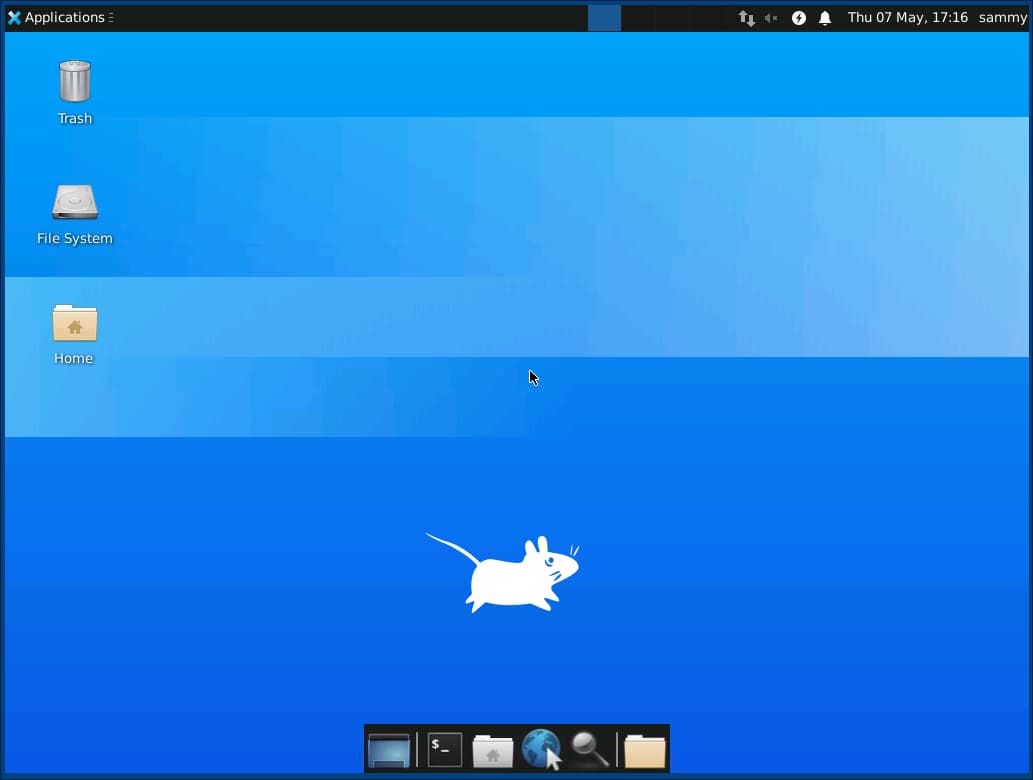
Point your viewer at localhost:59000, accept the host key warning if prompted, then authenticate with the password from Step 4. You should see the default Xfce workspace:
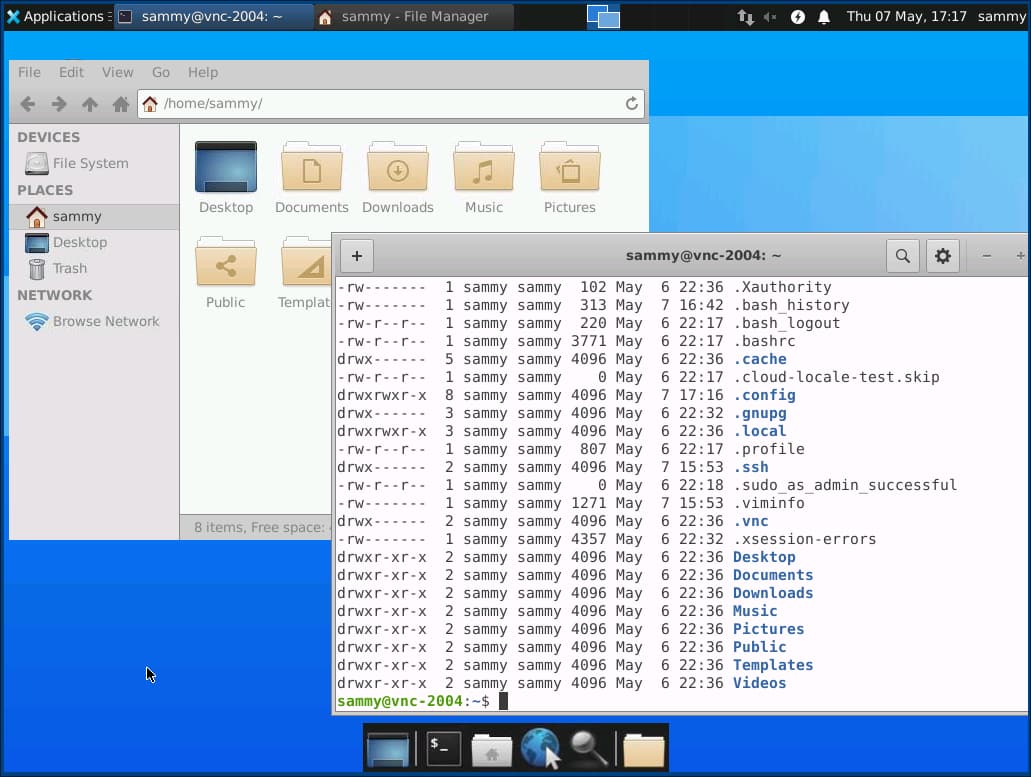
Browse files through Thunar or any terminal emulator:
Closing your VNC viewer disconnects the client but leaves the server-side session running. Your applications and open windows persist between sessions, and you can reconnect any time by re-establishing the SSH tunnel and opening the viewer again. The pkill command below is for tearing down the tunnel itself when you are done for the day, not for ending a single VNC session.
Because -f backgrounds the SSH process, stop the tunnel by targeting its command line instead of pressing CTRL+C:
- pkill -f 'ssh -L 59000:localhost:5901'
If you intentionally omit -f, CTRL+C in that foreground SSH session tears down the tunnel immediately.
Start triage on the server before you suspect laptop networking. Confirm systemctl status, read ~/.vnc logs, then verify SSH forwarding on your workstation. That ordering prevents wasted firewall edits when TigerVNC never launched. Keep how to set up a firewall with UFW on Ubuntu nearby whenever ss proves the listener exists yet packets never arrive.
Tail ~/.vnc/<hostname>:<display>.log, for example /home/sammy/.vnc/server.example.com:1.log, after each failed boot. Run vncserver -kill :1, fix xstartup, then restart the systemd unit.
Confirm chmod +x ~/.vnc/xstartup succeeded and that startxfce4 & or the GNOME dbus-run-session block remains present. Missing execute bits strand TigerVNC at a blank framebuffer.
Run vncpasswd, restart sudo systemctl restart vncserver@1.service, and reconnect through a fresh tunnel.
Execute sudo systemctl status vncserver@1.service, ss -tlnp | grep 5901, and journalctl -u vncserver@1.service -n 50. If listeners look healthy, verify your SSH forward still runs because the viewer always hits localhost on whichever machine hosts the tunnel endpoint.
Reopen /etc/gdm3/custom.conf, confirm WaylandEnable=false, reboot, and repeat echo $XDG_SESSION_TYPE on the console session until it prints x11.
How do I install and configure a VNC server on Ubuntu 24.04?
Ubuntu 24.04 ships the same TigerVNC packages with refreshed patch versions. Install tigervnc-standalone-server, mirror the /etc/gdm3/custom.conf edit when GNOME runs locally, craft ~/.vnc/xstartup, then launch vncserver :1 -localhost yes. Validate vncserver --version output after apt install because minor numbers shift between releases.
Which VNC server is best for Ubuntu?
TigerVNC balances repository availability, documentation, and maintenance cadence for most Ubuntu installs. TightVNC remains in historical guides but receives fewer updates. RealVNC suits enterprises that purchase brokered connectivity. x11vnc fits when you must reflect an existing Xorg console rather than provisioning a virtual framebuffer.
How do I know if vncserver is running on Ubuntu?
Run vncserver -list for session IDs, combine ss -tlnp | grep vnc or ss -tlnp | grep 590 for listener checks, and inspect systemctl status vncserver@1.service when systemd owns the process. Journal output highlights crashes immediately after package upgrades.
Does VNC work with Wayland on Ubuntu 22.04 or 24.04?
Most TigerVNC deployments still assume X11 semantics even though Xvnc provides its own framebuffer. Disable Wayland in /etc/gdm3/custom.conf, reboot, and confirm echo $XDG_SESSION_TYPE prints x11 on interactive GNOME consoles to avoid conflicting session types.
Is there an open-source alternative to RealVNC available in the Ubuntu repositories?
Yes. TigerVNC is available with sudo apt install tigervnc-standalone-server and requires no account. RealVNC-specific setup is outside the scope of this tutorial; see RealVNC’s official documentation for licensing and installation steps. For most Ubuntu use cases, TigerVNC is the recommended choice.
How do I connect to a VNC server on Ubuntu securely?
Run ssh -L 59000:localhost:5901 -C -N -f sammy@your_server_ip, then aim your viewer at localhost:59000. SSH encrypts payloads while TigerVNC stays on loopback. Combine with key-based SSH from how to set up SSH keys on Ubuntu 22.04.
How do I stop or kill a VNC server session on Ubuntu?
Execute vncserver -kill :1, replacing :1 with whatever vncserver -list reports. Use sudo systemctl stop vncserver@1.service when systemd manages the lifecycle so logs remain coherent.
What desktop environment should I use with VNC on Ubuntu Server?
XFCE remains the pragmatic default for headless server workloads because it minimizes CPU, RAM, and bandwidth usage. GNOME works when you require its applications, but allocate extra resources and remain on Xorg so TigerVNC expectations stay consistent.
You installed TigerVNC on Ubuntu 22.04 or 24.04, configured xstartup for Xfce with optional GNOME coverage, validated listeners with vncserver -list and ss, and registered systemd units so the service survives reboots. Together those tasks cover the standard command-line setup operators bring from older TightVNC guides while aligning packages with maintained repositories.
You kept TigerVNC bound to loopback and relied on SSH forwarding, which delivers the secure connection pattern teams expect without widening UFW rules. If your team already uses SSH key-based authentication, the tunnel inherits that key without additional configuration; password-based SSH works identically.
Continue tightening SSH with how to set up SSH keys on Ubuntu 22.04, deepen tunnel patterns via how to use SSH tunneling, and revisit how to set up a firewall with UFW on Ubuntu whenever networking changes.
 This work is licensed under a Creative Commons Attribution-NonCommercial- ShareAlike 4.0 International License.
此内容由惯性聚合(RSS阅读器)自动聚合整理,仅供阅读参考。 原文来自 — 版权归原作者所有。