


How to secure Apache with Let’s Encrypt on Ubuntu: you install
Certbot, point Apache at your domain with a virtual
host, run sudo certbot --apache, then harden TLS and confirm automatic
renewal. When you finish, visitors reach your site over HTTPS with a trusted
certificate from Let’s Encrypt, a nonprofit
certificate authority operated by the Internet Security Research Group (ISRG).
Let’s Encrypt issues free domain-validated (DV) TLS certificates. Certbot is the recommended ACME client on Ubuntu. It requests the certificate, proves you control the domain, and updates Apache for HTTPS.
This tutorial is for Ubuntu 22.04 LTS, 24.04 LTS (Noble Numbat), and 26.04 LTS (Resolute Raccoon) with Apache 2.4. You use a dedicated virtual host file (not the default site alone). If you still run Ubuntu 20.04, see the Ubuntu 20.04 version of this tutorial.
Version note: Commands were checked against Ubuntu 22.04, 24.04, and
26.04 LTS with Apache from the default repositories. Ubuntu 26.04 LTS
shipped in April 2026. Certbot installs through snap per
EFF instructions, not
the older apt install certbot path. Renewal uses a systemd timer (often
snap.certbot.renew.timer on snap installs).
sudo snap install --classic certbot and link
/snap/bin/certbot into your PATH.ServerName and ServerAlias in a virtual host
before you run sudo certbot --apache.sudo ufw allow 'Apache Full' and remove the plain
Apache profile if it is redundant./etc/apache2/mods-available/ssl.conf or a custom conf file:
disable TLS 1.0/1.1, enable OCSP stapling, and add HSTS with
mod_headers.sudo certbot renew --dry-run and inspect
/var/log/letsencrypt/letsencrypt.log if something fails.lsb_release, apache2 -v, and openssl version.Here is a simplified flow of how Let’s Encrypt certificate issuance works:
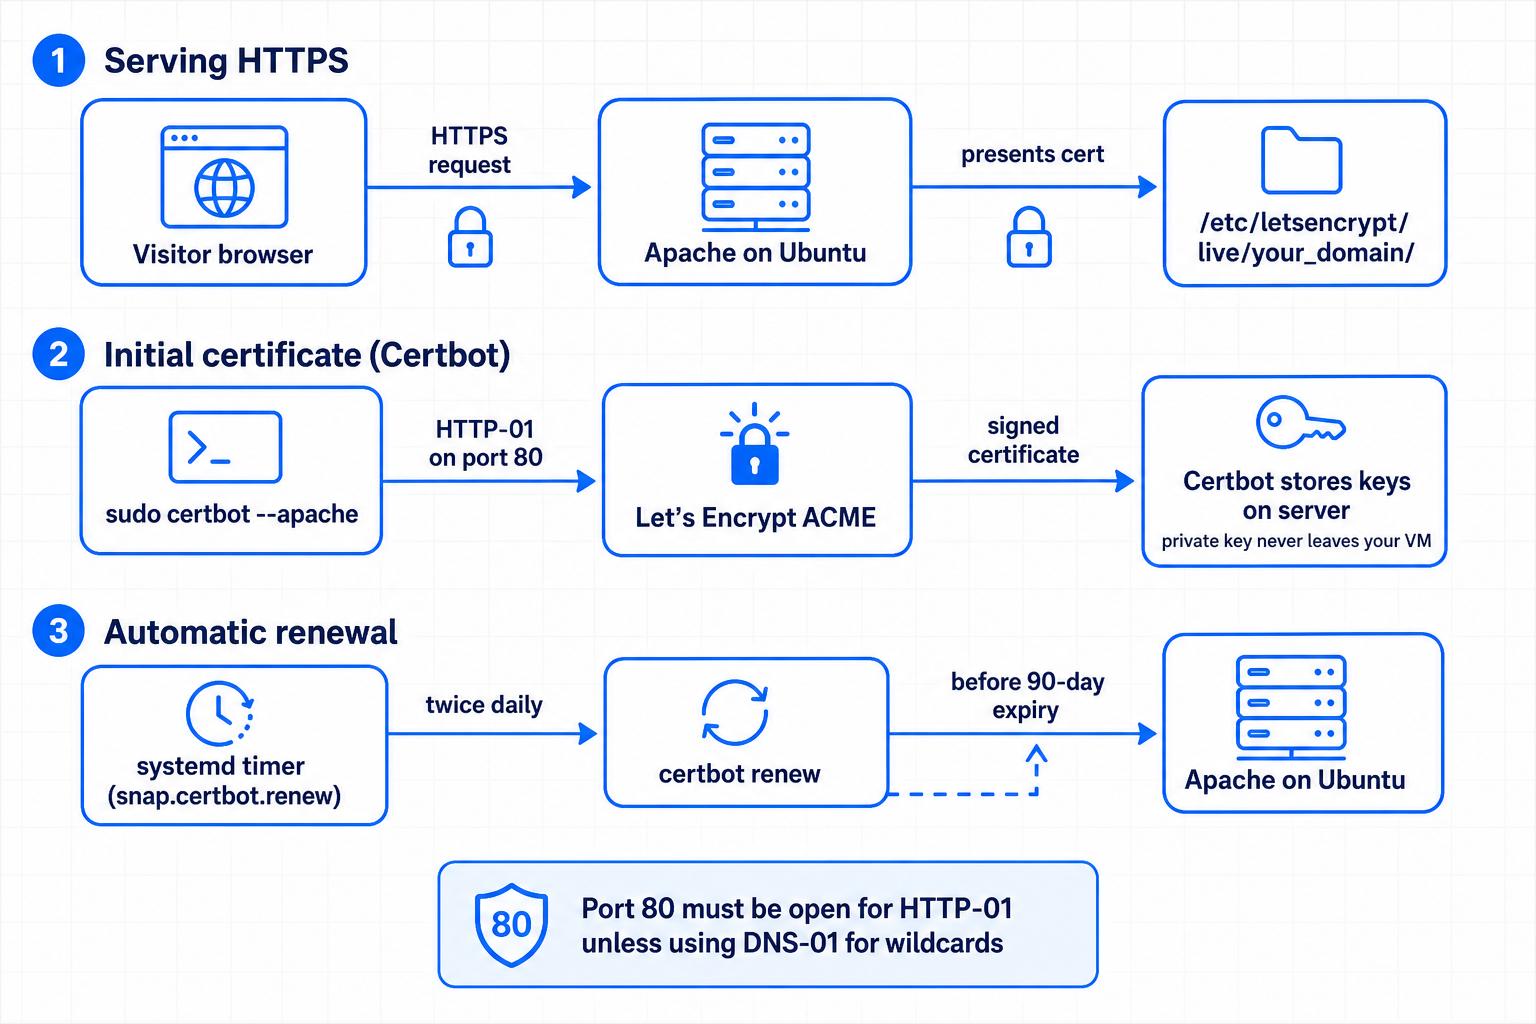
Figure: Serving HTTPS, first-time certificate issuance with Certbot, and automatic renewal on Ubuntu.
https://your_domain./etc/letsencrypt/live/your_domain/.certbot renew twice per day and renews certs before
they expire.Port 80 must reach your server for HTTP-01 validation unless you use a DNS plugin for wildcards.
To follow this tutorial, you need:
your_domain and www.your_domain pointing to your
server’s public IP. See
DigitalOcean DNS./etc/apache2/sites-available/your_domain.conf.Run these checks on the server before you install or renew certificates. They help you confirm you are on a supported LTS release and that Apache is ready.
Check the Ubuntu release:
- lsb_release -ds
You should see Ubuntu 22.04.x LTS, Ubuntu 24.04.x LTS, or Ubuntu 26.04.x LTS.
Confirm Apache is installed and note the version (package numbers change with security updates):
- apache2 -v
Example first line on current LTS images:
Server version: Apache/2.4.58 (Ubuntu)
Your output may differ on 22.04 or 26.04. Compare with
Ubuntu package search for your suite
(jammy, noble, or resolute).
Confirm OpenSSL (TLS 1.2 and 1.3 need OpenSSL 1.1.1 or newer; 22.04+ ships OpenSSL 3.x):
- openssl version
Confirm Apache is active:
- sudo systemctl is-active apache2
You want active. If Apache is not installed, follow
How To Install the Apache Web Server on Ubuntu 22.04
first. The same apt install apache2 flow applies on 24.04 and 26.04.
| Ubuntu LTS | Codename | Apache in default repos (approx.) |
|---|---|---|
| 22.04 | Jammy | 2.4.52 or newer |
| 24.04 | Noble | 2.4.58 or newer |
| 26.04 | Resolute | 2.4.x (run apache2 -v on your host) |
I have not pinned an exact Apache package revision for 26.04 here because
security updates change the build string. Always trust apache2 -v on your VM.
On Ubuntu 22.04, 24.04, and 26.04, the Certbot team recommends the snap
package over the default apt Certbot packages.
Update packages and install snapd (on minimal images snapd may already be
present on Ubuntu 26.04 cloud images):
- sudo apt update
- sudo apt install snapd -y
Refresh the snap core runtime before installing Certbot (recommended on new 22.04, 24.04, and 26.04 servers):
- sudo snap install core
- sudo snap refresh core
Remove any older Certbot packages from apt so the snap binary is used:
- sudo apt remove certbot python3-certbot-apache 2>/dev/null || true
Install Certbot from snap:
- sudo snap install --classic certbot
Prepare the certbot command (EFF documents this symlink):
- sudo ln -sf /snap/bin/certbot /usr/bin/certbot
Confirm the version:
- certbot --version
You should see a Certbot version string. The exact number changes as snap updates the package.
Confirm the snap provides the Apache plugin and renewal timer:
- sudo certbot plugins
Look for an apache plugin in the list.
- snap list certbot
- systemctl list-timers --all | grep -i certbot
On snap installs you often see snap.certbot.renew.timer after the first
successful certbot --apache run.
Ubuntu 26.04 LTS (Resolute Raccoon) uses the same paths as 22.04 and 24.04:
/etc/apache2/, a2ensite, apachectl configtest, and UFW Apache Full.
Certbot still stores certificates under /etc/letsencrypt/.
If certbot runs the wrong binary, check which copy answers:
- which -a certbot
Remove leftover apt packages and keep the symlink at /usr/bin/certbot pointing
to /snap/bin/certbot.
Certbot reads ServerName and ServerAlias from your virtual host to
know which names to include on the certificate.
Open your site file:
- sudo nano /etc/apache2/sites-available/your_domain.conf
Confirm these lines exist inside the <VirtualHost *:80> block:
ServerName your_domain
ServerAlias www.your_domain
Enable the site and required modules if you have not already:
- sudo a2ensite your_domain.conf
- sudo a2enmod ssl
- sudo systemctl reload apache2
Test syntax before every reload:
- sudo apachectl configtest
You want Syntax OK. Fix typos, then reload:
- sudo systemctl reload apache2
If UFW is active, allow HTTP and HTTPS with the Apache Full application profile.
Check current rules:
- sudo ufw status
If only Apache (port 80) is allowed, add the full profile:
- sudo ufw allow 'Apache Full'
Remove the narrower profile when it is redundant:
- sudo ufw delete allow 'Apache'
Verify:
- sudo ufw status
| UFW profile | Ports opened | Typical use |
|---|---|---|
| Apache | 80/tcp | HTTP only |
| Apache Full | 80/tcp, 443/tcp | HTTP and HTTPS |
| Apache (v6) / Apache Full (v6) | Same on IPv6 | Dual-stack hosts |
Renewal uses HTTP-01 on port 80. Keep port 80 open even after HTTPS works.
Run Certbot with the Apache plugin:
- sudo certbot --apache
Certbot prompts for:
your_domain and www.your_domain).Example successful output (dates and paths will differ on your server):
Successfully received certificate.
Certificate is saved at: /etc/letsencrypt/live/your_domain/fullchain.pem
Key is saved at:         /etc/letsencrypt/live/your_domain/privkey.pem
This certificate expires on YYYY-MM-DD.
These files will be updated when the certificate renews.
Certbot has set up a scheduled task to automatically renew this certificate in the background.

Deploying certificate
Successfully deployed certificate for your_domain to /etc/apache2/sites-available/your_domain-le-ssl.conf
Successfully deployed certificate for www.your_domain to /etc/apache2/sites-available/your_domain-le-ssl.conf
Congratulations! You have successfully enabled HTTPS on https://your_domain and https://www.your_domain
Visit https://your_domain in a browser. You should see a lock icon for a valid
certificate.
| Path | Purpose |
|---|---|
/etc/letsencrypt/live/your_domain/fullchain.pem |
Certificate plus intermediate chain (use in Apache SSLCertificateFile) |
/etc/letsencrypt/live/your_domain/privkey.pem |
Private key (SSLCertificateKeyFile) |
/etc/letsencrypt/live/your_domain/cert.pem |
Domain certificate only |
/etc/letsencrypt/live/your_domain/chain.pem |
Intermediate certificates |
/etc/letsencrypt/live/your_domain/README |
Notes from Certbot |
/etc/letsencrypt/renewal/your_domain.conf |
Renewal settings for this cert |
Files under live/ are symlinks. Certbot updates them on renewal.
For background on keys and CSRs, see OpenSSL Essentials.
Run the SSL Labs Server Test against your domain after hardening (Step 5) for an external grade.
Certbot enables HTTPS. You should still disable old protocols and add security headers.
- sudo a2enmod headers
Edit the SSL module configuration:
- sudo nano /etc/apache2/mods-available/ssl.conf
Add or update these directives inside the file (comments explain each line):
# Allow TLS 1.2 and 1.3 only. Drop SSLv3, TLS 1.0, and TLS 1.1.
SSLProtocol             all -SSLv3 -TLSv1 -TLSv1.1

# Prefer modern AEAD ciphers. Apache negotiates the best match with clients.
SSLCipherSuite          ECDHE-ECDSA-AES128-GCM-SHA256:ECDHE-RSA-AES128-GCM-SHA256:ECDHE-ECDSA-AES256-GCM-SHA384:ECDHE-RSA-AES256-GCM-SHA384

# Let the client pick the cipher order (recommended for TLS 1.3).
SSLHonorCipherOrder     off

# OCSP stapling: Apache attaches revocation status to the handshake.
SSLUseStapling          on
SSLStaplingCache        "shmcb:${APACHE_RUN_DIR}/ssl_stapling(32768)"
| Protocol | Apache 2.4 on Ubuntu 22.04/24.04/26.04 | Notes |
|---|---|---|
| TLS 1.3 | Supported (OpenSSL 3.x on 22.04+) | Default on modern clients |
| TLS 1.2 | Supported | Minimum for most production sites |
| TLS 1.1 and below | Disabled with SSLProtocol above |
Required for strong grades on SSL Labs |
Ubuntu 24.04 commonly ships Apache 2.4.58 in the default repos. Ubuntu
22.04 ships 2.4.52 or newer. On 26.04, run apache2 -v and check the
resolute suite on packages.ubuntu.com
for the current package revision.
Edit the SSL virtual host Certbot created (name may end in -le-ssl.conf):
- sudo nano /etc/apache2/sites-available/your_domain-le-ssl.conf
Inside <VirtualHost *:443>, add:
# Tell browsers to use HTTPS for one year, including subdomains.
Header always set Strict-Transport-Security "max-age=31536000; includeSubDomains"

# Reduce MIME sniffing attacks.
Header always set X-Content-Type-Options "nosniff"

# Limit embedding in frames (adjust if you need iframes).
Header always set X-Frame-Options "SAMEORIGIN"
Test and reload:
- sudo apachectl configtest
- sudo systemctl reload apache2
Certbot often adds an HTTP to HTTPS redirect. Confirm http://your_domain
redirects to https://. For redirect patterns, see
How To Create Temporary and Permanent Redirects with Apache.
Let’s Encrypt certificates expire after 90 days. Certbot installs a systemd timer that runs renewal checks twice per day.
Check the timer (snap installs often use this unit name):
- sudo systemctl status snap.certbot.renew.timer
If that unit is missing, try:
- sudo systemctl status certbot.timer
List all Certbot timers:
- systemctl list-timers | grep -i certbot
Run a dry run:
- sudo certbot renew --dry-run
Example success message:
Congratulations, all simulated renewals succeeded:
  /etc/letsencrypt/live/your_domain/fullchain.pem (success)
sudo less /var/log/letsencrypt/letsencrypt.log.sudo certbot renew --dry-run again after fixes.Let’s Encrypt emails the address you registered before certificates expire. Do not rely on email alone for production monitoring.
dig +short your_domain A and compare to your
server IP.ServerName must match the domain you request.Run sudo apachectl configtest. Certbot edits files under
/etc/apache2/sites-available/. Restore from backup or re-run
sudo certbot --apache after fixing ServerName typos.
Let’s Encrypt enforces rate limits. The certificates per registered domain limit is 50 per week (see official docs for current numbers). If you hit a limit, wait for the window to reset or use a staging endpoint while testing:
- sudo certbot --apache --staging
Staging certificates are not trusted by browsers. Use them only for tests.
Renewal still uses HTTP-01 on port 80 in the default setup. Keep Apache Full
or explicit 80/tcp and 443/tcp rules in place.
| Factor | Let’s Encrypt | Paid CA (DigiCert, Sectigo, etc.) |
|---|---|---|
| Cost | Free | Annual fee per cert or subscription |
| Validation | Domain validation (DV) | DV, OV, or EV options |
| Certificate lifetime | 90 days (automated renewal) | Often 1 year |
| Wildcard | Yes, via DNS-01 challenge | Yes, often easier with paid support |
| Support | Community forums and docs | Vendor SLA and phone support |
| Best fit | Public websites, APIs, homelabs | EV branding, legacy enterprise policies |
When Let’s Encrypt fits: you control the server, you automate renewal, and you need standard DV HTTPS.
When a paid CA fits: your organization requires OV/EV seals, specific compliance paperwork, or a vendor support contract.
The CA/Browser Forum has discussed shorter maximum certificate lifetimes in the industry. Automated renewal with Certbot is the practical response on Ubuntu regardless of future lifetime changes. Watch Let’s Encrypt blog for policy updates.
Here are some commonly asked questions about using Let’s Encrypt on Ubuntu with Apache.
Install Certbot from snap, configure Apache ServerName, open ports 80 and 443,
then run sudo certbot --apache. Certbot requests the certificate and updates
Apache. Renewal runs on a systemd timer.
Enable mod_ssl with sudo a2enmod ssl, obtain certificates (Certbot is the
usual path), and serve HTTPS on port 443 in a virtual host. Certbot creates
your_domain-le-ssl.conf when you use the Apache plugin.
Set SSLProtocol all -SSLv3 -TLSv1 -TLSv1.1 in /etc/apache2/mods-available/ssl.conf.
That leaves TLS 1.2 and 1.3 on current Ubuntu builds. Run sudo apachectl configtest
before sudo systemctl reload apache2.
Yes. Let’s Encrypt does not charge for certificates. ISRG runs the service as a nonprofit. See the Let’s Encrypt FAQ. Rate limits still apply.
90 days by default. Certbot’s timer attempts renewal when a certificate is
within 30 days of expiration. Run sudo certbot renew --dry-run to confirm
your server renews correctly.
You installed Certbot from snap, obtained a Let’s Encrypt certificate with the Apache plugin, opened HTTPS in UFW, hardened TLS settings, and confirmed automatic renewal on Ubuntu. Your site now serves trusted HTTPS for your_domain.
For Nginx instead of Apache, follow How To Secure Nginx with Let’s Encrypt on Ubuntu 22.04. For local testing without a public CA, see How To Create a Self-Signed SSL Certificate for Apache in Ubuntu 18.04.
Official references: Certbot documentation and Let’s Encrypt documentation.
apt steps match 24.04 and 26.04).Run Apache on a DigitalOcean Droplet with snapshots and monitoring so you can roll back if a config change breaks HTTPS.
 This work is licensed under a Creative Commons Attribution-NonCommercial- ShareAlike 4.0 International License.
此内容由惯性聚合(RSS阅读器)自动聚合整理,仅供阅读参考。 原文来自 — 版权归原作者所有。