


A single XSS vulnerability can turn passkeys from a phishing-resistant login mechanism into a persistent account takeover backdoor. If malicious JavaScript can run on your page, it may be able to register an attacker-controlled passkey against the victim’s account. The user sees nothing, the website records a successful registration, and the attacker walks away with a valid authentication backdoor.

For an organisation, that means more than “someone found XSS”. It means identity compromise, persistence, audit-trail ambiguity, regulatory exposure, and a security control that appears to have worked while silently enabling an attacker.
The uncomfortable truth is that while passkeys do bring amazing benefits, and I think that everyone should use them, there is a dangerous gap in the threat model that's being overlooked by almost everyone I speak to. This blog post explains the risk, demonstrates how this is possible, and what the effective defences look like.
Introduction
Before we get started, if you'd like a brief overview of how passkeys work, you can jump over to my Passkeys 101 blog post, where I explain the basics. I'm going to assume in this blog post that you understand the concept of passkeys, and we're going to look at how they work in more detail in this post.
We also need to establish some terminology to make the rest of this blog post easier to understand:
Relying Party: The website or application that stores and verifies a user's passkey credential for authentication.
Authenticator: The user’s device or password manager that creates, stores, and uses the private key to prove the user’s identity to the Relying Party.
Attestation: The mechanism an Authenticator can use during registration to prove what kind of hardware created the credential.
How Passkey Registration Works
When registering a passkey with an RP like Report URI, JavaScript will make a call out to fetch the data it needs:
const optRes = await fetch('/passkeys/register_get_options/' + getCsrfToken(), { method: 'POST' });POST /passkeys/register_get_options/8f3c1a9e4b2d7f60c5a1e8d2b9f4a7c3 HTTP/1.1
Host: report-uri.com
Cookie: session=...
Content-Length: 0The RP will return a response that looks like this and contains the publicKey object:
HTTP/1.1 200 OK
Content-Type: application/json

{
  "publicKey": {
    "rp": {
      "name": "Report URI",
      "id": "report-uri.com"
    },
    "user": {
      "id": "Yi8kP1xqd0Jx3mWZ8Q2vK7nR4tH6sLpA9dF1gE0wXc=",
      "name": "jane@example.com",
      "displayName": "jane@example.com"
    },
    "challenge": "kQ7nR4tH6sLpA9dF1gE0wXc2vK7mZ8Q2Yi8kP1xqd0J",
    "pubKeyCredParams": [
      { "type": "public-key", "alg": -8 },
      { "type": "public-key", "alg": -7 },
      { "type": "public-key", "alg": -257 }
    ],
    "timeout": 60000,
    "authenticatorSelection": {
      "requireResidentKey": true,
      "residentKey": "required",
      "userVerification": "required"
    },
    "attestation": "none",
    "excludeCredentials": [
      {
        "type": "public-key",
        "id": "AX9k2mZ8Q2vK7nR4tH6sLpA9dF1gE0wXc...",
        "transports": ["usb", "nfc", "ble", "hybrid", "internal"]
      }
    ]
  }
Now that your device has the information it needs, it can create the new passkey and save it, likely showing you some kind of confirmation that requires a PIN, FaceID, TouchID, etc... This is done with the following JavaScript API call that will trigger the interaction with your Authenticator:
const cred = await navigator.credentials.create({ publicKey });If you complete the process, your Authenticator will then store your new passkey. The JavaScript will then build the response to send back to the RP to confirm that everything has been completed and to save the new passkey against the user's account:
const payload = {
    name: nameInput?.value?.trim() || '',
    password: passwordInput.value,
    id: cred.id,
    rawId: cred.rawId,
    type: cred.type,
    clientDataJSON: cred.response.clientDataJSON,
    attestationObject: cred.response.attestationObject,
};

const finRes = await fetch('/passkeys/register_finish/' + getCsrfToken(), {
    method: 'POST',
    headers: { 'Content-Type': 'application/json' },
    body: JSON.stringify(payload),
});
The attestationObject contains the important information, with everything else being mostly metadata. Here's the content of the attestationObject with the public key being the crucial part:
attestationObject (CBOR)
├─ fmt                       ← attestation format, e.g. "none" / "apple"
├─ authData                  ← authenticator data
│  ├─ rpIdHash               ← SHA-256 hash of the RP ID
│  ├─ flags                  ← UP/UV/AT/ED flags, etc.
│  ├─ signCount              ← signature counter
│  └─ attestedCredentialData
│     ├─ aaguid              ← type/model id, not useful for synced passkeys
│     ├─ credentialIdLength
│     ├─ credentialId        ← credential is, also surfaced as id/rawId
│     └─ credentialPublicKey ← COSE-encoded public key
└─ attStmt                   ← attestation statement; empty for fmt "none"
The RP can now save the public key against the user and we know that this is a passkey they will be able to use to authenticate in the future. The stored record might look something like this:
{
    "id": "AX9k2mZ8Q2vK7nR4tH6sLpA9dF1gE0wXc",
    "name": "Jane's MacBook",
    "pem": "-----BEGIN PUBLIC KEY-----\nMFkwEwYHKoZIzj0CAQYIKoZIzj0DAQcDQgAE...\n-----END PUBLIC KEY-----\n",
    "counter": 0,
    "created": "2026-05-16T14:22:07+00:00"
}
How Passkey Authentication Works
The process for logging in is equally as simple, with only a couple of steps to successfully authenticate with a passkey. First, the JavaScript must fetch the information required to authenticate from the RP.
const optRes = await fetch('/passkeys/login_get_options/' + getCsrfToken(), { method: 'POST', credentials: 'same-origin' });POST /passkeys/login_get_options/8f3c1a9e4b2d7f60c5a1e8d2b9f4a7c3 HTTP/1.1
Host: report-uri.com
Cookie: session=...
Content-Length: 0The RP will respond with a publicKey object that contains the required information:
HTTP/1.1 200 OK
Content-Type: application/json
{
  "publicKey": {
    "challenge": "Vk7nR4tH6sLpA9dF1gE0wXc2vK7mZ8Q2Yi8kP1xqd0J",
    "timeout": 20000,
    "rpId": "report-uri.com",
    "userVerification": "required",
    "allowCredentials": [
      {
        "id": "AX9k2mZ8Q2vK7nR4tH6sLpA9dF1gE0wXc",
        "type": "public-key",
        "transports": ["usb", "nfc", "ble", "hybrid", "internal"]
      }
    ]
  }
}
You must have some way of telling the RP which user/account is trying to login, and Report URI rely on the user already having completed their email address and password in the first step, but some websites will just ask for your email address. The response that came back from the RP has to have looked up the user's account, jane@example.com in this case, and now provides a list of allowCredentials which are the id values of previously registered passkeys. If you look in the earlier registration steps you can see that we registered a passkey with the id value AX9k2mZ8Q2vK7nR4tH6sLpA9dF1gE0wXc and this has now been returned to us during login as an allowed credential. We can now pass this to the Authenticator using the following JavaScript API call :
const assertion = await navigator.credentials.get({ publicKey });At this point, your Authenticator might ask you for a PIN, FaceID, TouchID or similar, and then the Authenticator is going to sign the challenge with the associated private key it stored earlier during registration, identified using the id provided. This signed challenge can then be returned to the RP to demonstrate possession of the private key:
const payload = {
    id: assertion.id,
    rawId: assertion.rawId,
    type: assertion.type,
    clientDataJSON: assertion.response.clientDataJSON,
    authenticatorData: assertion.response.authenticatorData,
    signature: assertion.response.signature,
    userHandle: assertion.response.userHandle || '',
};

const finRes = await fetch('/passkeys/login_finish/' + getCsrfToken(), {
    method: 'POST',
    credentials: 'same-origin',
    headers: { 'Content-Type': 'application/json' },
    body: JSON.stringify(payload),
});
POST /passkeys/login_finish/8f3c1a9e4b2d7f60c5a1e8d2b9f4a7c3 HTTP/1.1
Host: report-uri.com
Content-Type: application/json
Cookie: session=...
{
"id": "AX9k2mZ8Q2vK7nR4tH6sLpA9dF1gE0wXc",
"rawId": "AX9k2mZ8Q2vK7nR4tH6sLpA9dF1gE0wXc==",
"type": "public-key",
"clientDataJSON": "eyJ0eXBlIjoid2ViYXV0aG4uZ2V0IiwiY2hhbGxlbmdlIjoiVms3blI0dEg2c0xwQTlkRjFnRTB3WGMydks3bVo4UTJZaThrUDF4cWQwSiIsIm9yaWdpbiI6Imh0dHBzOi8vcmVwb3J0LXVyaS5jb20iLCJjcm9zc09yaWdpbiI6ZmFsc2V9",
"authenticatorData": "SZYN5YgOjGh0NBcPZHZgW4_krrmihjLHmVzzuoMdl2MdAAAAAA==",
"signature": "MEUCIQD3...base64 of the ECDSA/EdDSA signature...AiEA9k2m",
"userHandle": "T3xq2mP9kZ8Q2vK7nR4tH6sLpA9dF1gE0wXcYi8kP1w="
}If the RP can then successfully verify the signature in this payload using the public key it stored during registration, the user trying to log in has proven possession of the private key that's associated with the stored public key. This means they have now completed authentication with a passkey and you can grant them access to the account.
Understanding Attestation
Attestation is a pretty big deal, but if you go back and look at the registration process when the client called out to /passkeys/register_get_options, you will notice the following in the response sent back by the RP:
{
  ...
  "attestation": "none",
  ...
}
Attestation allows your application, the RP, to answer the question 'what kind of authenticator am I working with', and it's answering that question at a hardware level and getting an answer it can verify. That sounds great, so why is Report URI not requiring that?
In order for attestation to work, you would first need to get the certificates of all registered authenticators that can produce passkeys. You can grab that information from the FIDO Alliance as part of their Metadata Service (MDS3), and it's just a case of downloading the file and verifying its signature, and then parsing out all of the certificates. You need to do this ~once per month to stay current, and then you can ask for attestation when an authenticator is registering a passkey with your application.
Attestation is then a signature from the authenticator proving that it's a genuine authenticator from a particular manufacturer, let's say a YubiKey. Our application can verify that signature using the certificates that we fetched above and then we can be confident that we're dealing with a genuine YubiKey. The authenticator will provide an attestationObject that contains an attStmt that looks like this during the registration flow:
"attStmt": {
  "alg": -7,                // COSE alg of the signature (e.g. -7 = ES256)
  "sig": h'3045022100…',    // sig over (authData ‖ SHA-256(clientDataJSON))
  "x5c": [                  // attestation certificate chain, leaf first
    h'308202bd30820…',      // leaf: the authenticator's attestation cert
    h'30820336308…'         // (optional) intermediate CA cert(s)
  ]
}
So why on Earth would we not require attestation when registering a passkey with our application?
Convenience
The trade-off nobody mentions! An authenticator's ability to cryptographically prove what kind of hardware device it is can't be explained as anything other than a major security win. But that win does come at a cost.
We pulled the current MDS3 list to take a look at what's in there and we see the likes of Yubico, Feitian, Thales, Ledger, the platform TPM/Hello authenticators, and many more. The problem is what we didn't see. 1Password, LastPass, Bitwarden, Dashlane, iCloud Keychain, Google Password Manager, Chrome's built-in store... This isn't an oversight from these companies, it's a design choice.
The original idea behind passkeys was that the private key would remain locked on a single device, in secure storage like the Secure Enclave, a TPM, or similar. I'd register a passkey against my online account and save it as "Scott's Laptop", and that passkey would forever remain on my laptop, securely stored in the TPM (I'm on Windows). This is a tremendous security super-power, but it comes with a trade-off. If I were to lose my laptop, spill a coffee on it, or it failed spectacularly and the magic smoke got out, I'm in big trouble. I'd now need to have another device somewhere else that already had a passkey registered on my account so I could sign in from that device, otherwise I'm in big trouble. This idea of having to register and manage individual passkeys for each of your devices to be able to access your online account is what drove us in another direction.
Synced Passkeys
Synced passkeys are the architectural polar-opposite of an attestable hardware credential. Instead of storing the passkey in a secure storage medium like the Secure Enclave or TPM, I use 1Password, which stores the private key in my 1Password vault. My vault is then synced across all of my devices, my Windows desktop, my iPhone, my MacBook Pro, my iPad, and more. This offers me a huge amount of convenience because I can register a passkey with an RP a single time, and then login with that passkey across all of my devices, instead of having to register a passkey from each and every device. But that's the rub... We can't have meaningful hardware attestation in this process to tell us what type of hardware Authenticator we're dealing with because the answer to the question 'what type of device is this?' will always be 'it depends'. There's no generally useful way for software Authenticators like 1Password and others to do attestation, and this is why we don't require it on Report URI, because if we did, the vast majority of our users wouldn't be able to use their preferred method for registering and authenticating with passkeys.
That tension — device attestation vs. synced passkeys — is genuinely the crux of this whole blog post.
Where It All Falls Apart
We now have all the pieces of the puzzle, so let's put this together and see where it falls apart. Most online services are not going to require Attestation because it would force so many of their users out of being able to use passkeys in their preferred way. But Attestation allows the RP to know that it's talking to a bona fide Authenticator backed by hardware. Without Attestation we're just talking to software, we're talking to code. As it turns out, webpages run code...
The entire passkey registration and authentication flows that we walked through earlier were driven by JavaScript. To register a new passkey the page will call navigator.credentials.create() and interact with the Authenticator, passing data backwards and forwards. To authenticate with a passkey the page will call navigator.credentials.get() and interact with the Authenticator, passing data backwards and forwards. If we take Attestation out of the picture, you can complete this entire flow in JavaScript without ever even having to involve an Authenticator. Let's walk through it:
-
The JavaScript calls
/passkeys/register_get_options/to begin the registration flow as normal. -
Typically, the JavaScript would now call
navigator.credentials.create()to create the new public/private key pair in the Authenticator, instead, we're going just going to create a new key pair in JavaScript.const kp = await crypto.subtle.generateKey( { name: 'ECDSA', namedCurve: 'P-256' }, true, ['sign'] ); -
We now need to build the payload to send to
/passkeys/register_finish/which requires the public key that we just generated, and no attestation data is required. The RP will later only be able to verify that logins are signed by the private key corresponding to this submitted public key; it has not verified that the key was created inside a 'real' authenticator. -
A new passkey has been successfully registered on the user's account with absolutely no user interaction required.
This might sound crazy, that by simply visiting a page running malicious JavaScript it can register a passkey on your account with absolutely no interaction, but that's exactly how it works if no other steps are required.
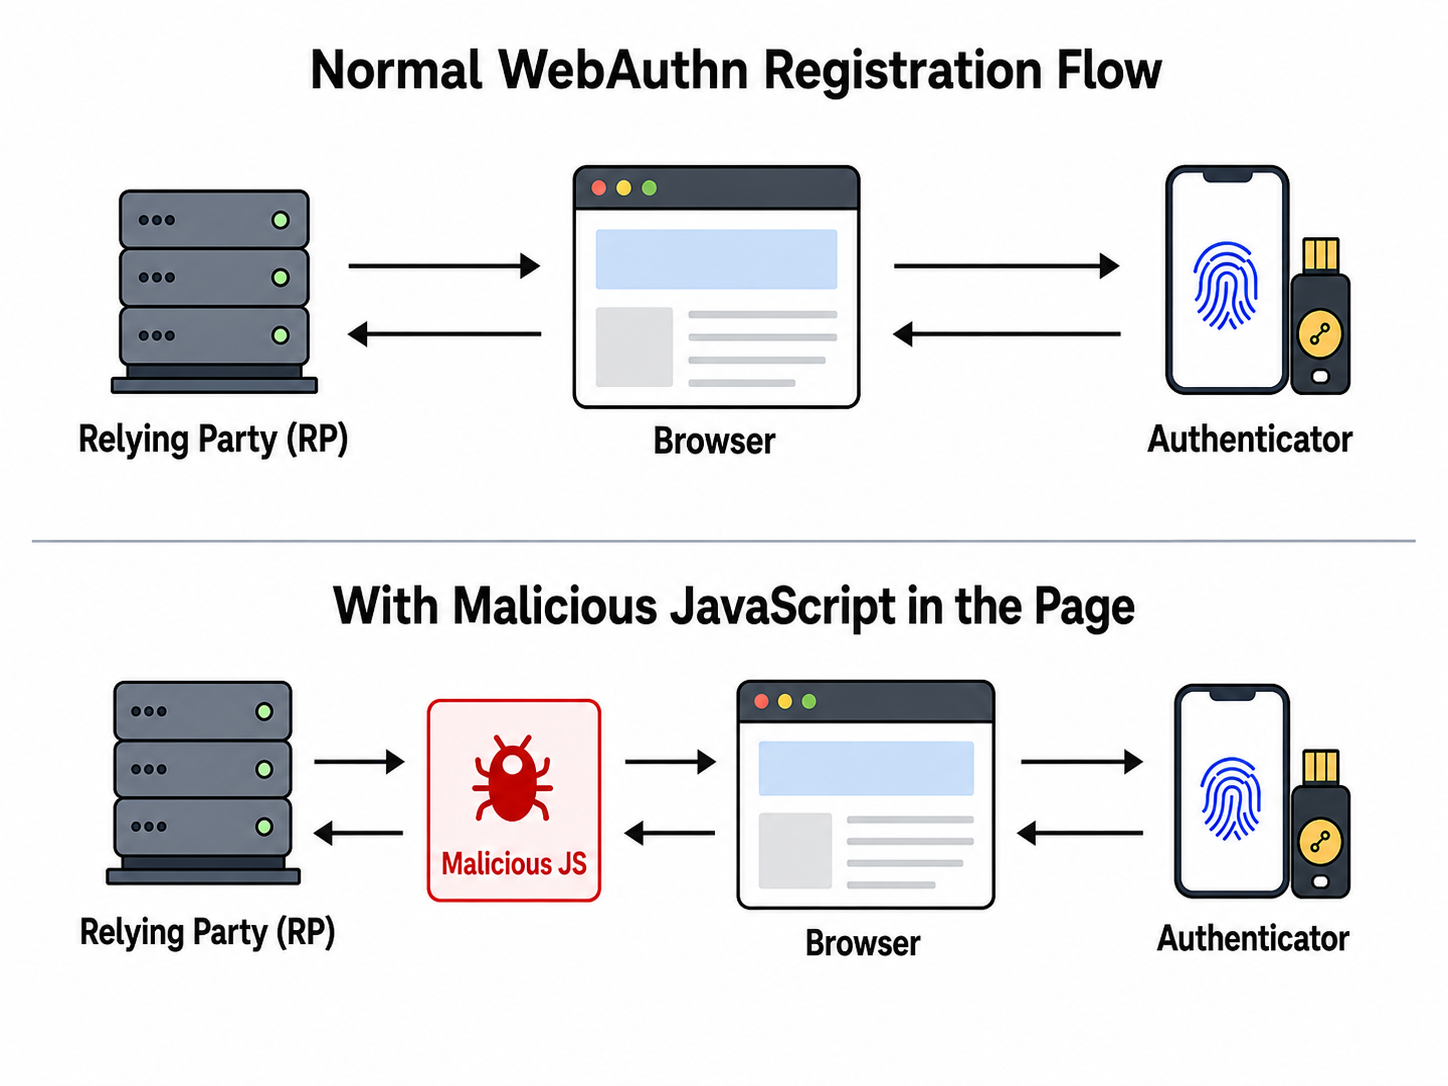
To prove this, I built a few demo pages on the Report URI Demo Site, and specifically you want to look at Passkeys Demo 1 for this. The very moment that page loads in your browser, the JavaScript payload is going to register a passkey on your account. You can register your own passkey as normal and even sign in with your own passkey, give it a try, but there will always be that second passkey registered by the malicious JavaScript and owned by the attacker.
XSS Is Now Deadly
Having an attacker register their own passkey on your account is a particularly nasty form of account takeover. It is persistent, it looks like a legitimate account-security change, and if passkeys are sufficient to sign in, the attacker now has a clean authentication path back into the account. You are now totally pwned, and, it gets worse.
Because the passkey registration process is orchestrated by JavaScript, if we're running malicious JavaScript in the page, we can proxy the WebAuthn API calls between the browser and the Authenticator. The ultimate in-page MiTM attack!
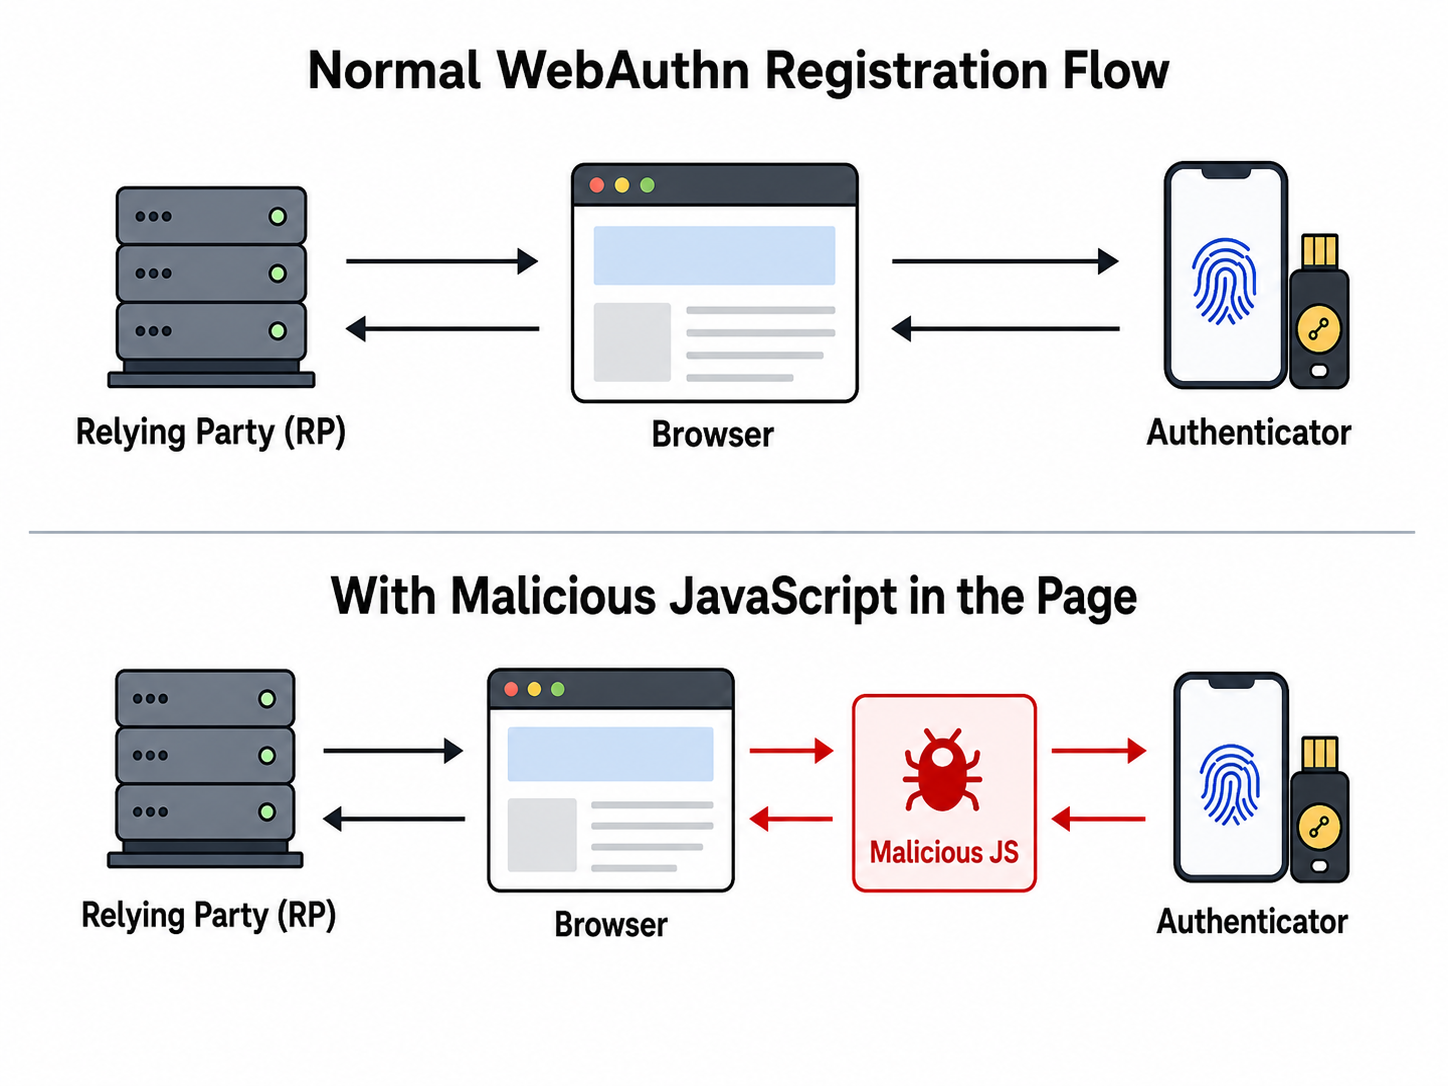
By hooking and tampering with the navigator.credentials.create() API, we can substitute the values being passed between the browser and the Authenticator. This means that the user will conduct their normal registration process, get a prompt from their Authenticator to create and save a new passkey, but the Authenticator will then save the wrong passkey. The Authenticator will save the passkey that it generated, but that was not the passkey sent to the RP, which was substituted for the attacker's passkey. It now looks like you've registered a passkey on the website, you see a passkey in your password manager, the website shows that a Passkey has now been registered on your account, but the passkey the victim has will never work. Only the passkey that the attacker has will work and the reason this work so well is best demonstrated by updating the diagram.
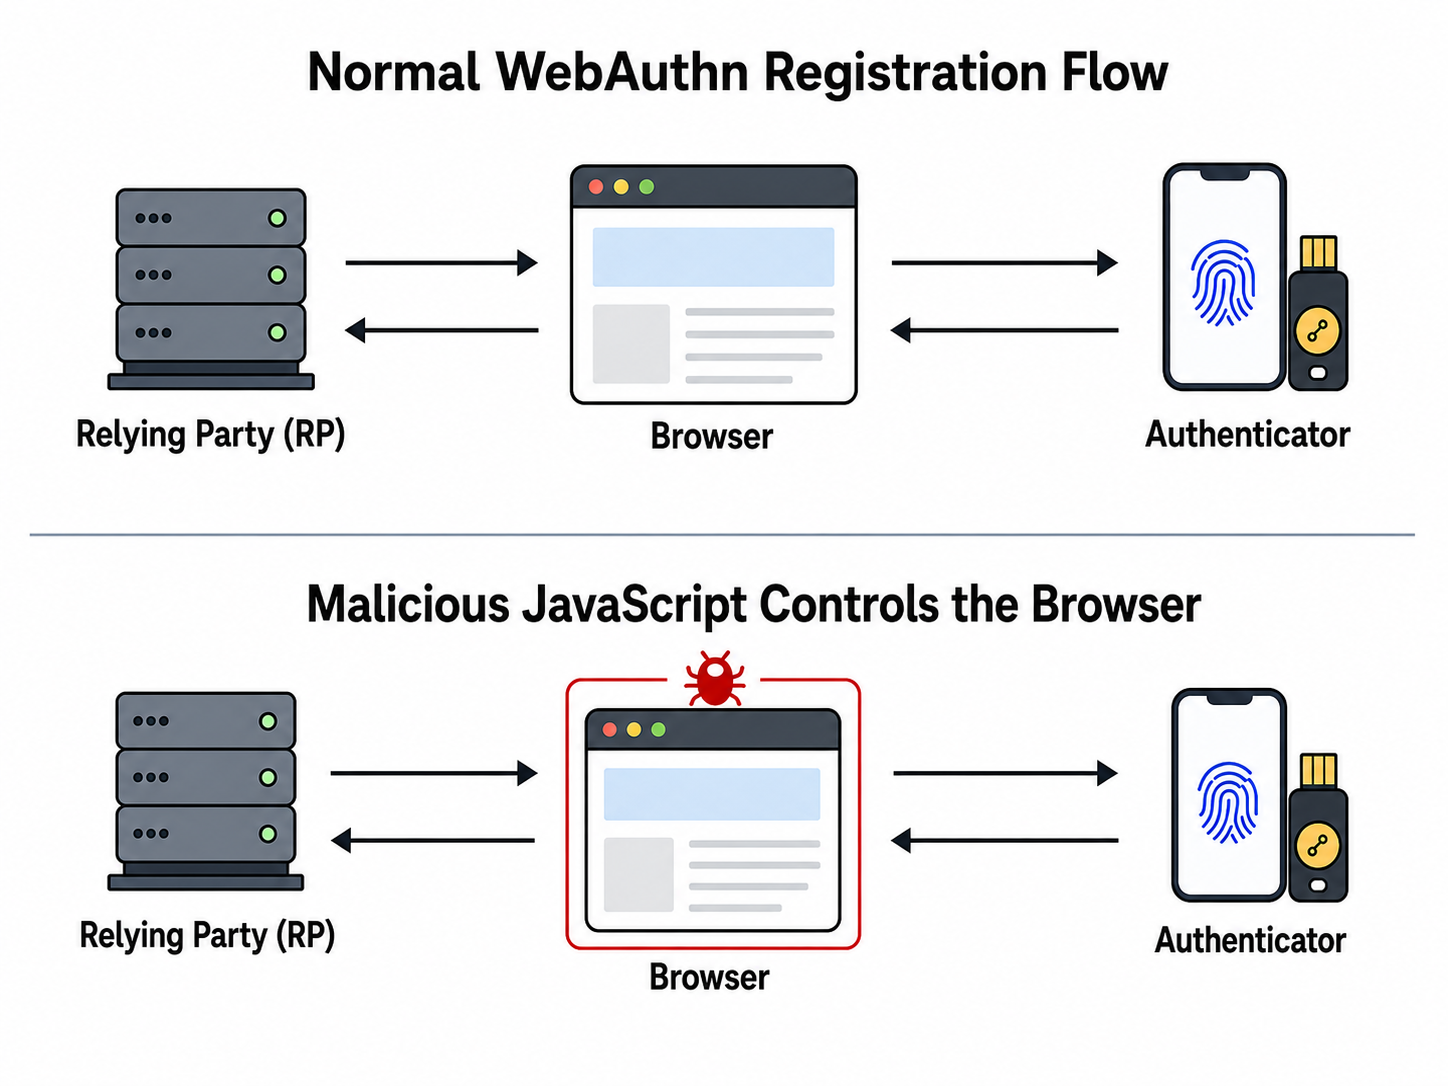
To demonstrate this process, we've created Passkeys Demo 2, where you can register a passkey on your account, but the passkey saved on your device will not be the correct passkey. You can then try to sign in with your passkey and observe that, as expected, it doesn't work, but the attacker can log in with their passkey.
The Threat Model That Matters
Attestation isn't being "skipped" out of laziness or a lack of knowledge, it's a recognition that for a service whose users are spread across every device and every password manager, the strong version of attestation would trade an assurance about device provenance for a very real loss of accessibility. The threat model that matters for us — phishing, credential theft, replay — is fully addressed by the challenge/origin binding and the signature check provided by synced passkeys. Device attestation doesn't move that needle, and it's why we don't require it.
Attestation and synced passkeys are fundamentally at odds, and choosing not to attest is what lets your users bring the passkeys that they actually have. If it's a choice between no Attestation or no passkeys, which are you choosing?
Defending Against The Threat
Everyone out there should be using, or aiming to use, passkeys, but we need to acknowledge the risks that exist and take steps to mitigate them. Here is some practical guidance to take away and use to help strengthen your passkeys deployment.
Step up authentication before registration
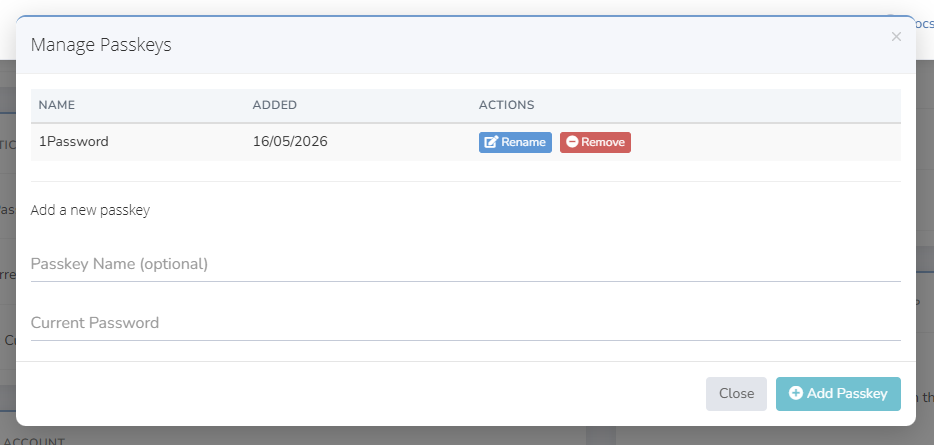
This one can be tricky because I've seen many sites using passkeys to replace passwords, but that's not something we've done on Report URI, passkeys are used as a 2FA mechanism. When attempting to register a new passkey on your account, you need the current password for the account to do it. This means that JavaScript can't silently register a new passkey. You could also require any other 2FA mechanism, a magic-link via email, or any other additional authentication mechanism.
Stop the Malicious JavaScript from running
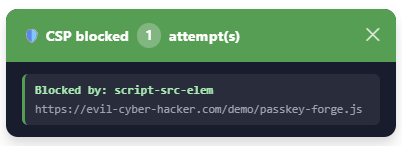
A strong Content Security Policy is going to go a long way here and the best way to stop this attack is to stop the XSS at the source. You should also use Subresource Integrity wherever possible to secure your third-party dependencies. You can see Passkeys Demo 3 for what happens when an analytics script goes rogue and starts registering passkeys for your visitors.
Take Control of Powerful APIs
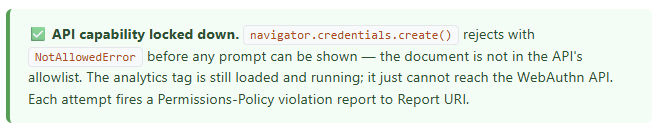
Using Permissions Policy, you can take control of which pages on your site, and which third-party scripts you're loading, have access to the navigator.credentials.create() and navigator.credentials.get() API calls to register a passkey and authenticate with a passkey. In reality, we probably have very few pages on our sites that need to touch passkeys, and probably even fewer third-party scripts that we want to have that capability. This won’t stop the direct /register_finish/ attack described above, because that attack doesn’t need the WebAuthn API, but it does reduce the number of places where malicious JavaScript can interfere with legitimate passkey ceremonies.
Out-Of-Band Notification on Registration
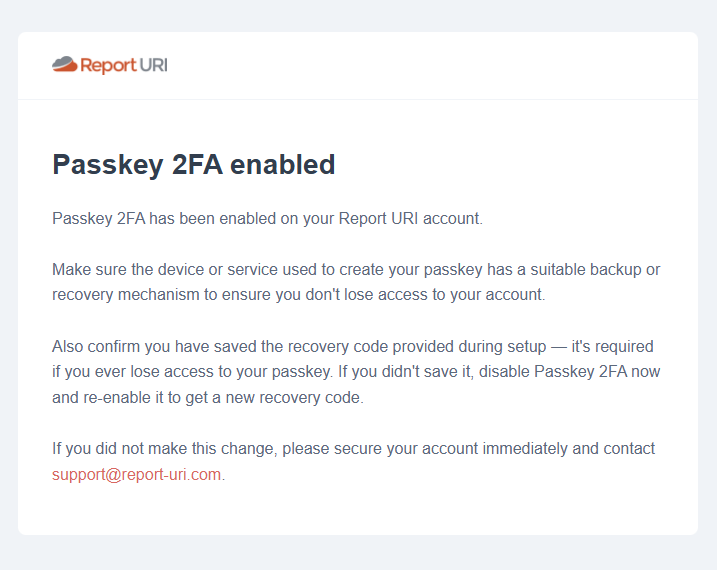
If a new passkey is added to the account of one of your users, you should absolutely be notifying them that this has happened. Send out a notification, via email or any other means, to your user as soon as a new passkey is added to their account. If they were not expecting this to have happened, they can take immediate steps to protect their account.
These Are Problems That Report URI Can Solve
As a specialised client-side protection platform, it stands to reason that Report URI can help you defend against these client-side attacks. I'm going to keep it brief here as the main purpose of this blog post is to highlight the risks above, but this is a topic we've done a lot of research on and we can provide some real value.

- Get a Content Security Policy deployed and get real-time feedback from the browser about what's happening in the page as your visitors see it.
- Use our JavaScript Integrity Monitoring to keep track of your third-party JavaScript dependencies, and when they change.
- Audit the use of Subresource Integrity across your site using Integrity Policy and keep your JavaScript Supply Chain secure.
- Deploy a Permissions Policy on your site and lock down the use of powerful JavaScript APIs.
We’ve also put together a dedicated Passkeys solutions page and whitepaper for teams who want practical guidance on finding and reducing these risks.
Conclusion
Using attestation: "none" isn't a problem, it's a trade-off between security and convenience. The hidden risk is overlooking the threat of a page-level adversary, who is always going to cause you problems, but they can cause some particularly big problems when it comes to passkeys.
Passkeys remain the right direction, and I want to see widespread adoption of them, but the security boundary they replace (passwords) was a single secret on the wire. The boundary they introduce, a ceremony brokered by the user agent, only holds if the user agent, and everything injected into it, can be trusted. This is why XSS becomes deadly to passkeys.
Have you enjoyed this post or found it helpful?
☕️ Consider buying me a coffee to say thanks!
🔔 Subscribe for free notifications when I publish!
🤩 Become a member and support my content!
Tags: XSS, Passkeys, Report URI