惯性聚合 高效追踪和阅读你感兴趣的博客、新闻、科技资讯
阅读原文 在惯性聚合中打开

推荐订阅源

Vercel News
Vercel News
Recorded Future
Recorded Future
CTFtime.org: upcoming CTF events
The GitHub Blog
The GitHub Blog
Application and Cybersecurity Blog
Google DeepMind News
cs.AI updates on arXiv.org
Microsoft Azure Blog
K
KPMG report finds enterprise disconnect between AI and its ROI | CIO
M
MIT News - Artificial intelligence
云风的 BLOG
云风的 BLOG
Y
Y Combinator Blog
N
News | PayPal Newsroom
freeCodeCamp Programming Tutorials: Python, JavaScript, Git & More
Help Net Security
Help Net Security
博客园 - Franky
SecWiki News
SecWiki News
Recent Announcements
T
Troy Hunt's Blog
The Register - Security
The Last Watchdog
The Last Watchdog
Webroot Blog
Webroot Blog
S
Security Affairs
博客园 - 司徒正美
S
Schneier on Security
I
InfoQ
博客园_首页
www.infosecurity-magazine.com
T
Threat Research - Cisco Blogs
Forbes - Security
Forbes - Security
腾讯CDC
N
Netflix TechBlog - Medium
N
News and Events Feed by Topic
Cloudbric
Cloudbric
T
The Exploit Database - CXSecurity.com
P
Proofpoint News Feed
A
About on SuperTechFans
Engineering at Meta
Engineering at Meta
Recent Commits to openclaw:main
B
Blog
V
Vulnerabilities – Threatpost
C
Check Point Blog
Google DeepMind News
Google Online Security Blog
C
Cyber Attacks, Cyber Crime and Cyber Security
Hacker News - Newest:
Hacker News - Newest: "LLM"
C
Cisco Blogs
Schneier on Security
O
OpenAI News
K
Kaspersky official blog

博客园 - 蔡清华

数据库中查询的各种连接(左连接,右连接,全连接,内连接,交叉连接,自连接) Android RenderScript 的使用基础篇 Android应用启动后自动创建桌面快捷方式 Android API教程:人脸检测(Face Detect) Android开发:如何实现TCP和UDP传输 用户授权认证过程 Android应用自动更新功能的代码实现 Android蓝牙开发浅析 网络通信的中文乱码问题 (转)android中 检查网络连接状态的变化,无网络时跳转到设置界面 Android开发之OpenGL+ES教程 android 示例源码 android 图片处理 Android应用如何实现换主题功能 android 开发环境搭建 Android 之 内存管理 Android编程获取网络连接状态(3G/Wifi)及调用网络配置界面 android 网络拨号流程 Android_launcher的源码详细分析
Android应用中通过AIDL机制实现进程间的通讯实例
蔡清华 · 2012-05-21 · via 博客园 - 蔡清华

 在Android中,每个应用程序都有自己的进程,当需要在不同的进程之间传递对象时,该如何实现呢?显然,Java中是不支持跨进程内存共享的,因此要传递对象,需要把对象解析成操作系统能够理解的数据格式,以达到跨界对象访问的目的。在Android中,则采用AIDL(Android Interface Definition Language :接口定义语言)方式实现。

AIDL (Android Interface Definition Language)是一种IDL 语言,用于生成可以在Android设备上两个进程之间进行进程间通信(IPC)的代码。如果在一个进程中(例如Activity)要调用另一个进程中(例如Service)对象的操作,就可以使用AIDL生成可序列化的参数。

AIDL IPC机制是面向接口的,它是使用代理类在客户端和实现端传递数据。

使用AIDL实现IPC

使用AIDL实现IPC服务的步骤是:

1. 创建.aidl文件-该文件(YourInterface.aidl)定义了客户端可用的方法和数据的接口。

2. makefile文件中加入.aidl文件-Eclipse中的ADT插件提供管理功能)Android包括名为AIDL的编译器,位于tools/文件夹。

3. 实现接口-AIDL编译器从AIDL接口文件中利用Java语言创建接口,该接口有一个继承的命名为Stub的内部抽象类(并且实现了一些IPC调用的附加方法),要做的就是创建一个继承于YourInterface.Stub的类并且实现在.aidl文件中声明的方法。

4. 向客户端公开接口-如果是编写服务,应该继承Service并且重载Service.onBind(Intent) 以返回实现了接口的对象实例

创建.aidl文件

AIDL使用简单的语法来声明接口,描述其方法以及方法的参数和返回值。这些参数和返回值可以是任何类型,甚至是其他AIDL生成的接口。重要的是必须导入所有非内置类型,哪怕是这些类型是在与接口相同的包中。下面是AIDL能支持的数据类型:

1.Java编程语言的主要类型 (int, boolean 不需要 import 语句。

2.以下的类 (不需要import 语句):

String

List -列表中的所有元素必须是在此列出的类型,包括其他AIDL生成的接口和可打包类型。List可以像一般的类(例如List<String>)那样使用,另一边接收的具体类一般是一个ArrayList,这些方法会使用List接口。

Map - Map中的所有元素必须是在此列出的类型,包括其他AIDL生成的接口和可打包类型。一般的maps(例如Map<String,Integer>)不被支持,另一边接收的具体类一般是一个HashMap,这些方法会使用Map接口。

CharSequence -该类是被TextView和其他控件对象使用的字符序列。

3.通常引引用方式传递的其他AIDL生成的接口,必须要import 语句声明

4.实现了Parcelable protocol 以及按值传递的自定义类,必须要import 语句声明。

通过对上面的基本了解,下面我就以一个具体的实例来说明Android中如何通过AIDL机制来实现两个进程中实现通讯:(情景假设:例如A应用通过服务Service方式向B应用提供通过书籍编号来查询书籍名称的服务)

A应用程序结构图如下:


通过上面的结构图可以看到,在A应用程序中创建一个 aidl 的接口,然后系统在 gen 目录下自动生成相应的 java 文件。

其中 IBook.aidl 文件的源码:

  1. package com.andyidea.aidl;  
  2.   
  3. interface IBook {  
  4.       
  5.     String queryBook(int bookNo);  
  6.   
  7. }  

其中 BookService.java 类中的源码如下:

  1. package com.andyidea.service;  
  2.   
  3. import com.andyidea.aidl.IBook;  
  4.   
  5. import android.app.Service;  
  6. import android.content.Intent;  
  7. import android.os.IBinder;  
  8. import android.os.RemoteException;  
  9.   
  10. /**  
  11.  * 查询书籍的服务  
  12.  * @author Andy  
  13.  *  
  14.  */  
  15. public class BookService extends Service {  
  16.       
  17.     private String[] bookNames = {"Java编程思想","设计模式","Android开发设计"};   
  18.       
  19.     private IBinder mIBinder = new BookBinder();  
  20.   
  21.     @Override  
  22.     public IBinder onBind(Intent intent) {  
  23.         // TODO Auto-generated method stub  
  24.         return mIBinder;  
  25.     }  
  26.       
  27.     /**  
  28.      * 服务中交互的方法  
  29.      * @param bookNo  
  30.      * @return  
  31.      */  
  32.     public String queryBookName(int bookNo){  
  33.         if(bookNo > 0 && bookNo <= bookNames.length){  
  34.             return bookNames[bookNo-1];  
  35.         }  
  36.         return null;  
  37.     }  
  38.       
  39.     private class BookBinder extends IBook.Stub{  
  40.   
  41.         @Override  
  42.         public String queryBook(int bookNo) throws RemoteException {  
  43.             return queryBookName(bookNo);  
  44.         }  
  45.           
  46.     }  
  47.   
  48. }  
同时别忘了在 Manifest.xml中配置该服务对象(标红色的部分),建议采用隐式方式激活该服务,适合不同的进程的意图。
  1. <?xml version="1.0" encoding="utf-8"?>  
  2. <manifest xmlns:android="http://schemas.android.com/apk/res/android"  
  3.     package="com.andyidea.service"  
  4.     android:versionCode="1"  
  5.     android:versionName="1.0" >  
  6.   
  7.     <uses-sdk android:minSdkVersion="8" />  
  8.   
  9.     <application  
  10.         android:icon="@drawable/ic_launcher"  
  11.         android:label="@string/app_name" >  
  12.           
  13. <span style="color:#ff0000;">        <service android:name=".BookService">  
  14.             <intent-filter>  
  15.                 <action android:name="com.andyidea.aidl.bookservice"/>  
  16.             </intent-filter>  
  17.         </service></span>  
  18.     </application>  
  19.   
  20. </manifest>  
以上我们已经实现了A应用程序提供服务的功能,下面我们来实现B应用(或者其它需要用到A应用提供服务的应用程序)

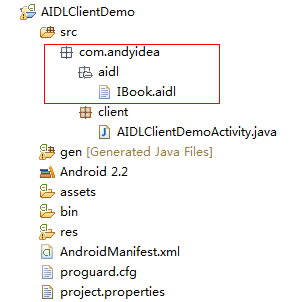
B应用程序结构图如下:


我们看到B应用程序也要和服务端同样的 .aidl 文件,我们可以从A应用程序中把该 aidl 文件中拷贝过来就是了,呵。由于B应用中 .aidl 文件和 A应用中的 .aidl 文件源码一样,我在这里就不列出来了。

其中AIDLClientDemoActivity.java源码如下:【注:其中该客户端类要通过 bindService 方式来启动另外一个进程的服务,这样才能实现和服务进行交互。如果通过startService方式来启动服务,则不能与服务进行交互】

  1. package com.andyidea.client;  
  2.   
  3. import android.app.Activity;  
  4. import android.content.ComponentName;  
  5. import android.content.Intent;  
  6. import android.content.ServiceConnection;  
  7. import android.os.Bundle;  
  8. import android.os.IBinder;  
  9. import android.os.RemoteException;  
  10. import android.view.View;  
  11. import android.widget.Button;  
  12. import android.widget.EditText;  
  13. import android.widget.TextView;  
  14.   
  15. import com.andyidea.aidl.IBook;  
  16.   
  17. public class AIDLClientDemoActivity extends Activity {  
  18.       
  19.     private EditText numberText;  
  20.     private TextView resultView;  
  21.     private Button query;  
  22.     private IBook bookQuery;  
  23.     private BookConnection bookConn = new BookConnection();  
  24.       
  25.     /** Called when the activity is first created. */  
  26.     @Override  
  27.     public void onCreate(Bundle savedInstanceState) {  
  28.         super.onCreate(savedInstanceState);  
  29.         setContentView(R.layout.main);  
  30.           
  31.         numberText = (EditText) this.findViewById(R.id.number);  
  32.         resultView = (TextView) this.findViewById(R.id.resultView);  
  33.         query = (Button)findViewById(R.id.query);  
  34.           
  35.         Intent service = new Intent("com.andyidea.aidl.bookservice");  
  36.         bindService(service, bookConn, BIND_AUTO_CREATE);  
  37.           
  38.         query.setOnClickListener(new View.OnClickListener() {  
  39.               
  40.             @Override  
  41.             public void onClick(View v) {  
  42.                 String number = numberText.getText().toString();  
  43.                 int num = Integer.valueOf(number);  
  44.                 try {  
  45.                     resultView.setText(bookQuery.queryBook(num));  
  46.                 } catch (RemoteException e) {  
  47.                     e.printStackTrace();  
  48.                 }  
  49.             }  
  50.         });  
  51.     }  
  52.       
  53.     @Override  
  54.     protected void onDestroy() {  
  55.         unbindService(bookConn);  
  56.         super.onDestroy();  
  57.     }  
  58.       
  59.     private final class BookConnection implements ServiceConnection{  
  60.   
  61.         @Override  
  62.         public void onServiceConnected(ComponentName name, IBinder service) {  
  63.             // TODO Auto-generated method stub  
  64.             bookQuery = IBook.Stub.asInterface(service);  
  65.         }  
  66.   
  67.         @Override  
  68.         public void onServiceDisconnected(ComponentName name) {  
  69.             // TODO Auto-generated method stub  
  70.             bookQuery = null;  
  71.         }  
  72.           
  73.     }  
  74. }  
其中界面布局文件 main.xml 源码:
  1. <?xml version="1.0" encoding="utf-8"?>  
  2. <LinearLayout xmlns:android="http://schemas.android.com/apk/res/android"  
  3.     android:layout_width="fill_parent"  
  4.     android:layout_height="fill_parent"  
  5.     android:orientation="vertical" >  
  6.   
  7.     <TextView  
  8.         android:layout_width="fill_parent"  
  9.         android:layout_height="wrap_content"  
  10.         android:text="书籍编号" />  
  11.     <EditText   
  12.         android:id="@+id/number"  
  13.         android:layout_width="fill_parent"  
  14.         android:layout_height="wrap_content"/>  
  15.     <Button  
  16.         android:id="@+id/query"  
  17.         android:layout_width="wrap_content"  
  18.         android:layout_height="wrap_content"  
  19.         android:text="查询"/>  
  20.     <TextView   
  21.         android:id="@+id/resultView"  
  22.         android:layout_width="fill_parent"  
  23.         android:layout_height="wrap_content"/>  
  24. </LinearLayout>  
至此,我们已经完成了B应用程序的代码实现部分,我们要先把A应用程序部署到机器上,然后我们再运行B应用程序。下面我们通过截图来看下程序运行的结果:

通过上面的截图,我们输入书籍编号 1,就可以查询出相应的书籍名称,到此,我们就可以了解了 Android应用中如何通过AIDL机制实现两个进程的通讯。

注:本文为 Andy.Chen 原创,欢迎大家转载,转载请大家注明出处,谢谢。