








对于熟悉Silverlight的同学来说是一件很简单的事情,所谓的偏差无非就是坐标的偏移,通过坐标偏移技术(TranslateTransform)就可以解决此问题。首先我们先看看DeepEarth中对于默认的圆形图元(PointControl)和线条(LineStringControl)的渲染。
var dpoint1 = new PointControl()
{
Location = new Location { Latitude = 40.554000079631, Longitude = 116.05599966645 }
};
var dpoint2 = new PointControl()
{
Location = new Location { Latitude = 38.92, Longitude = 121.62 }
};
var dpoint3 = new PointControl()
{
Location = new Location { Latitude = 31.23, Longitude = 121.47 }
};
var dpoint4 = new PointControl()
{
Location = new Location { Latitude = 29.57, Longitude = 106.55 }
};
geometryLayer.Add(dpoint1);
geometryLayer.Add(dpoint2);
geometryLayer.Add(dpoint3);
geometryLayer.Add(dpoint4);
var dline = new LineStringControl
{
Locations = new ObservableCollection<Location>
{
new Location { Latitude = 40.554000079631, Longitude = 116.05599966645 },
new Location { Latitude = 38.92, Longitude = 121.62 },
new Location { Latitude = 31.23, Longitude = 121.47 },
new Location { Latitude = 29.57, Longitude = 106.55 }
}
};
geometryLayer.Add(dline);
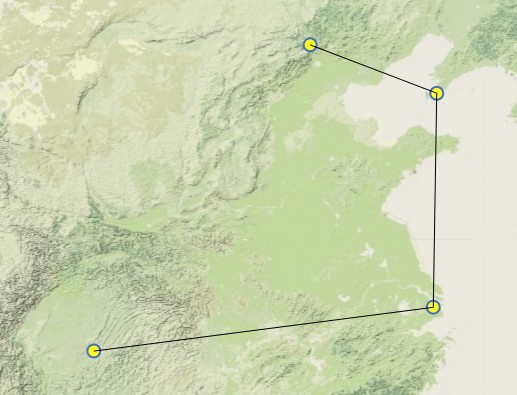
以上使用DeepEarth内脏的PointControl和LineStringControl可以正常的渲染图元点和线条,且线条的连线也处于图元点的中心。默认图元不具备标签功能,最终要实现图元下面显示标签功能,我们可以通过扩展Pointcontrol来实现。
[TemplatePart(Name = "tbName", Type = typeof(TextBlock))]
public class PointComponent : PointControl
{
protected TextBlock tbName;
private string nameValue = string.Empty;
public PointComponent(string name)
: base()
{
DefaultStyleKey = typeof(PointComponent);
this.Style = Application.Current.Resources["PointStyle"] as Style;
this.nameValue = name;
}
public override void OnApplyTemplate()
{
base.OnApplyTemplate();
this.tbName = GetTemplateChild("tbName") as TextBlock;
this.tbName.Text = nameValue;
}
}
以上扩展控件(PointComponent)通过继承PointControl实现,其引用了样式PointStyle来定制控件呈现的外观。样式代码如下:
<Style TargetType="app:PointComponent" x:Key="PointStyle">
<Setter Property="Template">
<Setter.Value>
<ControlTemplate TargetType="app:PointComponent">
<Grid>
<Grid.RenderTransform>
<CompositeTransform x:Name="PART_CompositeTransform" />
</Grid.RenderTransform>
<Grid.RowDefinitions>
<RowDefinition Height="20"/>
<RowDefinition></RowDefinition>
</Grid.RowDefinitions>
<Ellipse Grid.Row="0" Height="16" Width="16" Fill="Yellow" Stroke="RoyalBlue" StrokeThickness="2" HorizontalAlignment="Center" VerticalAlignment="Center"/>
<TextBlock Text="测试" Grid.Row="1" x:Name="tbName"/>
</Grid>
</ControlTemplate>
</Setter.Value>
</Setter>
</Style>
此时就可以使用扩展的控件进行图元渲染了,下面模拟坐标对扩展控件进行测试。
//北京
var point1 = new PointComponent("北京")
{
Location = new Location { Latitude = 40.554000079631, Longitude = 116.05599966645 }
};
//大连
var point2 = new PointComponent("大连")
{
Location = new Location { Latitude = 38.92, Longitude = 121.62 }
};
//上海
var point3 = new PointComponent("上海")
{
Location = new Location { Latitude = 31.23, Longitude = 121.47 }
};
//重庆
var point4 = new PointComponent("重庆")
{
Location = new Location { Latitude = 29.57, Longitude = 106.55 }
};
geometryLayer.Add(point1);
geometryLayer.Add(point2);
geometryLayer.Add(point3);
geometryLayer.Add(point4);
var line = new LineStringControl
{
Locations = new ObservableCollection<Location>
{
new Location { Latitude = 40.554000079631, Longitude = 116.05599966645 },
new Location { Latitude = 38.92, Longitude = 121.62 },
new Location { Latitude = 31.23, Longitude = 121.47 },
new Location { Latitude = 29.57, Longitude = 106.55 }
}
};
geometryLayer.Add(line);
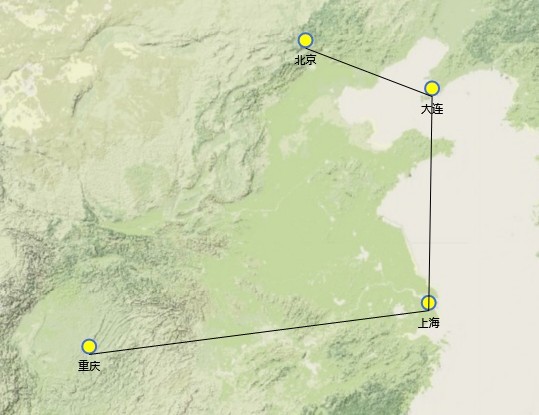
仔细观察上图可发现,线条所连接的点并非是图元点的中心,而是整个扩展控件的中心,于此我们需要多扩展控件的位置进行适当的调整,以适应线条连接在圆形图元点的中心位置。PS:要处理这个位置偏差其实是很简单的事情,直接使用Silverlight的偏移技术(TranslateTransform)就搞定,不知为什么,会有那么多的同学提问如何解决。
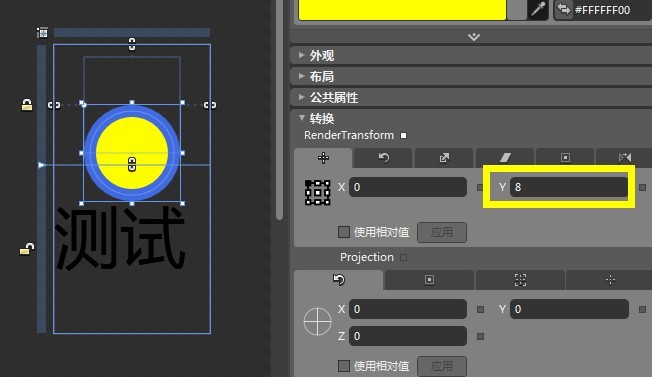
可以通过工具Microsoft Expression Blend,合理调整扩展控件(PointComponent)的样式中圆形图元的偏移值,达到线条的链接指向扩展控件的圆形图元中心点。
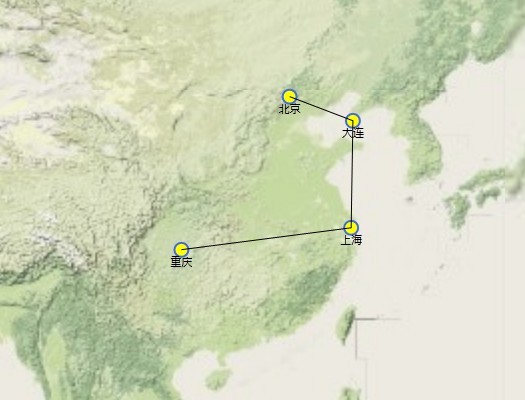
调整的后的控件样式和最终效果图如下:
<Style TargetType="app:PointComponent" x:Key="PointStyle">
<Setter Property="Template">
<Setter.Value>
<ControlTemplate TargetType="app:PointComponent">
<Grid>
<Grid.RenderTransform>
<CompositeTransform x:Name="PART_CompositeTransform" />
</Grid.RenderTransform>
<Grid.RowDefinitions>
<RowDefinition Height="20"/>
<RowDefinition></RowDefinition>
</Grid.RowDefinitions>
<Ellipse Grid.Row="0" Height="16" Width="16" Fill="Yellow" Stroke="RoyalBlue" StrokeThickness="2" HorizontalAlignment="Center" VerticalAlignment="Center">
<Ellipse.RenderTransform>
<TranslateTransform X="0" Y="8"></TranslateTransform>
</Ellipse.RenderTransform>
</Ellipse>
<TextBlock Text="测试" Grid.Row="1" x:Name="tbName">
<TextBlock.RenderTransform>
<TranslateTransform X="0" Y="4"></TranslateTransform>
</TextBlock.RenderTransform>
</TextBlock>
</Grid>
</ControlTemplate>
</Setter.Value>
</Setter>
</Style>

推荐阅读:
此内容由惯性聚合(RSS阅读器)自动聚合整理,仅供阅读参考。 原文来自 — 版权归原作者所有。