Spring Cloud Bus 将分布式的节点用轻量的消息代理连接起来。它可以用于广播配置文件的更改或者服务之间的通讯,也可以用于监控。本文要讲述的是用Spring Cloud Bus实现通知微服务架构的配置文件的更改。
本文还是基于上一篇文章来实现。按照官方文档,我们只需要在配置文件中配置 spring-cloud-starter-bus-amqp ;这就是说我们需要装rabbitMq,点击rabbitmq下载,点击erlang下载。上两个下载都是百度网盘的链接,也可以https://download.csdn.net/download/snowwolf9999/10551353帮我加点CSDN分,嘿嘿。
具体安装erlang环境,参考https://www.cnblogs.com/PPBoy/p/9335943.html。
在pom文件加上起步依赖spring-cloud-starter-bus-amqp和spring-boot-starter-actuator。
        <dependency>
            <groupId>org.springframework.cloud</groupId>
            <artifactId>spring-cloud-starter-bus-amqp</artifactId>
        </dependency>

        <dependency>
            <groupId>org.springframework.boot</groupId>
            <artifactId>spring-boot-starter-actuator</artifactId>
        </dependency>
完整的配置文件如下:

<project xmlns="http://maven.apache.org/POM/4.0.0" xmlns:xsi="http://www.w3.org/2001/XMLSchema-instance" xsi:schemaLocation="http://maven.apache.org/POM/4.0.0 http://maven.apache.org/xsd/maven-4.0.0.xsd">
  <modelVersion>4.0.0</modelVersion>
  <groupId>com.sun</groupId>
  <artifactId>eureka-config-client</artifactId>
  <version>0.0.1-SNAPSHOT</version>
    <packaging>jar</packaging>

    <name>config-client</name>
    <description>Demo project for Spring Boot</description>

    <parent>
        <groupId>com.sun</groupId>
        <artifactId>springcloud-parent</artifactId>
        <version>0.0.1-SNAPSHOT</version>
    </parent>

    <dependencies>
        <dependency>
            <groupId>org.springframework.boot</groupId>
            <artifactId>spring-boot-starter-web</artifactId>
        </dependency>
        <dependency>
            <groupId>org.springframework.cloud</groupId>
            <artifactId>spring-cloud-starter-config</artifactId>
        </dependency>
        <dependency>
            <groupId>org.springframework.cloud</groupId>
            <artifactId>spring-cloud-starter-netflix-eureka-client</artifactId>
        </dependency>

        <dependency>
            <groupId>org.springframework.cloud</groupId>
            <artifactId>spring-cloud-starter-bus-amqp</artifactId>
        </dependency>

        <dependency>
            <groupId>org.springframework.boot</groupId>
            <artifactId>spring-boot-starter-actuator</artifactId>
        </dependency>
    </dependencies>
</project>
View Code
在配置文件application.yml中加上RabbitMq的配置,包括RabbitMq的地址、端口,用户名、密码。并需要加上spring.cloud.bus的三个配置,具体如下:
spring:
  application:
    name: config-client
  cloud:
    config:
      label: master
      profile: dev
      #uri: http://localhost:8888/
      bus:
        enabled: true
        trace:
          enabled:true
    discovery:
      enabled: true
      serviceId: config-server
  rabbitmq:
    host: localhost
    port: 5672
    username: guest
    password: guest

eureka:
  client:
    serviceUrl:
      defaultZone: http://localhost:8888/eureka/
server:
  port: 8881

management:
  endpoints:
    web:
      exposure:
        include: bus-refresh
ConfigClientApplication启动类代码如下:
package com.sun;

import org.springframework.beans.factory.annotation.Value;
import org.springframework.boot.SpringApplication;
import org.springframework.boot.autoconfigure.SpringBootApplication;
import org.springframework.cloud.context.config.annotation.RefreshScope;
import org.springframework.cloud.netflix.eureka.EnableEurekaClient;
import org.springframework.web.bind.annotation.RequestMapping;
import org.springframework.web.bind.annotation.RestController;

@SpringBootApplication
@RestController
@EnableEurekaClient
@RefreshScope //添加注释
public class ConfigClientApplication {
    public static void main(String[] args) {
        SpringApplication.run(ConfigClientApplication.class, args);
    }

    @Value("${foo}")
    String foo;
    @RequestMapping(value = "/hi")
    public String hi(){
        return foo;
    }
}
这时我们去代码仓库将foo的值改为“foo version 4”,即改变配置文件foo的值。如果是传统的做法,需要重启服务,才能达到配置文件的更新。此时,我们只需要发送post请求:http://localhost:8881/actuator/bus-refresh,你会发现config-client会重新读取配置文件:
c.c.c.ConfigServicePropertySourceLocator : Fetching config from server at : http://localhost:8888
tip:这里发送post请求可以用postman:

写地址发送就可以了,这时我们再访问http://localhost:8881/hi 或者http://localhost:8882/hi 浏览器显示:
另外,/actuator/bus-refresh接口可以指定服务,即使用”destination”参数,比如 “/actuator/bus-refresh?destination=customers:**” 即刷新服务名为customers的所有服务。
此时的架构图:
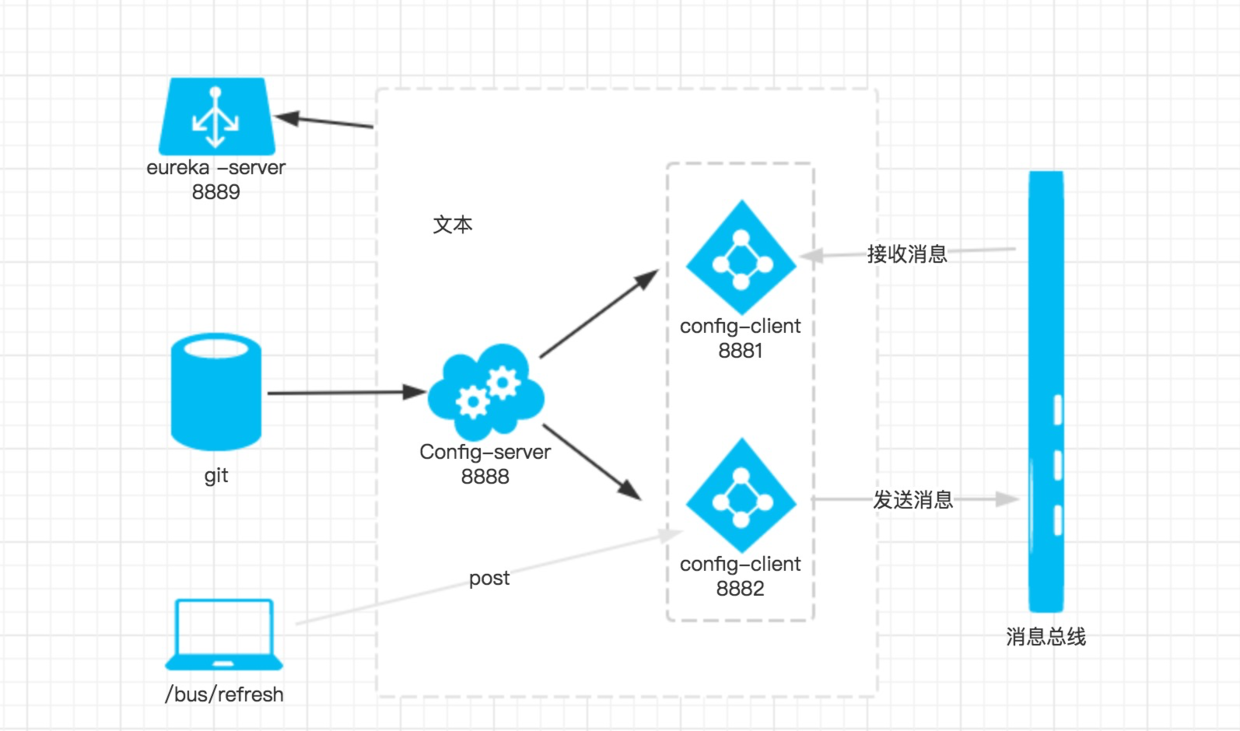
当git文件更改的时候,通过pc端用post 向端口为8881的config-client发送请求/bus/refresh/;此时8881端口会发送一个消息,由消息总线向其他服务传递,从而使整个微服务集群都达到更新配置文件。
当然,向端口8882的服务发送也可以。
最后说一下http://localhost:8881/actuator/bus-refresh不能成功刷新,基本上有2种可能:
1、查看rabbitmq是否安装完毕,是否运行。查看rabbitmq状态,参考:https://blog.csdn.net/lglgsy456/article/details/79045850
2、必须是post请求。可以由postman模拟发送。
本文绝大部分参考博客:https://blog.csdn.net/forezp/article/details/81041062 再次对博主表示感谢。
此内容由惯性聚合(RSS阅读器)自动聚合整理,仅供阅读参考。 原文来自 — 版权归原作者所有。