







# ip netns add blue
# ip netns list
blue
先创建veth
# ip link add veth0 type veth peer name veth1
在当前namespace可以看到veth0和veth1
# ip link list
1: lo: <LOOPBACK,UP,LOWER_UP> mtu 65536 qdisc noqueue state UNKNOWN
link/loopback 00:00:00:00:00:00 brd 00:00:00:00:00:00
2: eth0: <BROADCAST,MULTICAST,UP,LOWER_UP> mtu 1500 qdisc pfifo_fast state UP qlen 1000
link/ether 00:0c:29:b2:cf:72 brd ff:ff:ff:ff:ff:ff
3: veth1: <BROADCAST,MULTICAST> mtu 1500 qdisc noop state DOWN qlen 1000
link/ether ae:0d:00:e1:11:38 brd ff:ff:ff:ff:ff:ff
4: veth0: <BROADCAST,MULTICAST> mtu 1500 qdisc noop state DOWN qlen 1000
link/ether 42:e7:50:d4:bb:c5 brd ff:ff:ff:ff:ff:ff
将veth1加到namespace “blue”
# ip link set veth1 netns blue
此时,当前namepapce只能看到veth0。

通过如下命令可以查看blue namespace的网口
# ip netns exec blue ip link list

通过ip netns exec可以配置namespace的网口
# ip netns exec blue ifconfig veth1 172.17.42.2/16 up

通过bridge来实现。参见veth pair一节。
主要参考
[0]Introducing Linux Network Namespaces
veth pair是用于不同network namespace间进行通信的方式,veth pair将一个network namespace数据发往另一个network namespace的veth。如下:
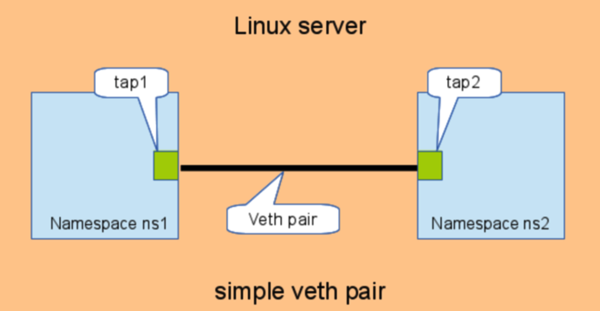
# add the namespaces
ip netns add ns1
ip netns add ns2
# create the veth pair
ip link add tap1 type veth peer name tap2
# move the interfaces to the namespaces
ip link set tap1 netns ns1
ip link set tap2 netns ns2
# bring up the links
ip netns exec ns1 ip link set dev tap1 up
ip netns exec ns2 ip link set dev tap2 up
如果多个network namespace需要进行通信,则需要借助bridge:
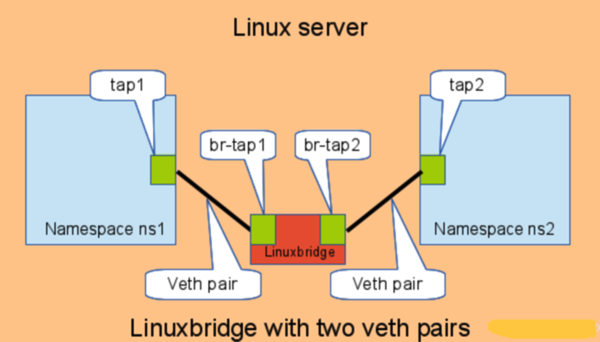
# add the namespaces
ip netns add ns1
ip netns add ns2
# create the switch
BRIDGE=br-test
brctl addbr $BRIDGE
brctl stp $BRIDGE off
ip link set dev $BRIDGE up
#
#### PORT 1
# create a port pair
ip link add tap1 type veth peer name br-tap1
# attach one side to linuxbridge
brctl addif br-test br-tap1
# attach the other side to namespace
ip link set tap1 netns ns1
# set the ports to up
ip netns exec ns1 ip link set dev tap1 up
ip link set dev br-tap1 up
#
#### PORT 2
# create a port pair
ip link add tap2 type veth peer name br-tap2
# attach one side to linuxbridge
brctl addif br-test br-tap2
# attach the other side to namespace
ip link set tap2 netns ns2
# set the ports to up
ip netns exec ns2 ip link set dev tap2 up
ip link set dev br-tap2 up
#
内核实现
veth的实现与loopback interface类似,比较简单:
//drivers/net/veth.c
static netdev_tx_t veth_xmit(struct sk_buff *skb, struct net_device *dev)
{
struct net_device *rcv = NULL;
struct veth_priv *priv, *rcv_priv;
priv = netdev_priv(dev);
rcv = priv->peer;
rcv_priv = netdev_priv(rcv);
stats = this_cpu_ptr(priv->stats);
length = skb->len;
//转发给peer
if (dev_forward_skb(rcv, skb) != NET_RX_SUCCESS)
goto rx_drop;
NETIF_F_NETNS_LOCAL是网络设备的一个特性,设置该特性的网络设备,不允许在不同network namespace间移动。这类设备也叫做本地设备(local devices)。
Loopback,VXLAN,PPP,bridge都是这类设备。可以通过ethtool -k,或者ethtool –show- features查看该值:
# ethtool -k br0
netns-local: on [fixed]
如果对这类设备network namespace,会报下面的错误:
# ip link set br0 netns ns1
RTNETLINK answers: Invalid argument
参考《Resource management:Linux kernel Namespaces and cgroups》
主要参考
[0]Linux Switching – Interconnecting Namespaces
作者:YY哥
出处:http://www.cnblogs.com/hustcat/
本文版权归作者和博客园共有,欢迎转载,但未经作者同意必须保留此段声明,且在文章页面明显位置给出原文连接,否则保留追究法律责任的权利。
此内容由惯性聚合(RSS阅读器)自动聚合整理,仅供阅读参考。 原文来自 — 版权归原作者所有。