


In this part, we’ll explore the architecture of the ingestion pipeline in more detail. We’ll dive into each one of the microservices and explain how they all work together. We’ll focus on the more significant subsets of the codebase, but the full source code is available if you want to dive even deeper.
Before diving in, let’s review the overall architecture again:
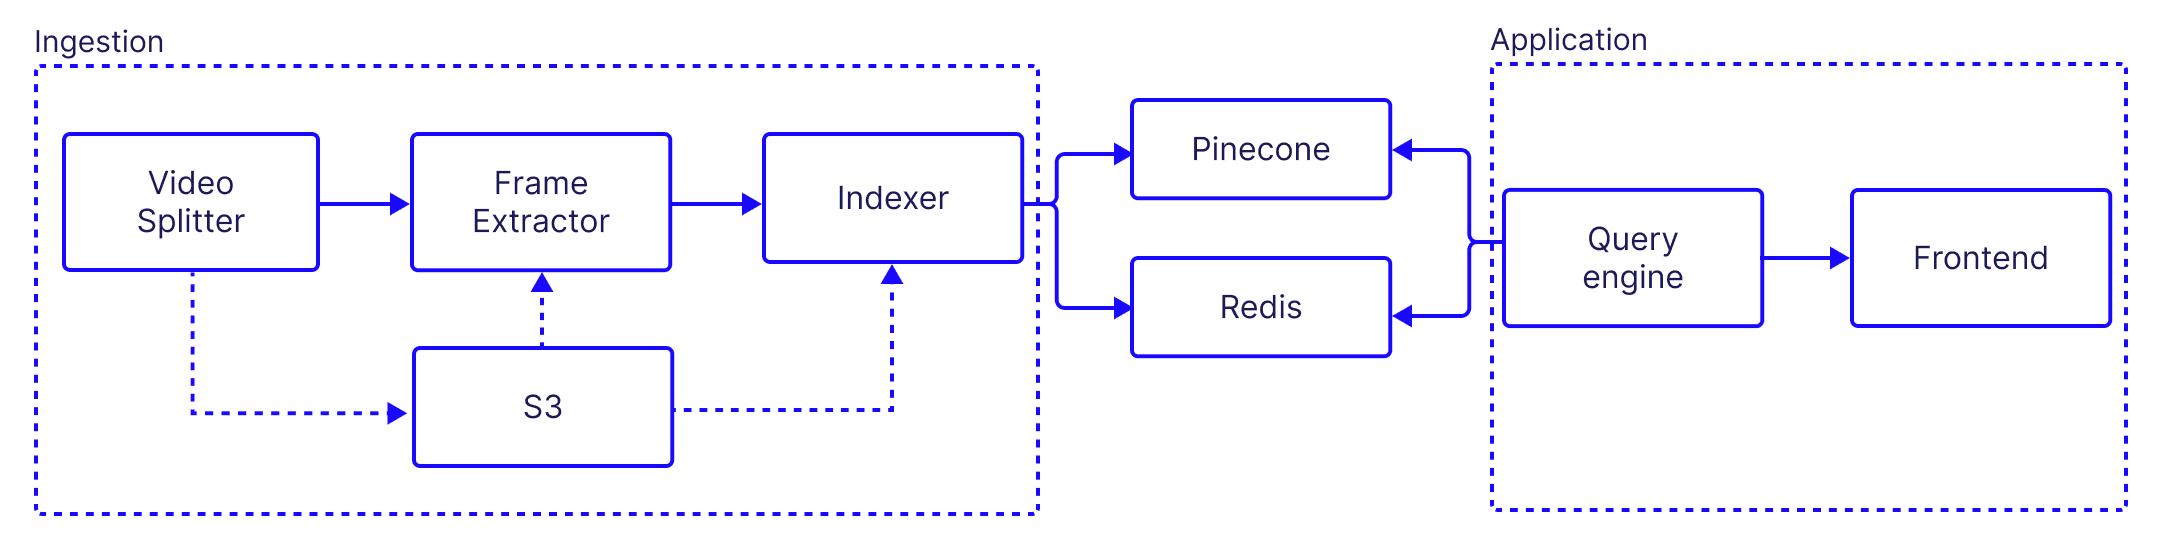
In this part, we’ll focus on the ingestion services and how the work together to produce the searchable video application. As with many other AI systems, our pipeline includes some pre-processing steps that may be compute intensive. The AI capabilities themselves are also compute intensive, and so we need to take that into consideration when we architect the system to operate at scale.
In fact, the architectural goal of the pipeline as a whole is to allow the system to easily scale up as the payload size increases, such that the overall processing time doesn’t prohibitively increases. We accomplish this by doing two things:
- Breaking the original payload into smaller units of work.
- Parallelizing computation across multiple workers.
As previously discussed, it's important for our system to work properly that each worker is stateless. But why? One reason, as we've mentioned, is to ensure that multiple clients or consumers can experience consistent behavior from each worker.
Another reason is to ensure that if one worker fails, another can pick up the task without disrupting the overall process. This is crucial for maintaining high availability and fault tolerance in our system.
Finally, we want to simplify scaling. Stateless workers can be easily replicated across multiple machines as the workload increases, without worrying about maintaining a complex state across all of them.
While each worker may be stateless, we still need a way to persist data and move it around. For that purpose we use S3 as our distributed data store, and Kafka to send information about data we need to process. We don’t actually send the data itself over Kafka, but rather references to the stored data.
Kafka and Parallelization
Kafka is a distributed streaming platform designed to handle real-time data feeds with high-throughput and low-latency. It works on the principle of a publish-subscribe model, where producers generate data and send it to topics. Consumers, on the other hand, subscribe to these topics and process the data.
The power of Kafka lies in its ability to parallelize data processing. This is achieved through the concept of partitions within a topic. Each partition can be consumed by one consumer at a time, allowing for multiple consumers to read from a single topic in parallel. This way, if the number of partitions in a topic is equal to the number of consumers, each consumer can read from exactly one partition, making full use of its processing power.
In the context of our application, we use two Kafka topics:
- Frame extraction from video segments: Once our initial video is split into segment, each segment is sent to the
video-segmentstopic. The frame extractor subscribes to that topic and then each instance of the frame extractor picks a video segment to extract frames from. - Processing frames: When each frame is saved in S3, we send a message to the
framestopic, and the subscribed Indexer consumer consumes the message. This allows us to parallelize the workload of object detection, embedding and upserting across multiple instances.
Throughout this post, we’ll see how Kafka is being used in practice.
Video Splitter
The video splitter downloads a video from a given URL, splits it into chunks, and uploads these chunks to an AWS S3 bucket. It uses the fluent-ffmpeg library to handle video processing tasks such as splitting the video into chunks.
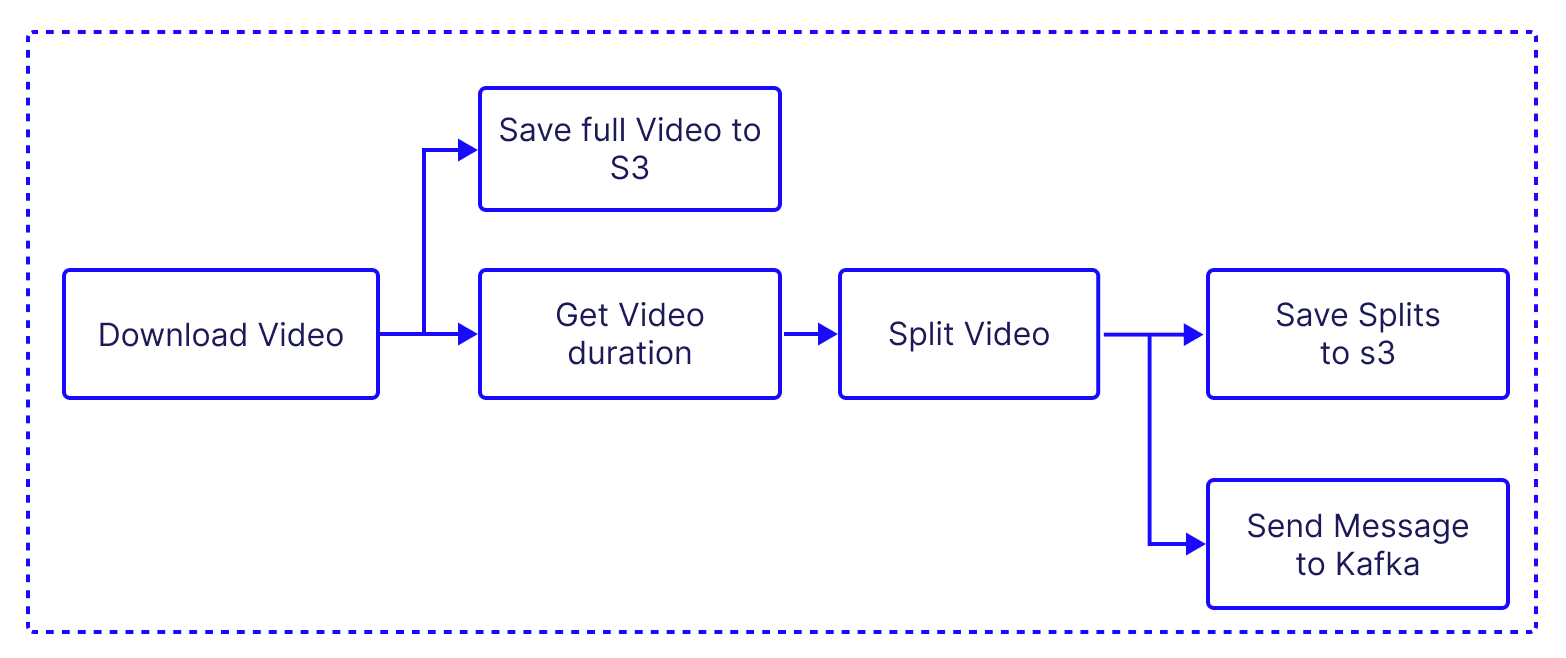
- Download Video: The
downloadAndSplitfunction indownloadAndSplit.tsdownloads a video from a given URL using theytdl-corelibrary. The video is saved locally as an MP4 file. - Split Video: the same
downloadAndSplitfunction then splits the downloaded video into chunks using thefluent-ffmpglibrary. The duration of each chunk is specified by thechunkDurationparameter.
const split = async (
  videoPath: string,
  name: string,
  fps: number,
  chunkDuration: number,
  videoLimit: number,
): Promise<VideoOutput[]> => {
  const outputFolder = join(__dirname, `temp_files/${name}`)

  // Create the folder if it doesn't exist
  await fsPromises.mkdir(outputFolder, { recursive: true })
  const duration = await videoDuration(videoPath)

  const videoDurationsInSeconds = Math.min(
    duration, // Implement this function to get the video duration
    videoLimit,
  )

  const numberOfChunks = Math.ceil(videoDurationsInSeconds / chunkDuration)
  await log(`Splitting video into ${numberOfChunks} parts, ${videoDurationsInSeconds}, ${videoLimit}, ${duration}.`)
  const videoOutputs: VideoOutput[] = []

  // Start splitting the video using the segment option
  await new Promise<void>((resolve, reject) => {
    let count = 0
    ffmpeg(videoPath)
      .outputOptions([
        "-c copy", // Use stream copy mode to avoid re-encoding
        "-map 0", // Map all streams to the output
        `-segment_time ${chunkDuration}`, // Duration of each segment
        "-f segment", // Use the segment muxer
        "-reset_timestamps 1", // Reset timestamps at the beginning of each segment
        "-segment_start_number 0", // Start numbering segments from 0
        "-copyinkf", // Copy initial non-keyframes
      ])
      .output(join(outputFolder, "part_%d.mp4"))
      .on("progress", async () => {
        count += 1
        if (count % 10 === 0) {
          await log(`: ${count}`)
        }
        console.log(count)
      })
      .on("end", () => resolve())
      .on("error", (err) => reject(err))
      .run()
  })

  // Create video output information
  for (let i = 0; i < numberOfChunks; i += 1) {
    videoOutputs.push({
      videoPath: join(outputFolder, `part_${i}.mp4`),
      index: i,
    })
  }

  return videoOutputs
}- Upload to S3: Each video chunk is then uploaded to an AWS S3 bucket. The saveToS3Bucket function uses the @aws-sdk/client-s3 library in
awsS3.tsis used for this purpose:
export const saveToS3Bucket = async (name: string, fileBuffer: Buffer) => {
	// Get S3 client
  const client = await getAwsS3Client()
	// Define upload parameters
  const uploadParams = {
    Bucket: AWS_S3_BUCKET,
    Key: name,
    Body: fileBuffer,
    ACL: "public-read",
  }

	// Upload the file to S3
  return client.send(new PutObjectCommand(uploadParams))
}- Kafka Messaging: After each video chunk is uploaded to S3, a message is sent to a Kafka topic with details about the video chunk. This is done in the sendMessage function of the KafkaProducer class in
kafka-producer.ts. This is how the KafkaProducer is constructed:
constructor() {
    const kafka = new Kafka({
      clientId: "video-segments-producer-service",
      brokers: [`${KAFKA_BROKER}:9092`],
      logLevel: logLevel.INFO,
    })

    this.producer = kafka.producer({
      createPartitioner: Partitioners.DefaultPartitioner,
    })
    this.admin = kafka.admin()
    this.topic = "video-segments"
    this.isConnected = false
}- When a new
KafkaProducerobject is created, it initializes a Kafka client with specific configurations such as client ID, brokers, and log level. - It also sets up a Kafka producer, which is responsible for sending messages to the Kafka broker, and a Kafka admin client, which is used for administrative tasks.
- The constructor also sets the topic that this producer will be sending messages to, and initializes a connection status flag to false, indicating that the producer is not yet connected to the Kafka broker. We also create an
admininstance which allows us to handle tasks like listing and creating topics.
The Kafka producer can send messages using the sendMessage function:
async sendMessage(message: string) {
    // Generate a random key
    const key = Math.random().toString(36).substring(2)
    try {
      // Check if the producer is connected before sending messages
      if (!this.isConnected) {
        console.log("It seems like the producer is not connected, trying to connect...")
        await this.connect()
      }
      const { topic } = this
      await log(`Sending message: ${message}`)
      await this.producer.send({
        topic: topic!,
        messages: [{
          value: message!,
          key,
        }],
      })
    } catch (error) {
      console.error("Error sending messages to Kafka:", error)
    }
}- When called,
sendMessagesfirst generates a random key. This key is used to determine the partition that the message will be sent to in the Kafka topic. The randomness of the key is useful for load balancing: it will allow us to distribute the messages evenly across all partitions. - The method then checks if the producer is connected to the Kafka broker. If it's not, it attempts to establish a connection. Once the connection is confirmed, it logs the message being sent for debugging or auditing purposes.
- The method then sends the message to the Kafka topic using the producer's
sendmethod. The message is sent with the previously generated key and the message value. If any errors occur during this process, such as issues with connecting to the broker or sending the message, they are caught and logged to the console.
Frame Extractor
The frame extractor behaves very similarly to the video splitter: it processes the video segments, extracts individual frames from each segment and uploads the frames to an AWS S3 bucket and saves some reference information about the frames in the Redis database. We will use this information later in the indexer and when we consume the frames in the application. It uses the fluent-ffmpeg library to extract frames and the @aws-sdk/client-s3 library to interact with S3.
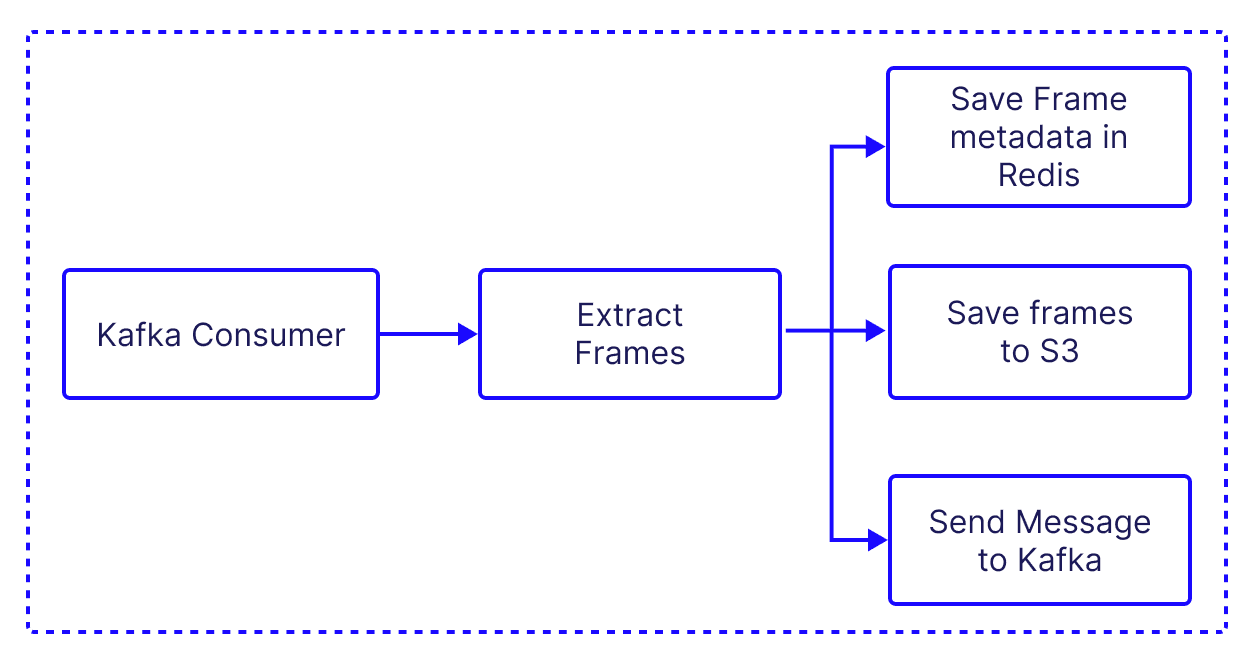
Here's a high-level overview of its main functionalities:
- Extract Frames: The
extractFramesfunction inprocessVideo.tsusesfluent-ffmpegto extract frames from a video file. The frames are saved locally as PNG files.
const extractFrames = async (
  videoPath: string,
  name: string,
  index: string,
  fps: number,
  // eslint-disable-next-line no-async-promise-executor
): Promise<string[]> => new Promise(async (resolve, reject) => {
  let frameCount = 0
  const files: string[] = []
  const outputFolder = join(__dirname, `temp_files/${name}`)

  // Create the folder if it doesn't exist
  if (!existsSync(outputFolder)) {
    mkdirSync(outputFolder, { recursive: true })
  }

  // Use fluent-ffmpeg to extract frames
  ffmpeg(videoPath)
    .outputOptions([`-vf fps=${fps}`])
    .output(join(outputFolder, `${index}_%d.png`))
    .on("end", async () => {
			// Report total frames processed back to the main logger
      await log(`Total frames: ${frameCount}, ${index}`)
			// Iterate over each frame and save it in S3
      for (let i = 1; i <= frameCount; i += 1) {
        try {
          const outputFilePath = join(outputFolder, `${index}_${i}.png`)
          const fileBuffer = fs.readFileSync(outputFilePath)
					// Build a file path
          const filePath = `${name}/frame/${index}_${i}.png`
					// Save the file in S3
          await saveToS3Bucket(filePath, fileBuffer)
          files.push(filePath)
          // Delete the local file
          await unlinkAsync(outputFilePath)
          // Send for indexing
          await log(`Sending message: ${filePath}}`)
          await trackFile(filePath)
					// Send a message to the Kafka queue with the file path.
					// This kicks off the processing of each frame downstream
          await producer.sendMessage(filePath)
        } catch (e) {
          await log(`Error ${e}`)
          console.log(`ERROR ${e}`)
        }
      }
      await log("Frames extraction completed.")
      await log(`Extracted ${frameCount} frames.`)
      resolve(files)
    })
    .on("progress", async (progressData) => {
      frameCount = progressData.frames
      console.log(".")
      await log(`Frames extracted: ${frameCount}`)
    })
    .on("error", (error: Error) => {
      const err = `Error occurred: ${error.message}`
      reject(err)
    })
    .run()
})- Upload to S3: Each frame is then uploaded to an AWS S3 bucket. The
saveToS3Bucketfunction inawsS3.tsis used for this purpose. - Kafka Messaging: After each frame is uploaded to S3, a message is sent to a Kafka topic with details about the frame. This is done in the
sendMessagefunction of theKafkaProducerclass inkafka-producer.ts.
Indexer
The indexer is the heart of the pipeline, and is responsible for processing images, detecting objects within them, embedding the identified objects and indexing them into a Pinecone index. It also saves each segment in S3 for later use in the application.
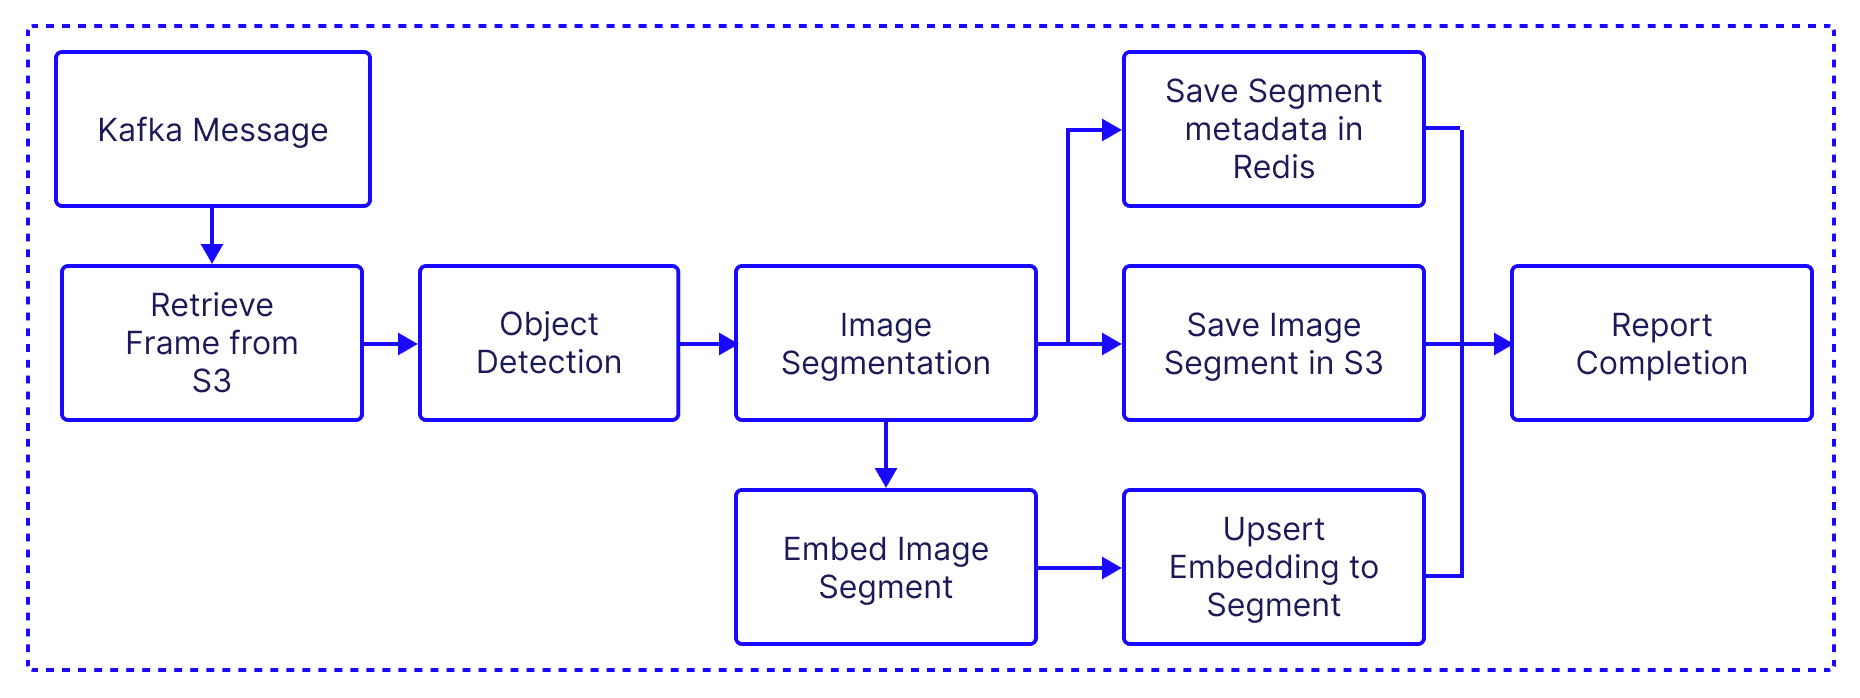
- Orchestration: The indexImages function is the main function that orchestrates the entire process. It fetches the frames stored in S3 then it processes each image and indexes the processed images into a Pinecone database. Additionally, it tracks the progress of the overall process and reports it back to the logger function in app-backend.
const indexImages = async ({ name, limit, filesList }: { name?: string; limit?: number; filesList?: string[]; }) => {
  // Get the S3 client
  const client = await getAwsS3Client()
  let list: string[] = []
  // If no filesList is provided and name is provided, get the list of files from S3
  if (!filesList && name) {
    const files = await client.send(
      new ListObjectsV2Command({
        Bucket: AWS_S3_BUCKET,
        Prefix: `${name}/frame`,
      }),
    )
    // If files are found, map them to a list
    if (files && files.Contents) {
      list = limit ? files.Contents.slice(0, limit).map((x) => x.Key!) : files.Contents.map((x) => x.Key!)
    }
  } else {
    // If filesList is not provided, throw an error
    if (!filesList) {
      throw new Error("No files list provided")
    }
    list = filesList
  }

  // Map each file in the list to a task
  const tasks = list.map(async (fileName) => {
    try {
      // Segment the image and filter out any undefined segments
      const segmentedFiles = (await segmentImage(fileName || ""))?.filter((x) => x) || []
      // Embed and upsert the segmented files
      await embedAndUpsert({ imagePaths: segmentedFiles, chunkSize: 100 })
      // Log the completion of indexing for the file
      await log(`Done indexing ${fileName}`)
      // Mark the file as complete
      await completeFile(fileName)
    } catch (error) {
      // Log any errors encountered during processing
      console.error(`Error processing file ${fileName}: ${error}`)
    }
  })
  // Wait for all tasks to complete
  await Promise.all(tasks)
}- Image retrieval segmentation: This functions retrieves the full URL where the frame is saved on S3, and then loads the raw image and passes it to the object detection function.
const fetchImageAndBoundingBoxes = async (imagePath: string) => {
  try {
    const url = generateS3Url(imagePath)
    const image = await RawImage.fromURL(url)
    const boundingBoxes = await detectObjects(image)
    return { image, boundingBoxes }
  } catch (error) {
    console.log(`Error in fetchImageAndBoundingBoxes: ${error}`)
    return undefined
  }
}- Object Detection: The detectObjects function uses the detr-resnet-50 model to detect objects within an image. It returns a list of bounding boxes for the detected objects.
const detectObjects = async (image: RawImage) => {
  try {
    const detector = await pipeline(
      "object-detection",
      "Xenova/detr-resnet-50",
    )
    // const image = await RawImage.read(url);
    const output = await detector(image, { threshold: 0.9 })
    return output
  } catch (e) {
    console.log(`Failed detecting object ${e}`)
    return false
  }
}- Processing the bounding boxes: This function uses the bounding box information to extract the images from the original frame, and then saves it in S3 and Redis.
const processBoundingBoxes = async (
  boundingBoxes: LabeledDetectedBoundingBox[],
  videoName: string,
  frameIndex: string,
  obj: Buffer,
) => {
  const files: FileWithReference[] = [] // Array to store processed bounding box files
  // Log the number of bounding boxes being processed
  await log(`Processing ${boundingBoxes.length} bounding boxes`, { boxesCount: boundingBoxes.length, eventType: "boxCount" })

  // Loop through each bounding box
  for (const element of boundingBoxes) {
		// Destructure box and label from the bounding box element
    const { box, label } = element
		// Generate a unique ID for the bounding box
    const boxId = generateBoxId(box, frameIndex)
		// Convert the bounding box to the required format
    const boundingBox = convertBoundingBox(box)
		// Get metadata of the image
    const metadata = await sharp(obj).metadata()

    // Check if the bounding box is within the image boundaries
    if (
      boundingBox.left >= 0
      && boundingBox.top >= 0
      && boundingBox.left + boundingBox.width <= metadata.width!
      && boundingBox.top + boundingBox.height <= metadata.height!
    ) {
      // Extract the bounding box from the image and convert it to a buffer
      const bBoxBuffer = await sharp(obj).png().extract(boundingBox).toBuffer()

      // Define the path for the bounding box image in the S3 bucket
      const bboxPath = `${videoName}/bbox/${label}_${boxId}.png`
      // Save the bounding box image to the S3 bucket
      await saveToS3Bucket(bboxPath, bBoxBuffer)

      // Generate the URL for the bounding box image in the S3 bucket
      const bboxUrl = generateS3Url(bboxPath)

      // Check if the bounding box already exists in Redis
      if (!(await redis.hGet("bbox", boxId))) {
        // Define the bounding box object to be stored in Redis
        const bbox = {
          boxId,
          frameIndex,
          src: bboxUrl,
          boundingBox,
        }
        // Store the bounding box object in Redis
        await redis.hSet("bbox", boxId, JSON.stringify(bbox))
      }

      // Add the bounding box file to the files array
      files.push({
        boxId,
        path: bboxUrl,
        frameIndex: frameIndex.toString(),
      })
    }
  }
  // Return the array of processed bounding box files
  return files
}- Embedding Generation and Indexing: The embedAndUpsert function generates embeddings for the image segments using the the clip-vit-large-patch14 model and saves these embeddings into a Pinecone database.
async function embedAndUpsert({
  imagePaths,
  chunkSize,
}: {
  imagePaths: FileWithReference[];
  chunkSize: number;
}) {
  // Chunk the image paths into batches of size chunkSize
  const chunkGenerator = chunkArray(imagePaths, chunkSize)

  // Get the index
  const index = pineconeClient.index(PINECONE_INDEX)
  const ns = index.namespace(namespace)

  const embedders = []
  // Embed each batch and upsert the embeddings into the index
  for (const paths of chunkGenerator) {
    embedders.push(
      embedder.embedBatch(paths, chunkSize, async (embeddings) => {
        try {
          // Filter out any failed embeddings
          const filteredEmbeddings = embeddings.filter(
            (x) => x.values.length > 0,
          )
          await ns.upsert(filteredEmbeddings)
          log(`Done saving batch with ${filteredEmbeddings.length} embeddings}`, {
            eventType: "embeddingCount",
            embeddingCount: filteredEmbeddings.length,
          })
        } catch (e) {
          console.error(
            "error chunked upsert",
            e,
            embeddings.map((x) => x.id),
          )
        }
      }),
    )
  }
  // Run embedders in parallel and wait for them to finish
  await Promise.allSettled(embedders).then(console.log)
}
Similar to the frame extractor, we can create multiple instances of the indexer such each instance can process a portion of the produced frames - in parallel.
Centralized Logging
In order to maintain a cohesive picture of what the system is doing as a whole, we set logging endpoints in app-backend to track messages from the various services. To log arbitrary messages we is the log function:
const log = async (message: string, payload: object = {}) => {
  const podId = process.env.POD_NAME || "unknown"
  const formattedMessage = `${podId}: ${message}`
  try {
    await fetch(`http://${BACKEND}/log`, {
      method: "POST",
      headers: {
        "Content-Type": "application/json",
      },
      body: JSON.stringify({ message: formattedMessage, payload }),
    })
  } catch (error) {
    console.error("Failed to log message", error)
  }
}
To make it easier to track file completion, we use the trackFile method/endpoint which allows us to track the number of files processed in each service. In the next part of the series, we’ll take a look at how these metrics are communicated with the frontend.
Up next...
In this post, we reviewed into the architecture and functionality of the ingestion pipeline. We shed light on the main components - the video splitter, frame extractor, and indexer - elaborating on their roles within the system and their interaction with Kafka, S3, and Pinecone. This exploration highlights how the system maintains high availability, fault tolerance, and scalability while processing large volumes of data. In the next part, we’ll dive into the consumption side of the application. We’ll see how the front-end works, and how the data is queried.
Was this article helpful?