


In this tutorial, we'll learn how to build an image search engine using Pinecone and the CLIP model. We'll use a small dataset of images (included in this repository) and show how to embed and index them in Pinecone. We'll then show how to query the index to find similar images.
In this tutorial, we'll explore the code found in this repo. To follow along, we recommend you clone the repo and experiment with it as you go.
To complete this tutorial, you'll need a Pinecone account. If you don't have one yet, you can sign up for free at pinecone.io.
You'll also need Node.js and npm installed. You can download Node.js from nodejs.org.
You can see the full list of dependencies in the package.json file, but the main ones are:
To install the dependencies, run:
npm install
The CLIP (Contrastive Language-Image Pretraining) model was developed by OpenAI that connects images and text in a unique way. Unlike previous models that were trained on one or the other, CLIP is trained on a variety of internet text paired with images. The model learns to understand and generate meaningful responses about images based on the context provided by the associated text.
This allows for sophisticated image search capabilities; you can find images based on a textual description or even use a detailed phrase to search for a specific type of image. The model's ability to create a shared embedding space for images and text means that CLIP can convert an image into a vector that can be indexed and searched within a vector database, like Pinecone.
Let's start by taking a look at the top level indexImages function. The function will:
data folderconst indexImages = async () => {
try {
await createIndexIfNotExists(pineconeClient, indexName, 512);
await waitUntilIndexIsReady(pineconeClient, indexName);
await embedder.init("Xenova/clip-vit-base-patch32");
const imagePaths = await listFiles("./data");
await embedAndUpsert({ imagePaths, chunkSize: 100 });
} catch (error) {
console.error(error);
}
};Now let's break the embedding process up a bit. The Embedder class is initialized using the AutoModel, AutoTokenizer and AutoProcessor which automatically defines the model, tokenizer and processor based on the model name. The embed function takes an image path and returns the embedding. The embedBatch function takes a batch of image paths and calls the onDoneBatch callback with the embeddings. For the ID of the embedding, we use the MD5 hash of the image path.
In this example, we're not going to use any text inputs, so we just pass an empty string as the input to the tokenizer.
class Embedder {
  private processor: Processor;

  private model: PreTrainedModel;

  private tokenizer: PreTrainedTokenizer;

  async init(modelName: string) {
    // Load the model, tokenizer and processor
    this.model = await AutoModel.from_pretrained(modelName);
    this.tokenizer = await AutoTokenizer.from_pretrained(modelName);
    this.processor = await AutoProcessor.from_pretrained(modelName);
  }

  // Embeds an image and returns the embedding
  async embed(
    imagePath: string,
    metadata?: Record<string, unknown>
  ): Promise<Vector> {
    try {
      // Load the image
      const image = await RawImage.read(imagePath);
      // Prepare the image and text inputs
      const image_inputs = await this.processor(image);
      const text_inputs = this.tokenizer([""], {
        padding: true,
        truncation: true,
      });
      // Embed the image
      const output = await this.model({ ...text_inputs, ...image_inputs });
      const { image_embeds } = output;
      const { data: embeddings } = image_embeds;

      // Create an id for the image
      const id = createHash("md5").update(imagePath).digest("hex");

      // Return the embedding in a format ready for Pinecone
      return {
        id,
        metadata: metadata || {
          imagePath,
        },
        values: Array.from(embeddings) as number[],
      };
    } catch (e) {
      console.log(`Error embedding image, ${e}`);
      throw e;
    }
  }

  // Embeds a batch of documents and calls onDoneBatch with the embeddings
  async embedBatch(
    imagePaths: string[],
    batchSize: number,
    onDoneBatch: (embeddings: Vector[]) => void
  ) {
    const batches = sliceIntoChunks<string>(imagePaths, batchSize);
    for (const batch of batches) {
      const embeddings = await Promise.all(
        batch.map((imagePath) => this.embed(imagePath))
      );
      await onDoneBatch(embeddings);
    }
  }
}
The embedAndUpsert function takes a list of image paths and a chunk size, and proceeds to embed and upsert these images in chunks:
async function embedAndUpsert({
  imagePaths,
  chunkSize,
}: {
  imagePaths: string[];
  chunkSize: number;
}) {
  // Chunk the image paths into batches of size chunkSize
  const chunkGenerator = chunkArray(imagePaths, chunkSize);

  // Get the index
  const index = pineconeClient.Index(indexName);

  // Embed each batch and upsert the embeddings into the index
  for await (const imagePaths of chunkGenerator) {
    await embedder.embedBatch(
      imagePaths,
      chunkSize,
      async (embeddings: Vector[]) => {
        await chunkedUpsert(index, embeddings, "default");
      }
    );
  }
}
We expose the indexImages function in the index.ts file, which is called when the server starts, under the /indexImages route. We'll call it later on from our UI.
In order to easily present the results of our image query, we created a simple UI using React. The UI will present a set of images and allow us to select one of them. The query will then return the most similar images to the selected image.
Once an image is selected, it's path will be sent to the /search endpoint, which will query the index and return the results. The query function will:
const queryImages = async (imagePath: string) => {
  const queryEmbedding = await embedder.embed(imagePath);
  const queryResult = await pineconeIndex.query({
    queryRequest: {
      vector: queryEmbedding.values,
      includeMetadata: true,
      includeValues: true,
      namespace: "default",
      topK: 6,
    },
  });
  return queryResult.matches?.map((match) => {
    const metadata = match.metadata as Metadata;
    return {
      src: metadata.imagePath,
      score: match.score,
    };
  });
};
The application is a simple React app that allows us to select an image and query the index for similar images. The app is served by the Express server, which also exposes the /search and /indexImages endpoints.
All the application does is paginate through the results of the query and display them in a grid. The main App component is responsible for rendering the UI and calling the /search endpoint when an image is selected.
When an image is clicked, we call the following function:
const handleImageClick = async (imagePath: string) => {
  setSelectedImage(imagePath);
  const response = await fetch(
    `/search?imagePath=${encodeURIComponent(imagePath)}`
  );
  const matchingImages: SearchResult[] = await response.json();
  setSearchResults(matchingImages);
};
And here's the final result:
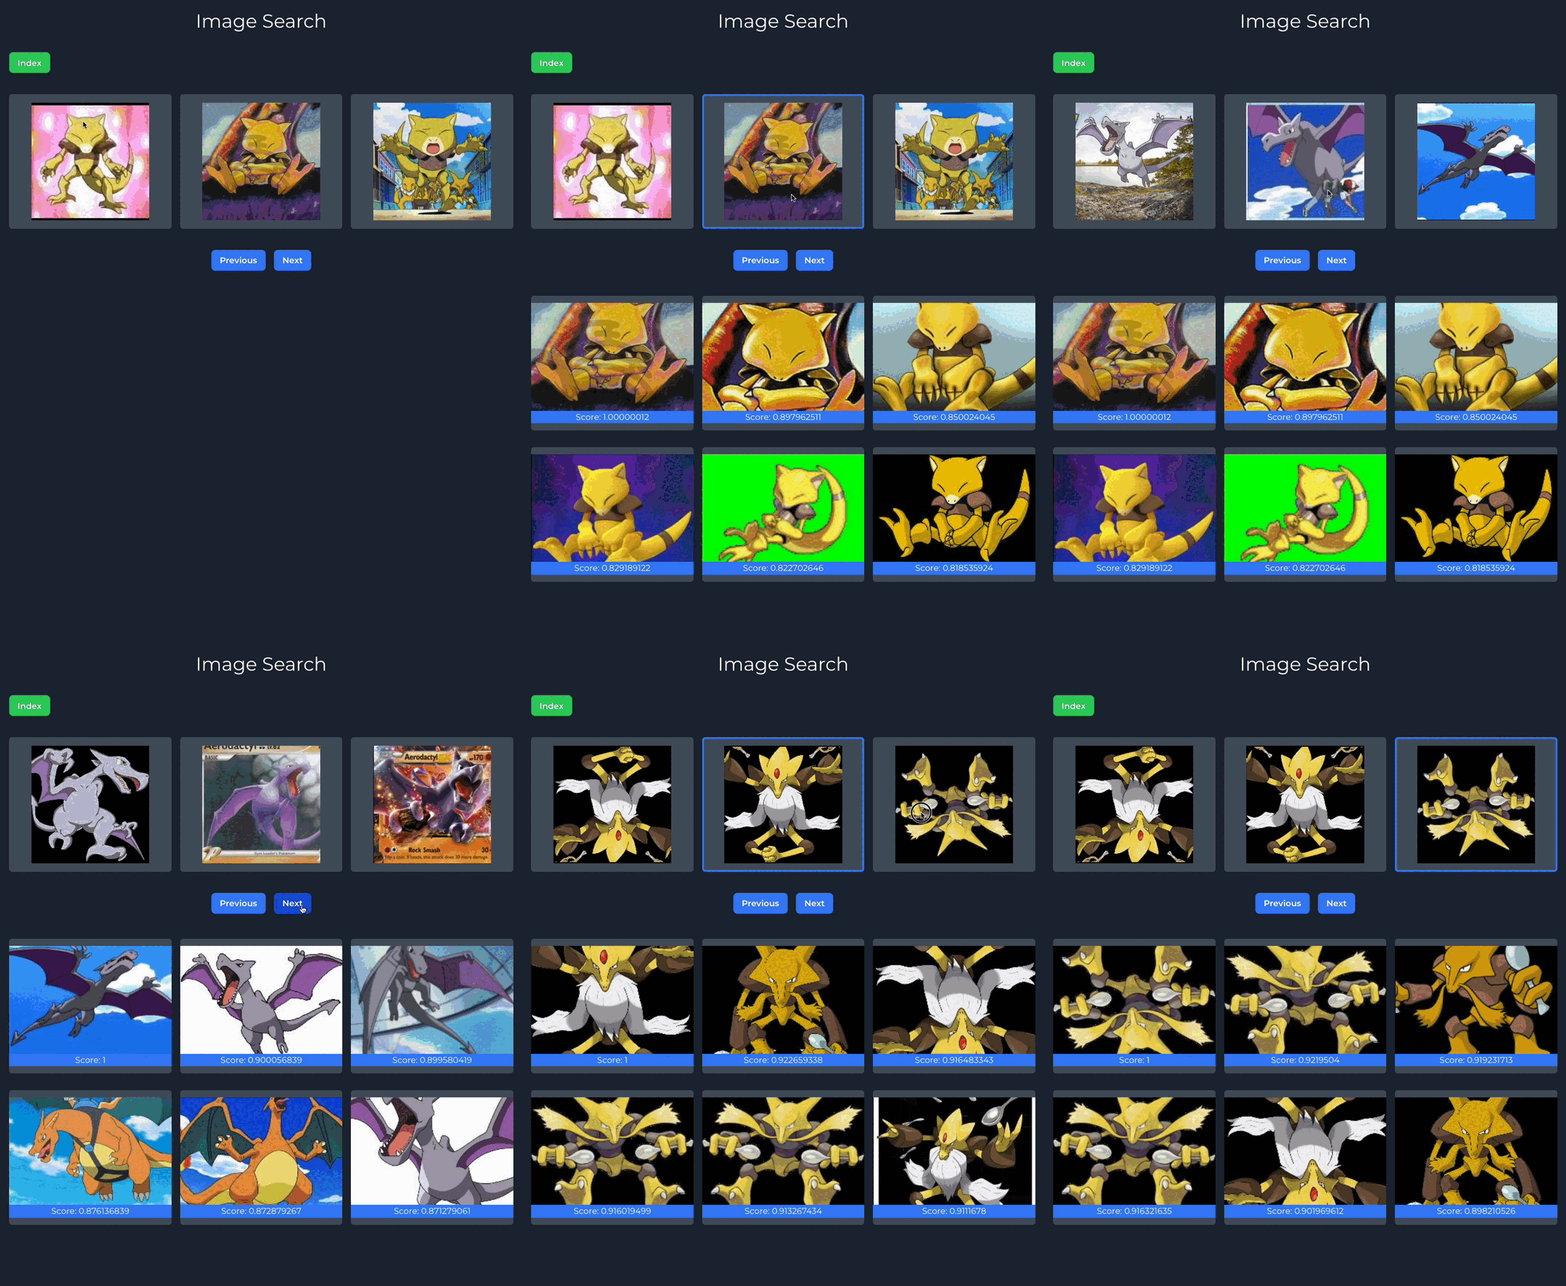
Final result
And that's it! You now have a functional image search engine. To customize this search engine further, try loading your own images and experiment using different models to see how the results can be effected.
此内容由惯性聚合(RSS阅读器)自动聚合整理,仅供阅读参考。 原文来自 — 版权归原作者所有。