STSDEV是一个优秀的Sharepoint开源开发工具,并且对于2008年中之前需要开发基于VS2008/3.5的moss webpart应用的兄弟姐妹们,更是唯一的选择。(详见Kaneboy的《Visual Studio Extensions for SharePoint v1.1》和choral的《一个SharePoint开发人员必备的工具》)。
不过STSDEV与微软官方所出的Visual Studio Extensions相比,易用性和稳定性稍逊一筹,我为了能够成功用STSDEV开发一个最基本的基于VS2008/3.5的webpart应用折腾了半天,为了后来的兄弟姐妹们少走弯路,故写此教程。
因本文太长,所以先做个目录,方便不同需求的兄弟们快速查看。
下载修正版STSDEV
手把手开发一个基于VS2008/3.5的webpart
创建解决方案
编辑代码
部署webpart
其他问题
感谢和引用
促进交流
下载修正版STSDEV
万事开头难,当你满怀着终于找到一个可以开发基于VS2008/3.5的webpart应用的工具STSDEV的惊喜时候,却发现这是一个美丽的误会,这个号称能创建基于VS2008/3.5的MOSS应用的工具居然就在第一步,创建解决方案的时候就崩溃了!
怎么办!难道就因此止步于此?从而倒退回使用DotNet3.0开发Webpart?还好,历史的车轮不会因为小小一块石头而止步,我把这个问题修复了(详见《修正版的STSDEV,可以用于开发基于dotnet3.5/vs2008的moss应用》),大家直接下载修正版STSDEV.zip,然后继续向前进吧。
手把手开发一个基于VS2008/3.5的webpart
创建解决方案
把修正版STSDEV.zip解压到一个常用的目录,因为以后如果需要移动该目录的话将会十分麻烦(使用STSDEV创建的解决方案编译和部署的时候都需要调用STSDEV),打开STSDEVBin目录,会发现有如下文件: 
双击stsdev.exe文件,就弹出一个命名行和创建解决方案向导: 
然后我们:
-
输入Solution Name(解决方案),比如Adalovelacer.WebPartTest(注意!请输入整个最顶层命名空间的名称!).
-
选择Parent Directory,这里选择C盘(注意1:如果Parent Directory里面所填的目录事先没有创建,将不会自动创建。所以请预先创建或者选择已有的空目录)
(注意2: 如果Parent Directory里面所选择的目录如果有空格,比如 C:\Documents and Settings\ ,有时候会报错,有时候能创建成功,原因尚未研究。请尽量使用没有空格的目录,比如C:\Documents_and _Settings\)
-
点击Signing Key文本框旁边的…按钮,将会弹出下面对话框
-
然后在Solution Type中选择Web Part Solution(C# assembly)
-
在Solution/Project Version Type中选中Visual Studio 2008 with .NET 3.5
这时候界面应该如下:

这时候点击Create Solution。好!提示解决方案创建成功。
然后点击Ok之后,就会自动打开刚才创建的解决方案(注意!只有使用修正版STSDEV.zip才会自动打开刚才创建的解决方案,而原来版本的STSDEV是不会自动打开,需要你找到解决方案的目录,手动打开。)
好,出现如下界面:

这里有两个选项选择,第1个是浏览模式,适合只需要阅读MOSS 项目源代码而不需要修改的兄弟姐妹(顺便赞扬一句:STSDEV与Visual Studio Extensions for SharePoint v1.1相比,除了可以创建基于VS2008的DotNet3.0, 3.5Moss解决方案,还有它不会在VS上装模板,是独立VS本身运行的,可以在默认安装的VS上打开,并且打开通过STSDEV创建的解决方案会有查看模式和编辑模式选择。这点我想对于很多只需要阅读MOSS 项目源代码而不需要修改的兄弟姐妹们很重要。)浏览模式安全性更强,不过会屏蔽掉部分vs自动化功能和智能感应。
第2个是,我们现在是要开发而不是查看代码,所以我们选择第2个选项,普通模式。然后点ok.就打开了解决方案。
打开了解决方案之后,我们可以看到解决方案下包含下列文件夹:
其中DeploymentFiles是部署用文件夹,稍后将会提到。
RootFiles是资源文件夹,用于存放css,Image,webpart等资源文件。
除了刚才那两个文件夹外的其他地方(包括根目录下和你在DeploymentFiles、RootFiles外创建的文件夹)都是存放代码的地方。
编辑代码
编辑webpart代码主要包括以下个步骤:
1. 编辑webpart的C#代码(指.cs文件)
2. 编辑webpart描述文件(Template/Features/{解决方案名称}/WebParts下的.webpar文件)
3. 编辑feature.xml(Template/Features/{解决方案名称}/下的feature.xml文件)
4. 编辑WebParts.xml(Template/Features/{解决方案名称}/WebParts下的WebParts.xml文件)
好,现在让我们开始一个例子。这个例子是创建一个使用了LINQ和自动属性等DotNet3.5特性技术,用来显示一个数组中小于5的数字。效果如下:

既然要用LINQ,第一步当然是要添加LINQ的引用拉,注意!LINQ的引用是System.Core
好,万事具备,我们开始按照刚才讲的4个步骤做吧,
第1步,编辑webpart的C#代码(指.cs文件)。
先在解决方案根目录下创建一个名为HelloDotNet35.CS文件。然后把这个文件的代码修改成下面内容:
1 using System;
2using System.Web;
3using System.Web.UI;
4using System.Linq;
5using Microsoft.SharePoint;
6using Microsoft.SharePoint.WebControls;
7using Microsoft.SharePoint.WebPartPages;
8using System.Web.UI.WebControls;
9
10namespace Adalovelacer.WebpartTest
11 {
{
12 public class HelloDoNet35 : WebPart
13 {
{
14 /// <summary>
15 /// 使用Dotnet3.5的自动属性功能
16 /// </summary>
17 public string Introduction { get; set; }
18
19 protected override void Render(HtmlTextWriter writer)
20 {
21 Introduction = "使用Dotnet3.5的自动属性,LINQ功能<br/>";
22 writer.Write(Introduction);
23
24 int[] numbers = { 5, 4, 1, 3, 9, 8, 6, 7, 2, 0 };
25
26 writer.Write("在数组,<br/>");
27 foreach (int item in numbers)
28 {
29 writer.Write(item + " ");
30 }
31 writer.Write("<br/>中,小于5的数字有<br/>");
32
33
34 #region 使用LINQ检索列表
35
36 var lowNums = from num in numbers
37 where num < 5
38 select num;
39
40 #endregion
41
42 foreach (int i in lowNums)
43 {
44 writer.Write(i + " ");
45 }
46 }
47 }
48 }
}
49
第2步,编辑webpart描述文件(Template/Features/{解决方案名称}/WebParts下的.webpar文件)
把Template/Features/Adalovelacer.WebpartTest/WebParts/CustomWebPart1.webpart复制后,再粘贴在相同目录下,并重命名为:HelloDotNet35.webpart。
然后打开HelloDotNet35.webpart,修改成如下内容:
<?xml version="1.0" encoding="utf-8"?><!--Created by STSDEV at 2008-3-27 22:31:24--><webParts> <webPart xmlns="http://schemas.microsoft.com/WebPart/v3"> <metaData> <type name="Adalovelacer.WebpartTest.HelloDoNet35, Adalovelacer.WebpartTest, Version=1.0.0.0, Culture=neutral, PublicKeyToken=03bd28a31f440b7b" /> <importErrorMessage>Error importing Web Part</importErrorMessage> </metaData> <data> <properties> <property name="Title" type="string">HelloDoNet35</property> <property name="Description" type="string">欢迎大家一起探讨Webcontorl/WebpPart开发,欢迎加入msn群:group182777@msnzone.cn</property> <property name="ChromeState" type="chromestate">Normal</property> <property name="AllowZoneChange" type="bool">True</property> <property name="AllowHide" type="bool">True</property> <property name="ExportMode" type="exportmode">All</property> </properties> </data> </webPart></webParts>
第3步,编辑feature.xml(Template/Features/{解决方案名称}/下的feature.xml文件)
我们打开Template/Features/Adalovelacer.WebpartTest/feature.xml。修改成:
<?xml version="1.0" encoding="utf-8"?><!--Created by STSDEV at 2008-3-27 22:31:24--><Feature Id="A0D121E7-B848-4A96-85C7-A9B6A530B2F5" Title="A sample feature: Adalovelacer.WebpartTest" Description="This SharePoint solution was created by the STSDEV utility (http://codeplex.com/stsdev)" Version="1.0.0.0" Scope="Site" Hidden="false" ImageUrl="Adalovelacer.WebpartTest\AfricanPith32.gif" xmlns="http://schemas.microsoft.com/sharepoint/"> <ElementManifests> <ElementManifest Location="WebParts.xml" /> <ElementFile Location="WebParts\CustomWebPart1.webpart" /> <ElementFile Location="WebParts\CustomWebPart2.webpart" /> <!--此处加上刚才完成的webpart文件--> <ElementFile Location="WebParts\HelloDoNet35.webpart" /> <!----> </ElementManifests></Feature>
第4步,编辑WebParts.xml(Template/Features/{解决方案名称}/WebParts下的WebParts.xml
我们打开Template/Features/Adalovelacer.WebpartTest/WebParts.xml。修改成:
1<?xml version="1.0" encoding="utf-8"?>
2<!--Created by STSDEV at 2008-3-27 22:31:24-->
3<Elements xmlns="http://schemas.microsoft.com/sharepoint/">
4 <Module Name="Adalovelacer.WebpartTest" List="113" Url="_catalogs/wp" Path="WebParts" RootWebOnly="True">
5 <File Url="CustomWebPart1.webpart" Type="GhostableInLibrary">
6 <Property Name="Group" Value="Adalovelacer.WebpartTest" />
7 </File>
8 <File Url="CustomWebPart2.webpart" Type="GhostableInLibrary">
9 <Property Name="Group" Value="Adalovelacer.WebpartTest" />
10 </File>
11
12 <!--此处加上刚才完成的webpart文件-->
13 <File Url="HelloDoNet35.webpart" Type="GhostableInLibrary">
14 <Property Name="Group" Value="Adalovelacer.WebpartTest" />
15 </File>
16 <!---->
17
18 </Module>
19</Elements>
好,编译一下,全部通过了,至此代码编写工作全部完成。但是请不要关闭你的vs2008,我们还要用它来部署。
部署webpart
完成了代码编写工作之后,当然是部署拉,部署分两种,一种在本机上部署,一种在远程服务器上部署。我们先讲
在本机上部署
还好,刚才没有关闭Vs2008,我们先把编译模式选择成DebugDeploy,如下图:

编译一下,编译通过!这个时候我们已经部署到本机的wss上了。
然后我们打开wss, 然后在Team Site > Site Settings > Site Features 里面可以看到我们刚才开发的webpart集已经出来在页面中,我们点击active按钮,把它active.
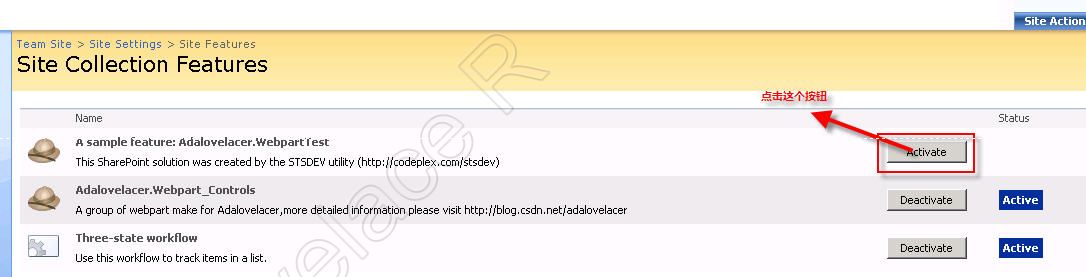
然后,我们随便到一个页面上把我们的HelloDoNet35 Webpart添加到页面上,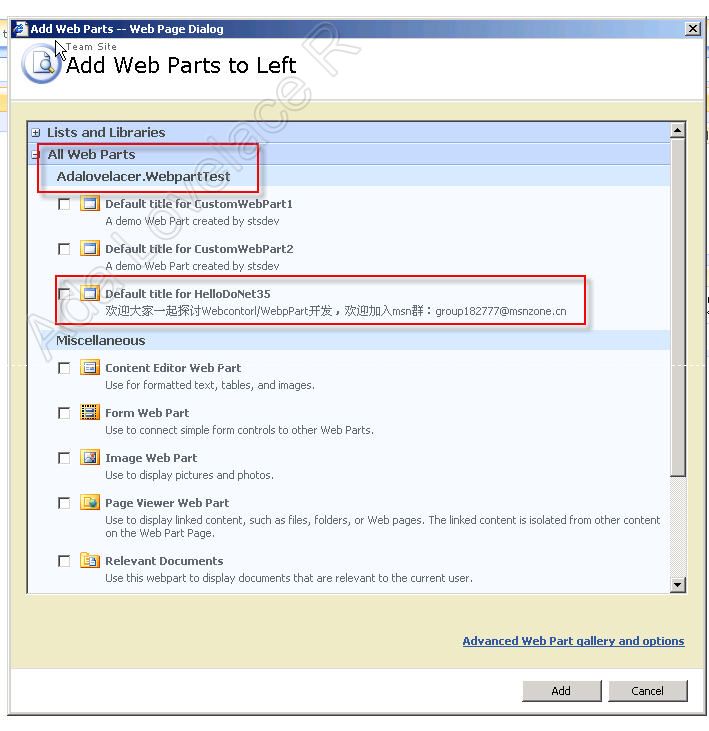
点add,好,终于看到我们的劳动成果了。
大功告成!但是请注意!如果你要修改或者添加新的webpart之后,再次部署的时候请把编译模式转成DebugUpgrade(因为你已经Deploy过了),否则就会编译错误 
部署到远程服务器
终于到了最后一步啦!
我们在本机打开解决方案所在目录,找到DeploymentFiles目录,把cab结尾的文件(本例子是Adalovelacer.WebpartTest.wsp.cab)复制到远程服务器上任意一个地方(本例子为c盘)。 
然后在命令提示符下敲入下列命令:
1cd "C:\Program Files\Common Files\Microsoft Shared\web server extensions\12\bin\" 回车
2
3stsadm -o addsolution -filename "C:\Adalovelacer.WebpartTest.wsp.cab" 回车
4
5stsadm -o execadmsvcjobs 回车
6
7stsadm -o deploysolution -name Adalovelacer.WebpartTest.wsp.cab -immediate -allowgacdeployment –allcontenturls 回车
8
9stsadm -o execadmsvcjobs 回车
10

好,部署成功!
打开wss, 然后在Team Site > Site Settings > Site Features 里面可以看到我们刚才开发的webpart集已经出来在页面中,我们点击active按钮,把它active.
然后,我们随便到一个页面上把我们的HelloDoNet35 Webpart添加到页面上,
点add,好,终于看到我们的劳动成果了。
注意!如果你要修改或者添加新的webpart之后,再次部署的时候请在命令提示符下敲入下列命令:
1cd "C:\Program Files\Common Files\Microsoft Shared\web server extensions\12\bin\" 回车
2
3stsadm -o upgradesolution -name Adalovelacer.WebpartTest.wsp.cab -filename "C:\Adalovelacer.WebpartTest.wsp.cab" -local -allowgacdeployment 回车
4
5stsadm -o execadmsvcjobs 回车
6
至此,第一个用STSDEV开发的基于dotnet 3.5的webpart应用就此开发并部署成功。
其他问题
开发完成了,但是我想你会在STSDEV遇到这些问题:
-
几种编译模式的介绍
|
DebugBuild |
编译代码,生成 .wsp 文件 |
|
DebugInstall |
编译代码,并安装到本地服务器。但是不部署。(如果之前使用过此模式或DebugDeploy模式编译成功,再次编译会报错) |
|
DebugDeploy |
编译代码,并安装到本地服务器。并且部署。(如果之前使用过此模式或DebugInstall模式编译成功,再次编译会报错) |
|
DebugUpgrade |
编译代码,并更新到本地服务器(如果之前没有使用DebugInstall或者DebugDeploy模式编译成功此时编译会报错) |
|
DebugQuickCopy |
编译代码,并且只复制到本地服务器WSS RootFiles目录中。 |
|
DebugRetract |
从本地服务器卸载解决方案 |
|
DebugDelete |
从本地服务器删除解决方案 |
|
ReleaseBuild |
编译Release代码(其他版本都是生成Debug代码),生成 .wsp 文件 |
-
我要移动STSDEV的目录。
移动STSDEV的目录后,你会发现凡是用STSDEV创建的解决方案编译的时候都会报错。怎么解决呢?
找到解决方案下的\DeploymentFiles\ Microsoft.SharePoint.targets, 使用记事本编辑如下地方,更改为新的STSDEV路径就可以了:

-
我要添加图片或者其他文件。

这样解决方案才能自动识别,并且打包到部署文件中,否则!报错罗。 -
开发机器的站点目录空间急剧减少?
当然,因为每次部署更新的时候都会在C:\inetpub\wwwroot\wss\virtualDirectories\目录生成备份文件:

直接把这些备份文件移掉或者删除就可以 -
可以删除掉默认的Customwebpart1和Customwebpart2吗?
可以!这两个文件只是example,你可以删除,不过要按照编辑webpart的四个步骤去删除。