
惯性聚合 高效追踪和阅读你感兴趣的博客、新闻、科技资讯
阅读原文 在惯性聚合中打开

推荐订阅源

OSCHINA 社区最新新闻
OSCHINA 社区最新新闻
博客园_首页
雷峰网
雷峰网
Cyber Security Advisories - MS-ISAC
WordPress大学
WordPress大学
腾讯CDC
T
Tailwind CSS Blog
A
About on SuperTechFans
H
Hackread – Cybersecurity News, Data Breaches, AI and More
The GitHub Blog
The GitHub Blog
T
The Blog of Author Tim Ferriss
G
Google Developers Blog
The Cloudflare Blog
D
DataBreaches.Net
Recent Announcements
Engineering at Meta
Engineering at Meta
B
Blog
博客园 - 聂微东
阮一峰的网络日志
阮一峰的网络日志
月光博客
月光博客
博客园 - 司徒正美
MongoDB | Blog
MongoDB | Blog
Google DeepMind News
Apple Machine Learning Research

博客园 - 胖胖安

Xamarin.Android 的 Google 登入 Xamarin.iOS 的 Google 登入 Xamarin.Android 的照相機使用 Xamarin.iOS 照相機功能的使用 (1) :最簡單的做法 Xamarin.iOS 的鍵盤控制 (AutoLayout 與 新的 Keyboard 事件 ) Xamarin.Android 控制鍵盤縮放 Xamarin 環境建置–Xamarin Agent install rvm iOS : TableView MultiSelect 兩個 System.IO.FileInfo 的 Extension Method SQL Server 2008 Resize LDF IIS 7 站點下,ASP.NET 3.5 與 4.0 的並存問題 jQuery AutoComplete Parameters Tips : SQL Server 2008 "saving changes is not permitted." 的解決辦法 - 胖胖安 Section 2 : 專案結構 Section 1 : 使用 XCode 建立一個新專案 iPhone 開發前的準備工作 IIS 7 上 设定ASP.NET 时应注意事项 DBML 在Beta2與正式版間差異 - 胖胖安 - 博客园
Section 3 : 程式進入點
胖胖安 · 2009-07-17 · via 博客园 - 胖胖安

我們先來看這一個名為 main.m 的檔案

裡面的內容為

#import <UIKit/UIKit.h>

int main(int argc, char *argv[]) {

    NSAutoreleasePool * pool = [[NSAutoreleasePool alloc] init];

    int retVal = UIApplicationMain(argc, argv, nil, nil);

    [pool release];

    return retVal;

}

這裡面的內容不需要修改,所以我們不須要花時間看這程式。

要注意一下,在這邊有NSAutoreleasePool這個物件,我們以後在討論到記憶體回收時,再來做說明。

對Programmer 來說,真正要看的是 [專案名稱]AppDelegate

- (void)applicationDidFinishLaunching:(UIApplication *)application 

- (void)applicationWillTerminate:(UIApplication *)application 

這兩個Method 正如名稱所示一個是程式啓動後第一個可由Programmer控制的Method

另一個是程式關閉前將會執行的程式。

先來看啓動方法內寫什麼

[window addSubview:[navigationController view]];

[window makeKeyAndVisible];

就只有令人摸不著頭緒的兩行程式碼

這個時候,可以點選 MainWindow.xib ( Interface Builder 會自動開啓 )
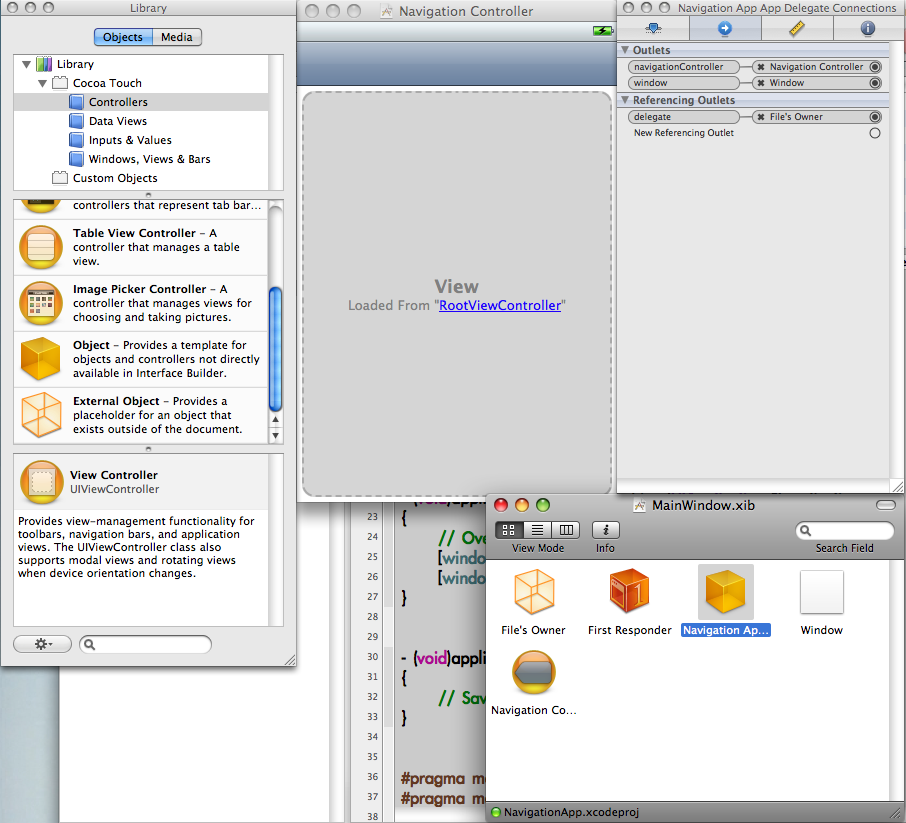
就可以看到在這邊已經使用 Interface Builder 選取 RootViewController 為 Window's View 

並且將這個 view 設定為 navigationController的屬性

所以透過這樣的關連連結起來。

若是想要不透過 Interface Builder 作這樣的操作
可以使用如下的寫法,其中StartViewController為自己寫的ViewController

window = [[UIWindow alloc] initWithFrame:[[UIScreen mainScreen] bounds]];

UINavigationController *nav = [[UINavigationController alloc

      initWithRootViewController:

            [[StartViewController alloc] initWithNibName:@"StartViewController" bundle:[NSBundle mainBundle]]

];

[window addSubview:nav.view];