





通过 yum 安装的 nginx 版本多数是 1.22.x,已经被暴露出有一个高危的安全漏洞(CVE-2022-3638)。需要自行编译安装最新的 1.23.2 以修复这个安全问题。
源码好下载,编译命令也简单,configure, make 就能行。难在如何配置 configure 参数。我们希望编译出来的 nginx ,替换掉默认的 nginx 可执行程序(位于 /usr/sbin/ 下)就能简单地完成升级,而不用再改一堆复杂配置。默认的 nginx 是通过系统服务启动的,也不想做改动,所以,最好能知道默认的 nginx 编译时使用了哪些参数,基于它进行编译就没问题。
首先当然是上网学习了。好吧,学习效果一般,都是教你怎么把 nginx 安装到 /usr/local/ 下,再修改一堆复杂的配置,做法不够简单,可能还会有一些问题(比如说 user, group 就不是 nginx)。
实际上,只要先通过 yum 安装了 nginx, 再输入命令 nginx -V, 就可以直接看到当时编译时用的参数。用它用为编译的参数不就行了么。
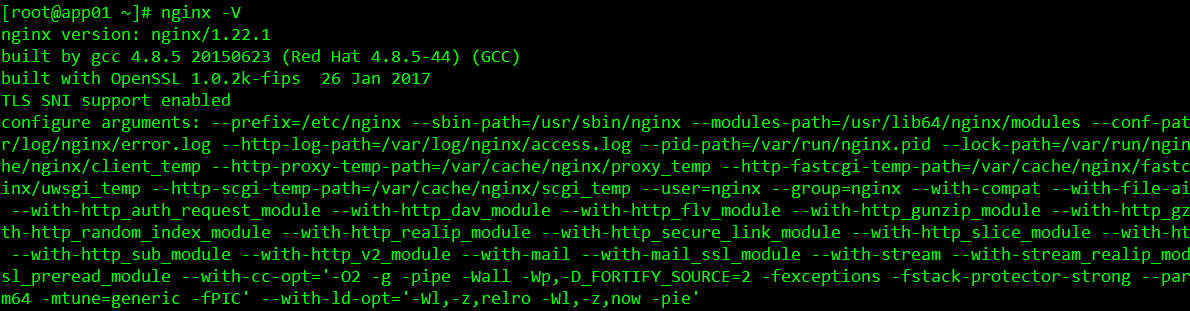
这是编译参数:
./configure --prefix=/etc/nginx --sbin-path=/usr/sbin/nginx --modules-path=/usr/lib64/nginx/modules --conf-path=/etc/nginx/nginx.conf --error-log-path=/var/log/nginx/error.log --http-log-path=/var/log/nginx/access.log --pid-path=/var/run/nginx.pid --lock-path=/var/run/nginx.lock --http-client-body-temp-path=/var/cache/nginx/client_temp --http-proxy-temp-path=/var/cache/nginx/proxy_temp --http-fastcgi-temp-path=/var/cache/nginx/fastcgi_temp --http-uwsgi-temp-path=/var/cache/nginx/uwsgi_temp --http-scgi-temp-path=/var/cache/nginx/scgi_temp --user=nginx --group=nginx --with-compat --with-file-aio --with-threads --with-http_addition_module --with-http_auth_request_module --with-http_dav_module --with-http_flv_module --with-http_gunzip_module --with-http_gzip_static_module --with-http_mp4_module --with-http_random_index_module --with-http_realip_module --with-http_secure_link_module --with-http_slice_module --with-http_ssl_module --with-http_stub_status_module --with-http_sub_module --with-http_v2_module --with-mail --with-mail_ssl_module --with-stream --with-stream_realip_module --with-stream_ssl_module --with-stream_ssl_preread_module --with-cc-opt='-O2 -g -pipe -Wall -Wp,-D_FORTIFY_SOURCE=2 -fexceptions -fstack-protector-strong --param=ssp-buffer-size=4 -grecord-gcc-switches -m64 -mtune=generic -fPIC' --with-ld-opt='-Wl,-z,relro -Wl,-z,now -pie' --add-module=headers-more-nginx-module
后面的 --add-module=headers-more-nginx-module 是新增额外要编译的模块,不用的话也可以去掉。
成功后直接运行 make.
然后把编译后的可执行文件替换掉原文件。再重启服务即可。
cp objs/nginx /usr/sbin/
systemctl restart nginx
这时候再用 nginx -V 检查版本号已经升级了。
够简单吧。
此内容由惯性聚合(RSS阅读器)自动聚合整理,仅供阅读参考。 原文来自 — 版权归原作者所有。