





9.5.1 使用前台服务
服务几乎都是在后台运行的,一直以来它都是默默地做着辛苦的工作。但是服务的系统 优先级还是比较低的,当系统出现内存不足的情况时,就有可能会回收掉正在后台运行的服 务。如果你希望服务可以一直保持运行状态,而不会由于系统内存不足的原因导致被回收, 就可以考虑使用前台服务。前台服务和普通服务最大的区别就在于,它会一直有一个正在运 行的图标在系统的状态栏显示,下拉状态栏后可以看到更加详细的信息,非常类似于通知的 效果。当然有时候你也可能不仅仅是为了防止服务被回收掉才使用前台服务的,有些项目由于特殊的需求会要求必须使用前台服务,比如说墨迹天气,它的服务在后台更新天气数据的同时,还会在系统状态栏一直显示当前的天气信息,如图 9.11 所示。

图 9.11
那么我们就来看一下如何才能创建一个前台服务吧,其实并不复杂,修改 MyService 中 的代码,如下所示:
public class MyService extends Service {
……
@Override
public void onCreate() {
super.onCreate();
Notification notification = new Notification(R.drawable.ic_launcher, "Notification comes", System. currentTimeMillis());
Intent notificationIntent = new Intent(this, MainActivity.class);
PendingIntent pendingIntent = PendingIntent.getActivity(this, 0, notificationIntent, 0);
notification.setLatestEventInfo(this, "This is title", "This is content", pendingIntent);
startForeground(1, notification);
Log.d("MyService", "onCreate executed");
}
……
}
可以看到,这里只是修改了 onCreate()方法中的代码,相信这部分的代码你会非常眼熟。 没错!这就是我们在上一章中学习的创建通知的方法。只不过这次在构建出 Notification 对 象后并没有使用 NotificationManager 来将通知显示出来,而是调用了 startForeground()方法。 这个方法接收两个参数,第一个参数是通知的 id,类似于 notify()方法的第一个参数,第二 个参数则是构建出的 Notification 对象。调用 startForeground()方法后就会让 MyService 变成 一个前台服务,并在系统状态栏显示出来。
现在重新运行一下程序,并点击 Start Service 或 Bind Service 按钮,MyService 就会以前 台服务的模式启动了,并且在系统状态栏会显示一个通知图标,下拉状态栏后可以看到该通 知的详细内容,如图 9.12 所示。
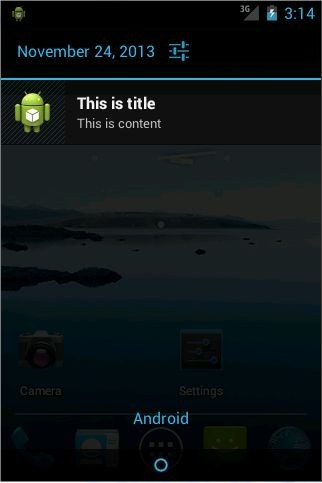
图 9.12
此内容由惯性聚合(RSS阅读器)自动聚合整理,仅供阅读参考。 原文来自 — 版权归原作者所有。